
By following this guide, you will be able to develop provinces efficiently, prioritize your settlement upgrades, and balance economy, recruitment, and defense in Total War: Warhammer 3. You'll understand which stats matter most, how to split your provinces for optimal growth, and why owning full provinces unlocks greater power.
Quick answer
| What | Answer |
|---|---|
| Main stat | Control |
| Growth use | Population surplus |
| Early priority | Growth |
| Default build split | Alternate financial and military provinces |
| Top defensive pick | Garrisons and walls |
| Best province shape | Full provinces |
Understand the settlement stats that matter
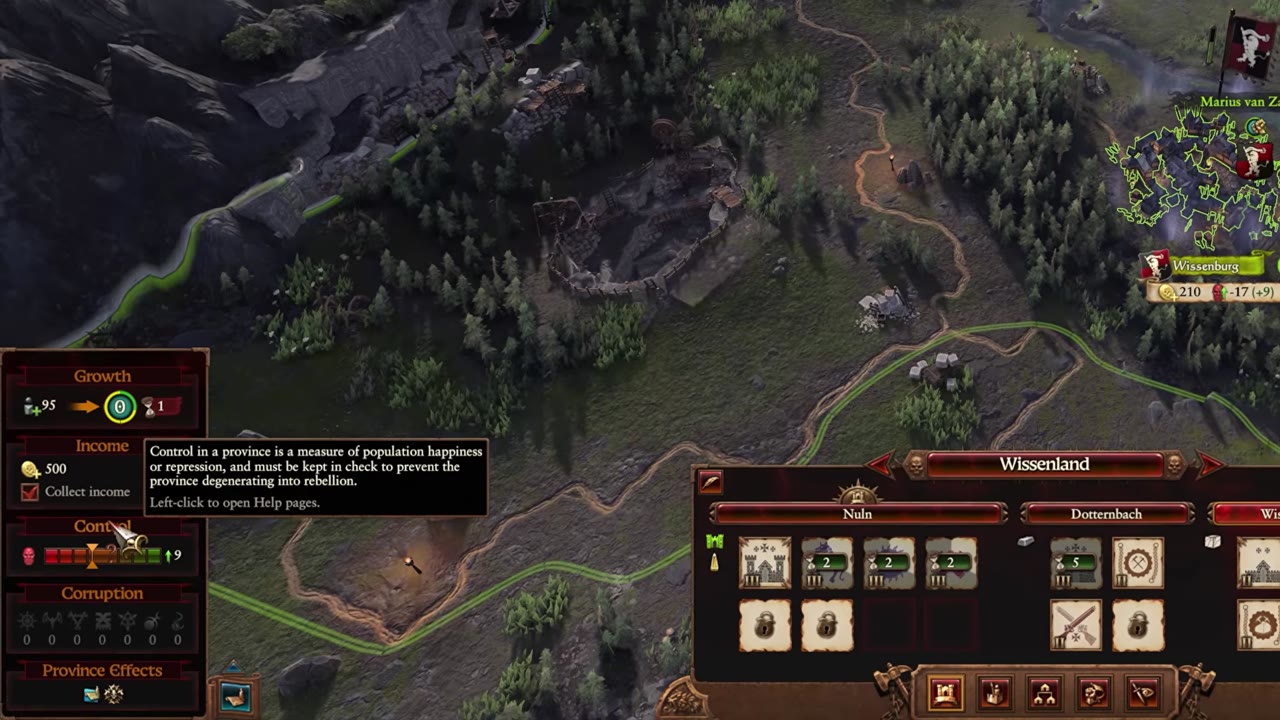
Settlement management is not just about conquering territory—it's about keeping your provinces functioning efficiently. The main stat to monitor in every settlement is control. High control gives faction-specific bonuses and increases the difficulty of maintaining more; low control brings penalties and risks rebellion. When control hits its lowest point, a rebellion army will spawn, raid, and potentially attack your settlement. Defeating the rebellion army offers only a brief reprieve in control, so it's not a sustainable solution.
Many factors influence control, including worldwide effects, conquest, and the presence of armies. One constant is the tax penalty: collecting tax income actively reduces control. You can disable taxes to improve stability, but you will lose steady gold per turn, so reserve this option for emergencies or provinces generating minimal money.
Corruption is another critical stat. Each faction has a preferred corruption type—Empire and Dwarves want none, while Vampire Counts prosper with vampiric corruption. High preferred corruption boosts friendly effects and deters enemies through penalties like higher attrition. Maintaining your preferred corruption is vital for faction-specific bonuses and for avoiding negative side effects.
Growth works differently. As growth accumulates, it fills a meter; once full, it grants population surplus, which is required to upgrade settlements. High growth is essential early on, unlocking additional settlement levels that open higher-tier units and more powerful buildings.


Choose the right building type for the province
Choosing buildings depends on whether a province should focus on economy or military. For financial provinces, prioritize income-generating structures, usually found under the infrastructure tab. Fill all available slots with income buildings first. If there are extra slots, use them for growth or control boosters to maximize returns.

Military provinces should prioritize recruitment and support buildings. Upgrade those that lower recruitment cost, increase recruitment capacity, or improve recruit rank. A principle to follow: build any structure that directly benefits armies recruiting in that province.
Defense buildings—walls and garrisons—are valuable in all provinces, not only border ones. Defensive upgrades make settlements harder to capture, force attackers to lose more units, and free your armies from guard duty. If money is tight, prioritize defenses in border provinces, but always protect strategic points.

Resource buildings should always be built when available, as they add unique buffs and extra income—often tradeable—and their effects cannot be replicated elsewhere.
Landmarks are unique structures restricted to certain provinces and factions. Build them whenever possible; their effects are powerful and exclusive.
Protection buildings reveal hidden undercity-style structures and are useful for countering parasitic buildings, but offer little value otherwise.
Control and corruption management buildings are situational. Build them to fix problems when a province is struggling with instability or unwanted corruption.
Set build priorities in the right order
What you build—and when—should follow a clear sequence to avoid waste and maximize efficiency.
- free follows the recommended sequence
- cheap minor cost, easy swap
- setup needs attention or planning

Place military and income provinces efficiently
Efficient province layout keeps recruitment and income easily accessible. A checkerboard pattern—alternating military and income provinces as you expand—ensures local recruitment is always close, reducing reliance on costly and slow global recruitment.
Start by developing your primary province with military structures, then alternate to an income-focused province next, and repeat the pattern in whichever direction you expand. This method keeps armies and cash handy through the campaign, even though the map's layout is rarely a perfect grid. Prioritize local recruitment, which is faster and cheaper.

- The first province supports recruitment buildings.
- The second province maximizes economy and gold generation.
- Keep recruitment and cash close in any direction you expand.
- Local recruitment is faster and cheaper than global.
Choose the provinces worth developing
Selecting which provinces to develop can make or break your campaign. Prioritize suitable climates (like green circles on the map) early and avoid unpleasant climates. Bad climates raise construction costs, lengthen build times, reduce control, and cut income—making them inefficient until late-game armies compensate.

Owning a full province is far better than holding isolated settlements. Partial provinces lose out on commandments (powerful buffs that only work with full ownership) and cannot benefit from building stacking. If another faction holds the rest, you have two paths: declare war and conquer, or use diplomacy—though the AI consistently overvalues settlements, making trades rarely worthwhile.
Certain provinces require robust defenses, especially borders. Enemy armies will exploit any gaps, plowing through lightly-defended areas and wreaking havoc. Interior provinces can be defended less, but should never be left completely exposed.
Also worth knowing
- Tomb Kings demand unique building strategies. Their economy and army strength rely more heavily on buildings than other factions, and they benefit more from multiple military structures in each province.
- Chaos Dwarfs use raw materials, not growth. Settlement upgrades require raw materials and laborers; these can allow near-instant upgrading if you have enough. Population surplus is irrelevant to them.
- Military buildings can be temporary. For some factions, building a barracks or recruitment structure in a non-capital settlement is worthwhile—and once advanced units are unlocked elsewhere, you can demolish it to free up space.
- Capitals should carry advanced recruitment and higher-tier structures. Minor settlements are best used for growth and income, while capitals house tier 4/5 military buildings. Lower-tier military buildings in minor settlements can be demolished later.
- Defense upgrades for minor settlements are often less efficient. Investing in walls and garrisons in every small settlement can hinder your economy—some players prefer to reserve defenses for province capitals or strategic border locations.
Frequently asked
Should I turn off taxes for control problems?
Only do it in emergencies or in provinces that make very little money. Tax income applies a baseline control penalty, so disabling it helps stability but costs passive gold per turn. It is a temporary fix, not a long-term plan.
What should I build first in a new province?
Recruitment is the first major focus for your initial province, especially early on. That province should carry most of your early investment so you can unlock more of your roster quickly. After that, income and settlement upgrades become easier to balance.
Are walls worth building in every settlement?
Yes, especially early. Walls and garrisons make settlements harder to take, force attackers to lose more units, and reduce the need for armies to sit idle on defense. If money is tight, at least protect border settlements.
Is it worth trying to trade for missing settlements?
Usually no, because the AI overvalues settlements heavily. You can try diplomacy, but expect to pay far more than the settlement is worth. In many cases it is cheaper to take the rest of the province by force.
Read next
Total War: Warhammer 3 Corruption Guide: Types and Cures
This plan covers how corruption works, how each type affects regions and factions, and how to spread or remove it efficiently. It is for players who want to use corruption deliberately instead of treating it as background pressure.
Total War: Warhammer 3 Hero-Only Campaign: How Far Heroes Alone Can Carry You
Plan a hero-only campaign around factions that can grow hero capacity quickly, with Skaven and Throt as the core example. The sections focus on early survival, hero recruitment, settlement expansion, and when the strategy starts to fall apart.
Total War: Warhammer 3 Campaign Expansion Guide: Provinces, Public Order and When to Stop
Learn how to expand by provinces instead of scattering settlements across the map. This plan covers when to commit to a full province, when to hold a broken province, and when to slow down for public order, defense, and income.
Total War: Warhammer 3 Economy Guide: Make Money Fast
This plan covers the main ways to generate income in Total War: WARHAMMER III, from taxes and trade to diplomacy, battles, raiding, and settlement actions. It is for players who want a practical breakdown of which income sources are passive, active, or faction-dependent.