
🎯 The core idea
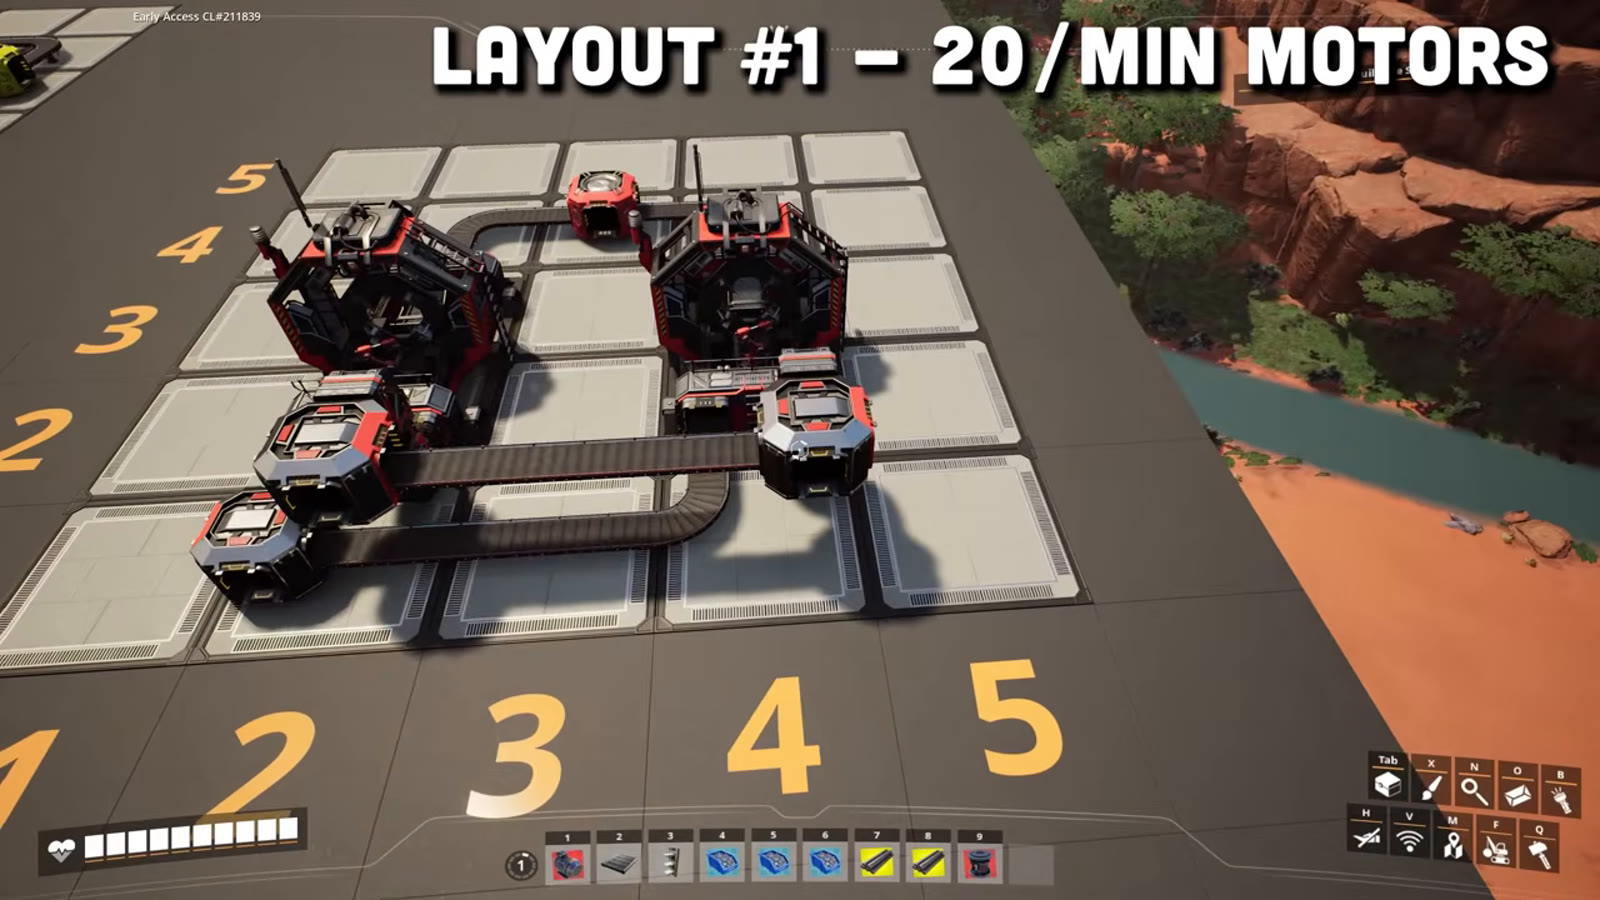
Motors gate multiple tiers, and getting the Rotor-to-Stator ratio right the first time is what trips up most players building this factory for real. If you're wondering how to make Motors without guessing at ratios, this guide follows three ready-made layouts -- a Stator factory, a Rotor factory using the Cast Screw alternate, and the Motor factory that combines them -- with every input number cross-checked against the current Satisfactory Wiki's confirmed recipes, catching one meaningful math error in the source video along the way.
- free costs nothing
- cheap small cost
- setup needs preparation
- grind pays off slowly
- skip the thing to stop doing
The Stator recipe, and why this layout needs four Assemblers

Stator uses the standard recipe of 3 Steel Pipe + 8 Wire → 1 Stator per craft on an Assembler (12 seconds, scaling to 15 Steel Pipe and 40 Wire per minute for 5 Stators per minute at full clock -- confirmed on the current Satisfactory Wiki). That's exactly why this guide's source video's layout uses four Assemblers for a 20-per-minute target: 4 times 5 is 20, a clean multiple that needs no under- or overclocking at the final stage.
Tracing the Stator factory's raw inputs

Four Assemblers at 20 Stators per minute need 60 Steel Pipe and 160 Wire per minute combined. Steel Pipe's own recipe (3 Steel Ingot to 2 Steel Pipe, Constructor, scaling to 30 Steel Ingot in for 20 Steel Pipe out per minute -- wiki-confirmed) means three Constructors cover that 60-per-minute Steel Pipe requirement exactly, needing 90 Steel Ingot per minute upstream. Wire's recipe (1 Copper Ingot to 2 Wire, Constructor, scaling to 15 Copper Ingot in for 30 Wire out per minute -- wiki-confirmed), which is what automated wiring production looks like once it's scaled past crafting Wire by hand, means five full Constructors plus one underclocked to 33.333% (10 Wire per minute instead of 30) reach exactly 160 Wire per minute, needing 80 Copper Ingot per minute. And Steel Ingot's own recipe (3 Iron Ore + 3 Coal to 3 Steel Ingot, Foundry, scaling to 45/45/45 per minute -- wiki-confirmed) means two Foundries producing 90 Steel Ingot per minute need exactly 90 Iron Ore and 90 Coal per minute -- an exact match to this guide's source video's own stated raw-input figures for the whole layout, which is a strong independent confirmation that the build is genuinely ratio-correct.
The Rotor recipe, and why Cast Screw changes the build

Rotor uses the standard recipe of 5 Iron Rod + 25 Screw → 1 Rotor per craft on an Assembler (15 seconds, scaling to 20 Iron Rod and 100 Screw per minute for 4 Rotors per minute at full clock -- confirmed on the current Satisfactory Wiki). Five Assemblers hit exactly 20 Rotors per minute. The Screw requirement is heavy -- 500 per minute across five Assemblers -- which is why this guide's source video leans on the Cast Screw alternate recipe (12.5 Iron Ingot in for 50 Screw out per minute per Constructor) rather than the standard Iron Rod-to-Screw chain: ten Constructors running Cast Screw reach exactly 500 Screw per minute.
Tracing the Rotor factory's raw inputs

The Iron Rod side still needs the standard recipe (1 Iron Ingot to 1 Iron Rod, Constructor, 15 Iron Ingot in for 15 Iron Rod out per minute at 100% -- wiki-confirmed): five Assemblers need 100 Iron Rod per minute, which seven Constructors cover with one slightly underclocked. Between the ten Cast Screw Constructors (125 Iron Ingot per minute) and the Iron Rod Constructors (100 Iron Ingot per minute), this layout needs 225 Iron Ingot per minute total -- an exact match to this guide's source video's own stated 225 Iron Ore per minute figure for the whole Rotor factory, since the standard Smelter recipe is a plain 1:1 Iron Ore to Iron Ingot conversion.
The Motor recipe -- and a math error worth flagging

Motor uses the standard recipe of 2 Rotor + 2 Stator → 1 Motor per craft on an Assembler (12 seconds, scaling to 10 Rotor and 10 Stator per minute for 5 Motors per minute at full clock -- confirmed on the current Satisfactory Wiki). This guide's source video states that feeding the exact 20 Rotors and 20 Stators per minute produced by the first two layouts into two Assemblers "will be producing 20 Motors per minute" -- but by the wiki's own confirmed rate, two Assemblers at default 100% clock speed produce 10 Motors per minute, not 20, since each Assembler only turns 10 Rotor and 10 Stator per minute into 5 Motors per minute. The video's build itself (two Assemblers, no overclocking mentioned) matches the 10-per-minute figure; only the stated headline number appears to be an error, and this guide corrects it rather than repeating it.
Building the compact Motor factory

The Motor factory itself is deliberately the simplest of the three: a 4×5 platform with two Assemblers fed by a double manifold belt line, one side carrying Rotors and the other Stators, merging into a single output belt into storage. Because it's downstream of the other two factories rather than needing its own raw-resource chain, this is the layout most players can reuse directly regardless of how their Rotor and Stator production is actually built.
Why the ratio trips people up

Motor consumes Rotor and Stator in an equal 2:2 ratio, so the practical trap isn't the ratio itself -- it's that Rotor and Stator have completely different upstream recipes (Iron Rod and Screw versus Steel Pipe and Wire) with different raw-material footprints, which means matching their production rates 1:1 downstream doesn't mean their upstream factories look anything alike. A player who assumes symmetry between the two feeder factories, because the final ratio is 1:1, is the most common way this build goes wrong -- and it's also the most common way a Motor line ends up bottlenecked, with one feeder factory quietly under-producing while the other sits idle waiting on it.
The finished chain

Traced start to finish: raw iron, coal and copper feed two separate factories producing 20 Stators and 20 Rotors per minute respectively, and those two streams combine in a compact final factory to produce Motors -- 10 per minute at default clock speed, using the confirmed recipe rate, ready to overclock further with Power Shards if a specific downstream need calls for more.
How this guide was fact-checked
The standard Stator recipe (3 Steel Pipe + 8 Wire, 5/min), Rotor recipe (5 Iron Rod + 25 Screw, 4/min), Motor recipe (2 Rotor + 2 Stator, 5/min), Steel Pipe recipe (3 Steel Ingot to 2 Steel Pipe, 20/min), Wire recipe (1 Copper Ingot to 2 Wire, 30/min), Steel Ingot recipe (3 Iron Ore + 3 Coal to 3 Steel Ingot, 45/min) and the Cast Screw alternate (12.5 Iron Ingot in for 50 Screw out per minute) are all confirmed on the current Satisfactory Wiki. Every raw-input total this guide's source video states -- 90 Iron Ore, 90 Coal and 80 Copper for the Stator factory; 225 Iron Ore for the Rotor factory -- checks out as an exact match once traced back through those confirmed per-machine rates, which is strong evidence the underlying builds are genuinely ratio-correct. The one figure that doesn't check out is the claimed "20 Motors per minute" from two default-clocked Assemblers, which the wiki's own Motor recipe rate puts at 10 per minute instead -- flagged here rather than repeated. The specific machine counts, belt tiers, splitter and merger placements all come directly from the source video's own on-screen builds.
What this guide doesn't answer
This guide doesn't cover the Copper Rotor or Quickwire Stator alternate recipes, both of which exist as Hard Drive unlocks and trade a different set of inputs (Copper Sheet and Screws for Copper Rotor; Quickwire for Quickwire Stator) for higher per-machine output than the standard recipes used here -- neither is demonstrated in this guide's source video, and a proper comparison deserves its own dedicated breakdown rather than a mention in passing. It also doesn't give exact power consumption figures beyond what the source video states for the Stator factory, since verifying building-level power draw independently would need a separate pass this guide didn't take on. Finally, it doesn't cover scaling any of these three layouts up via Blueprint, since the source video builds each one manually as a fixed-size platform rather than as a reusable, snap-together module.
Read next
Satisfactory Modular Frames Production Guide
Satisfactory Heavy Modular Frames Production Guide
Satisfactory Circuit Boards & High-Speed Connectors Production Guide
Satisfactory Battery Production Guide: Sulfuric Acid & Alumina Solution Ratios
Step-by-step guide to building a Battery production line in Satisfactory, covering Sulfuric Acid and Alumina Solution ratios with optimised multi-fluid chain blueprints.