
🎯 The core idea
Heavy Modular Frames (HMF for short) are the notorious Tier 5 chokepoint that needs four separate input chains — Modular Frames, Steel Pipes, Encased Industrial Beams and Screws — converging on one Manufacturer, which is why most players search for a proven ratio layout rather than designing one from scratch. Heavy Modular Frames are also a required Space Elevator shipment, so getting this chain running reliably isn't optional if you want to keep progressing through the tiers. This guide follows a real build that leans hard on alternate recipes to cut the raw resource footprint roughly in half, producing a working HMF line off just a handful of iron, coal and limestone nodes.
- free costs nothing
- cheap small cost
- setup needs preparation
- grind pays off slowly
- skip the thing to stop doing
Choosing a location with a light resource footprint

The build in this guide runs off a genuinely small footprint: one iron node, a handful of coal nodes, and a single limestone node, none of them pure. That's deliberate — the whole point of stacking alternate recipes through this build is that it needs far less raw ore than the default recipes would, so a Heavy Modular Frame factory doesn't have to sit on a rare, high-purity node cluster. If you check a production planner with every alternate recipe disabled, the required inputs for the same output jump dramatically, which is the clearest way to see how much these alternates are doing here.
Doubling iron ore with the Pure Iron Ingot alternate

Instead of Smelters, this build runs nine Refineries on the Pure Iron Ingot alternate: 7 Iron Ore + 4 Water → 13 Iron Ingot per craft, scaling to 35 Iron Ore and 20 Water per minute for 65 Iron Ingot per minute at full clock — confirmed on the current Satisfactory Wiki. Against the standard 1:1 Smelter recipe, that's close to double the ingots from the same ore, which is why this build needs roughly 305 Iron Ore per minute rather than the much higher figure a standard-recipe build would demand from the same output target. The same Refinery floor also runs the Wet Concrete alternate (6 Limestone + 5 Water → 4 Concrete, scaling to 100 Water and 120 Limestone per minute for 80 Concrete per minute, also wiki-confirmed) off a single Limestone node, with three Water Extractors comfortably supplying every Refinery in the build through one shared pipeline.
Steel: 50% more output from the same ore

Steel production runs through the Solid Steel Ingot alternate: 2 Iron Ingot + 2 Coal → 3 Steel Ingot per craft on a Foundry, scaling to 40 Iron Ingot and 40 Coal per minute for 60 Steel Ingot per minute — confirmed on the current Satisfactory Wiki, and roughly 50% more steel per unit of iron ore than the standard recipe once you account for the Pure Iron Ingot doubling upstream. The build runs 13 Foundries' worth of this recipe (achievable with 12 Foundries plus overclocking, or 13 exactly), which deliberately overproduces steel ingots well beyond what this specific factory consumes — a surplus the video treats as a feature rather than a problem, since steel feeds so many other builds later on.
The basics: plates, rods and screws made from steel instead of iron

Because steel is so plentiful in this build, the basic parts feeding everything else — Iron Plates, Iron Rods and Screws — are made from steel rather than raw iron wherever an alternate allows it. Three Foundries run the Steel Cast Plate alternate (getting three plates out of a single steel ingot, against two plates from three ingots on the standard recipe), a Constructor bank runs the Steel Rod alternate for the roughly 68 Iron Rods per minute the build needs, and two Constructors cover Screws with the Steel Screw alternate, which the video specifically favors because a small amount of steel yields a large quantity of screws — useful given how screw-hungry the Heavy Modular Frame recipe is downstream. None of these alternates are strictly required; each can be swapped back to its standard iron-ore version if you haven't unlocked the Hard Drive for it yet, at the cost of needing more raw iron ore to hit the same targets.
Reinforced Iron Plate and Modular Frame

The Iron Plates from the previous step feed into Reinforced Iron Plate production using the Bolted Iron Plate alternate, which doesn't change the underlying recipe so much as triple the plate output per Assembler — reducing the machine count needed for the roughly 23 Reinforced Iron Plate per minute this build requires down to just two Assemblers. From there, Modular Frame uses the standard recipe (3 Reinforced Iron Plate + 12 Iron Rod → 2 Modular Frame per craft on an Assembler, scaling to 3 Reinforced Iron Plate and 12 Iron Rod per minute for 2 Modular Frame per minute at full clock — confirmed on the current Satisfactory Wiki) across four Assemblers, deliberately kept as the default recipe here for simplicity even though several good Modular Frame alternates exist.
Encased Industrial Beam: swapping beams for pipes

Encased Industrial Beam is where the concrete and steel pipe production earns its keep: the standard recipe needs 3 Steel Beam + 6 Concrete per Encased Industrial Beam, but the Encased Industrial Pipe alternate swaps in 6 Steel Pipe + 5 Concrete → 1 Encased Industrial Beam per craft on an Assembler (15 seconds, scaling to 24 Steel Pipe and 20 Concrete per minute for 4 Encased Industrial Beam per minute — confirmed on the current Satisfactory Wiki), which costs meaningfully less steel overall since pipes are cheaper to produce per steel ingot than beams. About two and a half Assemblers' worth of this recipe covers the build's needs, alongside six Constructors making the Steel Pipes it consumes using the standard recipe and a single Assembler making Rotors on the side for use elsewhere in the base.
The finale: Heavy Modular Frame via the Heavy Encased Frame alternate

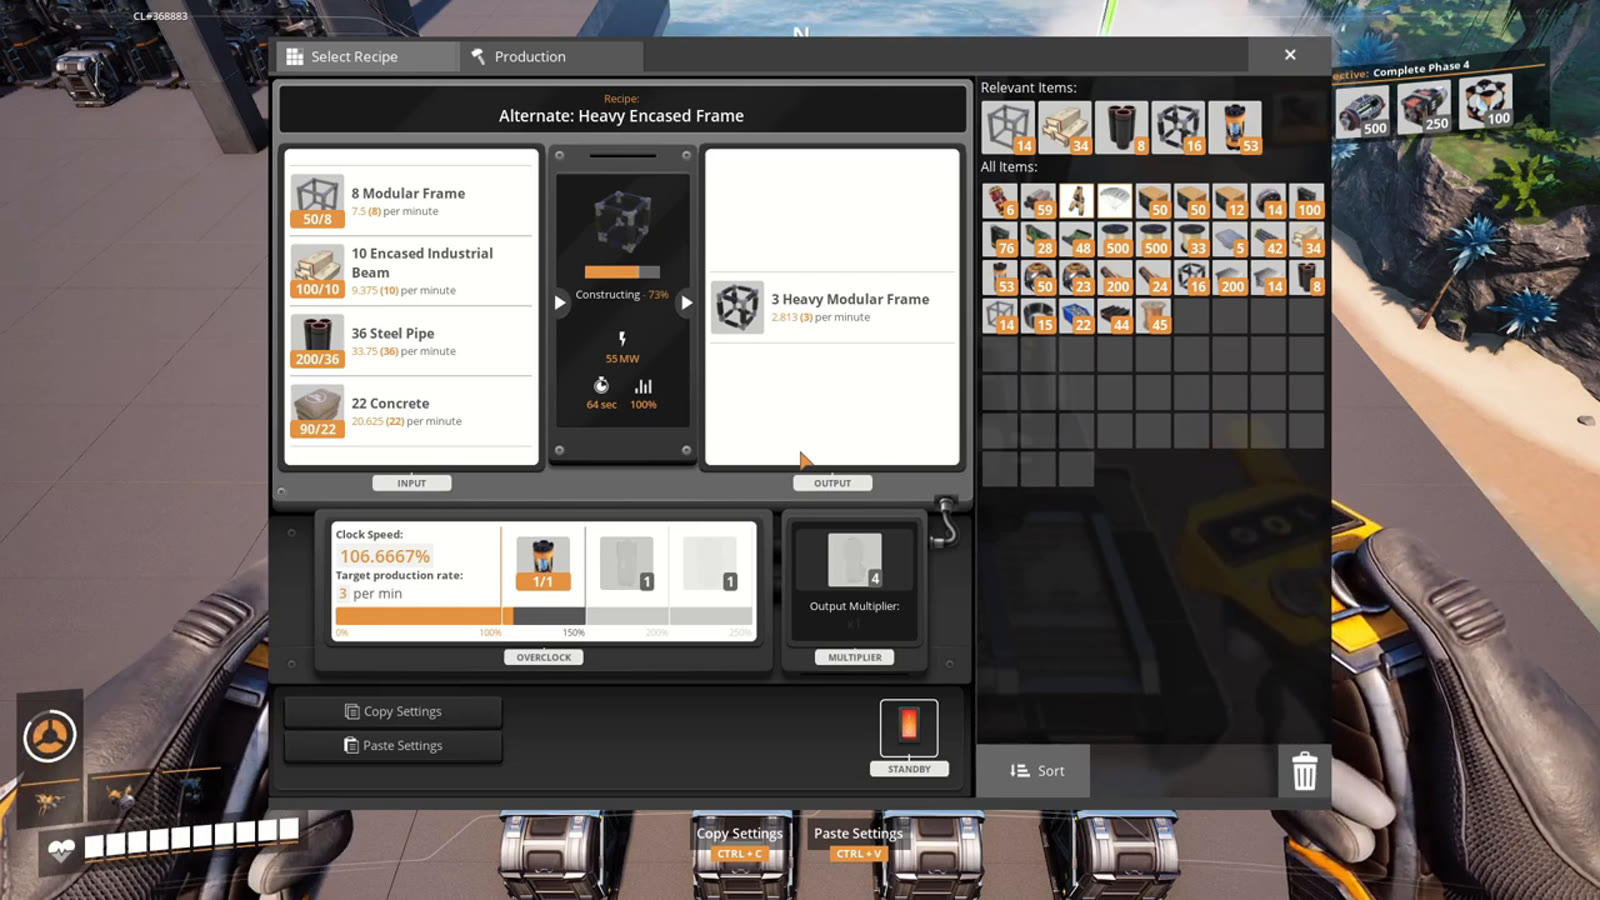
Everything converges on one Manufacturer running the Heavy Encased Frame alternate: 8 Modular Frame + 10 Encased Industrial Beam + 36 Steel Pipe + 22 Concrete → 3 Heavy Modular Frame per craft (64 seconds, scaling to 7.5 Modular Frame, 9.375 Encased Industrial Beam, 33.75 Steel Pipe and 20.625 Concrete per minute for 2.8125 Heavy Modular Frames per minute at full clock — confirmed on the current Satisfactory Wiki). That 2.8125 figure is why the video slightly overclocks this single Manufacturer to hit a clean 3 Heavy Modular Frames per minute. Against the standard recipe (5 Modular Frame + 20 Steel Pipe + 5 Encased Industrial Beam + 120 Screws → 1 Heavy Modular Frame per craft, scaling to 2 Heavy Modular Frames per minute at full clock, also wiki-confirmed), the alternate trades a heavy Screw requirement for Concrete instead — a genuinely different bottleneck to plan around depending on which belt is already under pressure elsewhere in your factory.
This factory produces more than just Heavy Modular Frames

Because this build runs full production lines for Modular Frames, Steel Pipes, Encased Industrial Beams, Reinforced Iron Plates, Iron Rods and Screws to feed the final Manufacturer, roughly half of everything it produces is useful on its own for other builds elsewhere in the base — not just the finished Heavy Modular Frame. The video deliberately keeps total output modest (a handful of Heavy Modular Frames, Rotors and spare pipes per minute) rather than scaling for a train line, on the reasoning that outputs this small are better suited to drone delivery than dedicating a whole train route to them.
How this guide was fact-checked
The Pure Iron Ingot alternate (7 Iron Ore + 4 Water → 13 Iron Ingot, 65/min), the Wet Concrete alternate (6 Limestone + 5 Water → 4 Concrete, 80/min), the Solid Steel Ingot alternate (2 Iron Ingot + 2 Coal → 3 Steel Ingot, 60/min), the standard Modular Frame recipe (3 Reinforced Iron Plate + 12 Iron Rod → 2 Modular Frame, 2/min), the standard Heavy Modular Frame recipe (5 Modular Frame + 20 Steel Pipe + 5 Encased Industrial Beam + 120 Screws → 1, 2/min) and the Heavy Encased Frame alternate (8 Modular Frame + 10 Encased Industrial Beam + 36 Steel Pipe + 22 Concrete → 3, 2.8125/min) are all confirmed on the current Satisfactory Wiki. The Heavy Encased Frame alternate's wiki-listed 2.8125-per-minute rate is a genuine, exact match for the video's own on-screen explanation of why it slightly overclocks that Manufacturer to reach 3 per minute. The Encased Industrial Pipe alternate (6 Steel Pipe + 5 Concrete → 1 Encased Industrial Beam) is confirmed on the wiki, though this guide didn't independently verify its exact craft-time-derived per-minute rate beyond the wiki's own listing. The Steel Cast Plate, Steel Rod and Steel Screw alternates, the specific machine counts, and every build technique described come directly from the source video's own on-screen factory.
What this guide doesn't answer
This guide doesn't give exact foundation dimensions or a placement-by-placement build order — the source video is a compact ~15-minute walkthrough that explains ratios and reasoning rather than transcribing every snap and connection, and it explicitly treats this as a flexible template rather than a fixed blueprint. It also doesn't compare every available Modular Frame or Heavy Modular Frame alternate head-to-head; the video sticks with the standard Modular Frame recipe for simplicity while noting several alternates exist, and a full alternate-recipe comparison for both items would need its own dedicated breakdown. Finally, it doesn't cover scaling this build up to train-line output levels — the source video deliberately keeps output modest and defers larger-scale logistics to drones, covered in a separate guide on this Content Plan.