
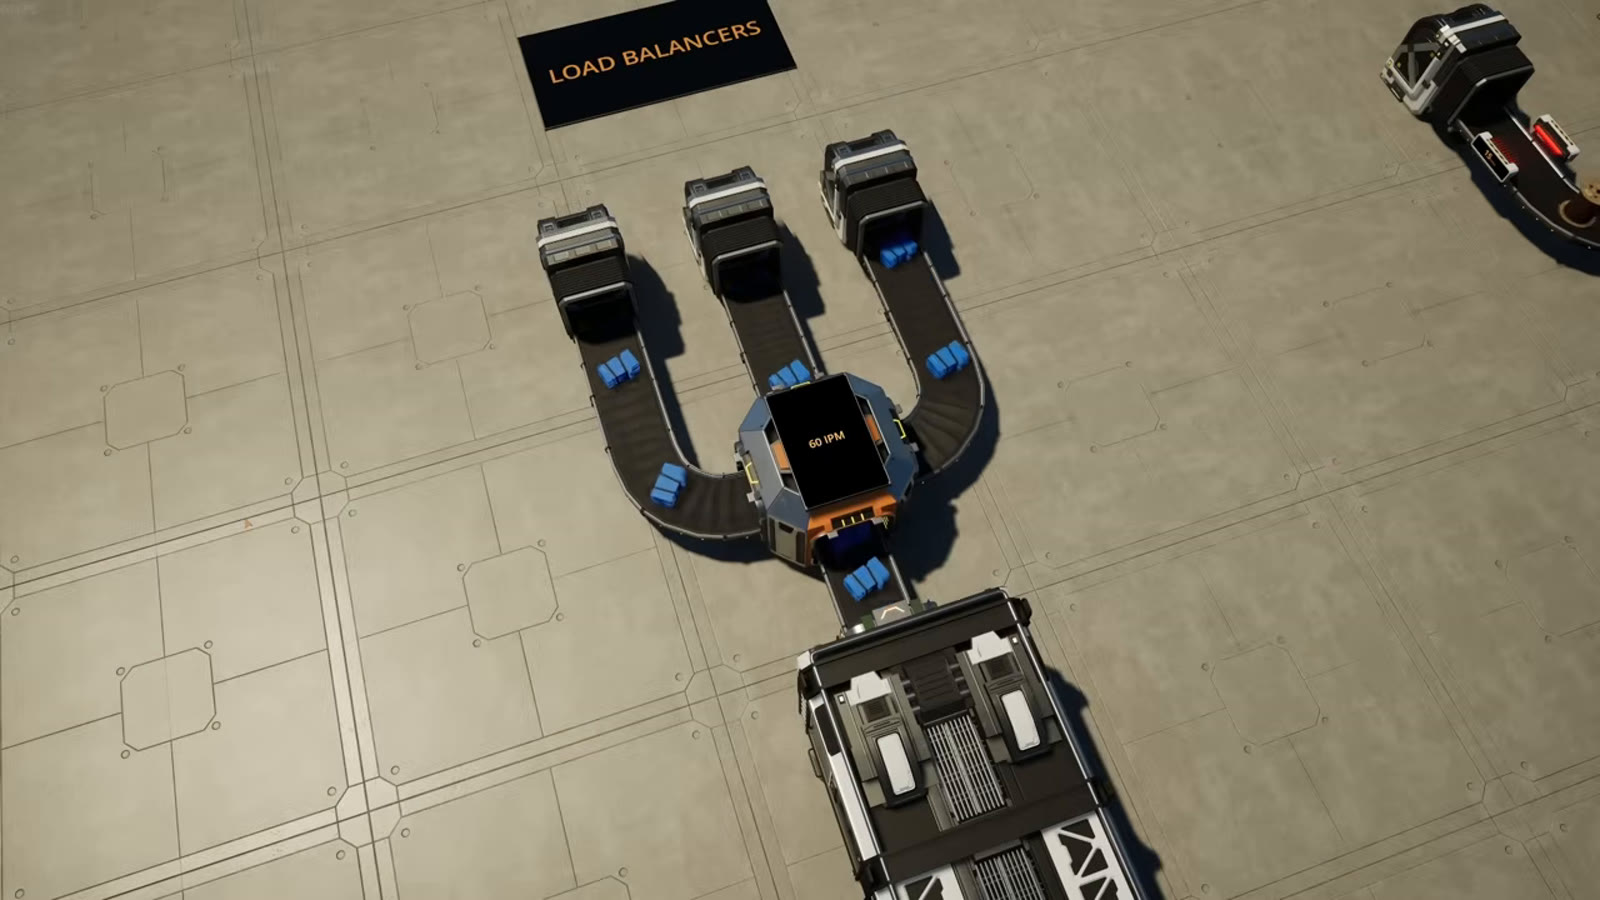
Quick answer: To split one belt into 3 equal lines, just use a Conveyor Splitter — it always has exactly three outputs. For any other number, divide by 2s and 3s in layers (1→6 is two layers of three-way splits); for a number that doesn't divide evenly (5, 7, 11...), split into the next multiple of 3 up, then recycle the extra lines back into the start through a Priority Merger.
- free costs nothing
- cheap small cost
- setup needs preparation
- grind pays off slowly
- skip the thing to stop doing
Belt tiers & throughput at a glance
| Belt | Throughput | Unlocked by |
|---|---|---|
| Mk.1 | 60 items/min | Tier 0 — HUB Upgrade 4 |
| Mk.2 | 120 items/min | Tier 2 — Logistics Mk.2 |
| Mk.3 | 270 items/min | Tier 4 — Logistics Mk.3 |
| Mk.4 | 480 items/min | Tier 5 — Logistics Mk.4 |
| Mk.5 | 780 items/min | Tier 7 — Logistics Mk.5 |
| Mk.6 | 1200 items/min | Tier 9 — Peak Efficiency |
A smaller-tier belt feeding into a larger one is also the simplest way to cap throughput at an exact number — see "Limiters" below.
Balancer patterns: splitting into N outputs
| Outputs needed | Pattern |
|---|---|
| 2 or 3 | One Conveyor Splitter — every splitter has exactly three outputs, so 2 is one output left unused (or merged elsewhere). |
| 4, 6, 9... | Layer splitters: split into 2 or 3, then split each of those again. 6 = split into 2, then each into 3 (or 3, then each into 2). |
| 5 | Split into 6 instead, then recycle the 6th line back into the start through a Priority Merger with the returning line set to high priority. |
| 7 | Split into 3, split each of those into 3 again (9 total), then merge 2 of the 9 back into a priority input and let the remaining 7 run forward. |
| Any non-multiple of 2/3 | Same principle: split into the next multiple of 3 above your target, recycle the extras through a Priority Merger. |
A load balancer splits one line into several equal ones

A load balancer takes one dedicated resource line and splits its output equally across several destinations -- a full Mark 1 belt (60 items/min) through a three-way splitter gives 20 items/min down each output. That works cleanly whenever the target number of outputs divides evenly by two or three, since every Conveyor Splitter only ever has three outputs. A five-lane split doesn't divide evenly, so the workaround is to split into six lines instead, feed the sixth line back into the start through a Priority Merger with that returning line's input set to high priority, and let the system settle -- which is exactly what this guide's source video demonstrates, running five Mark 5 belts at a steady 130 items/min once the recycled sixth line is prioritized correctly.
Odd numbers like seven need an extra layer of splitting

A five-lane split isn't the only awkward number -- seven doesn't divide evenly by two or three either. The source video's fix follows the same principle at a larger scale: split the input into three lines instead of two, split each of those into three again to get nine, then merge two of the nine back into a priority input and let the remaining seven run forward. Because the per-minute number is small, the displayed rate flickers between six and seven on each line as the game's internal counting catches up, but the long-run average across all seven lines balances out evenly.
Get the priority backwards and the balance falls apart

If the recycled line isn't the one set to high priority on the merger, the returning resources back up instead of feeding evenly back into the split, and the balancer becomes visibly lopsided -- some outputs pulling ahead while others starve. The fix demonstrated in the source video is a Smart Splitter placed before the imbalanced section, with its second output set to overflow, so any excess is diverted to another line or another facility instead of clogging the balancer. Getting the priority merger's input order right the first time avoids the stuttering start this workaround exists to fix.
A belt balancer solves a different problem: merging without overloading

Where a load balancer starts from one line, a belt balancer starts from several. Merging multiple full belts directly can push the combined total past the belt's max throughput and throttle the whole line, so a belt balancer splits every incoming belt into as many parts as there are outgoing belts, then cross-merges one piece from each input into each output. A two-in/two-out balancer needs two splitters and two mergers; the source video also builds three-in/three-out and even a two-in/five-out version — the same five-lane trick from the load balancer section, doubled up on the input side (the "3x3" and "4x4" versions follow the same cross-merge principle at larger scale), using lifted belts to keep the crossing lines from turning into spaghetti.
Limiters throttle a belt to a specific number, no splitting math required

A belt limiter (a smaller belt tier feeding into a larger one) is the simplest way to cap a line at a specific number of resources per minute -- run a Mark 1 belt (max 60/min) into a factory instead of a Mark 3, and the input is throttled to 60/min regardless of how much the source can supply. The source video shows several ways to combine limiting with splitting to hit oddly specific numbers, like reaching exactly 250 items/min by throttling a 270/min Mark 3 line down through a Mark 1 branch and recombining it with the untouched remainder. There's no single correct way to do this -- it's whichever combination of belt tiers and splits gets to the target number.
Ratio splitters send a fraction forward and recycle the rest

A ratio splitter flips the load balancer's structure: instead of merging outputs together to combine them, it merges two of a splitter's three outputs to recycle them, sending only the third fraction forward. A simple one-third ratio splitter needs one splitter and one merger; the source video builds down to a one-twelfth ratio splitter by chaining several ratio splits together, which on a full Mark 1 belt works out to just 5 resources per minute reaching the target facility -- useful for feeding a low-consumption recipe without wasting an entire dedicated line on it.
Priority mergers and Smart Splitters do the actual balancing work

Every one of these builds -- load balancers, belt balancers, limiters, ratio splitters -- ultimately relies on the same two pieces of infrastructure: a Priority Merger, which always pulls from its designated high-priority input first so a recycled or returning line never gets starved, and a Smart Splitter, which can be set to send its overflow output only when the main line is already full.
What this guide's source video doesn't cover: sushi belts and a bus layout
Two related logistics terms come up often in the wider Satisfactory community that this guide's source video doesn't touch directly. A sushi belt carries multiple different item types mixed together on a single belt, sorted out downstream by Smart Splitters filtering on item type -- a genuinely different approach from the single-resource balancers covered here, and one that trades simplicity for compactness. A bus system is a factory layout built around one or more long trunk belts running the length of a base, with individual production lines tapping off it as needed. Neither is demonstrated step by step in the source video, so treat this guide as the balancing toolkit and those two as the layout philosophies that toolkit gets used inside of.
Manifold vs balancer: when the extra complexity is worth it

None of this replaces a manifold for most builds -- a manifold is faster to place and self-balances reasonably well as long as every connected machine can keep up with supply, which covers the majority of early and mid-game factories. Load balancers, belt balancers, limiters and ratio splitters earn their extra part count specifically when a build needs a guaranteed exact number on a belt: matching an odd-numbered machine count precisely, feeding two factories a fixed even split of a scarce resource, or throttling a byproduct line to exactly what a downstream recipe consumes. See our manifold vs load balancer guide for that decision in more depth. The source video's own advice is worth repeating: once one of these builds works, compress it and save it as a blueprint, since a working balancer design should only need to be solved once per ratio.
FAQ
How do I split a belt into 3 in Satisfactory? Use a single Conveyor Splitter — every splitter has exactly three outputs by default, so splitting into 3 needs no extra parts at all.
How do I split a belt into 5 equal lines? Split into 6 instead (two layers of 2-and-3, or 3-and-2), then recycle the 6th line back into the start through a Priority Merger with the returning input set to high priority. The system settles into 5 equal outputs.
What's the difference between a load balancer and a belt balancer? A load balancer starts from one belt and splits it into several equal outputs. A belt balancer starts from several belts and cross-merges them into several outputs, so merging doesn't push any single output past its throughput cap.
How do I limit a belt to an exact number of items per minute? Feed it through a smaller-tier belt — a Mk.1 belt (60/min) running into a factory caps that input at 60/min no matter how much the source can supply. Combine tiers and splits to hit more specific numbers.
When should I use a balancer instead of a manifold? When a build needs a guaranteed exact number on a belt — matching an odd machine count precisely, splitting a scarce resource evenly between two factories, or throttling a byproduct line to exactly what's consumed downstream. A manifold is simpler and good enough for most other cases.
Sources
Belt throughput figures (Mk.1 60/min through Mk.6 1200/min) and unlock tiers are confirmed on the current Satisfactory Wiki's Conveyor Belts page. The Conveyor Splitter and Conveyor Merger mechanics this guide relies on -- three outputs per splitter, priority input behavior on a Priority Merger, and the overflow-routing behavior of a Smart Splitter -- are also wiki-confirmed and unchanged by recent patches, which addressed conveyor lift interactions rather than splitter or merger logic itself. All of the specific numeric examples (the 130/min five-lane balance, the 300/min and 250/min limiter combinations, the one-twelfth ratio splitter reaching 5/min) come directly from this guide's source video's own on-screen builds. The sushi belt and bus system definitions are general community terminology, included because they're closely related concepts the source video doesn't itself demonstrate.
Read next
- Satisfactory Manifold vs Load Balancer Guide — belt balancer patterns in more depth
- Satisfactory Central Storage Guide — conveyor logistics applied to a real build
- Satisfactory Modular Frames Production Guide — splitter arrays and balancers in practice
Frequently asked
What's the difference between a load balancer and a belt balancer?
A load balancer starts from one dedicated line and splits it equally into several outputs. A belt balancer solves the opposite problem -- merging several already-full belts into fewer or more outputs without exceeding any single belt's max throughput, by splitting every input and cross-merging pieces from each into every output.
How do you build a load balancer for an odd number of outputs, like five or seven?
Since a Conveyor Splitter only ever has three outputs, an odd target that isn't divisible by two or three needs an extra split layer -- for five outputs, split into six and recycle the sixth line back through a Priority Merger set to high priority on the returning line; for seven, split into three, split those into three again for nine, then recycle two of the nine the same way.
Why does my load balancer become unbalanced over time?
The most common cause is the priority merger's high-priority input being set to the wrong line -- it needs to be the recycled or returning line, not the main feed. Get that backwards and the returning resources back up instead of merging evenly, which visibly skews the balance toward whichever outputs are closest to the feed.
What's the simplest way to limit a belt to an exact number of resources per minute?
Run a lower belt tier into the line -- a Mark 1 belt caps at 60 items per minute regardless of how much the source can supply, so feeding a Mark 1 into a factory that would otherwise take a Mark 3 throttles it automatically. Combining a limited branch with an unthrottled remainder, then recombining them, is how odd specific numbers like 250 or 300 per minute get hit exactly.
Do I need a load balancer, belt balancer, or ratio splitter, or is a manifold good enough?
A manifold is faster to place and works fine as long as every connected machine can keep up with supply, which covers most early and mid-game builds. Reach for a balancer or ratio splitter specifically when a build needs a guaranteed exact number on a belt -- matching an odd machine count, splitting a scarce resource evenly between two factories, or throttling a byproduct to exactly what downstream needs.
How do I split a belt into 3 in Satisfactory?
Use a single Conveyor Splitter — every splitter has exactly three outputs by default, so splitting into 3 needs no extra parts at all.
Read next
Satisfactory Manifold vs Load Balancer: Which Should You Use?
A full comparison of manifolds and load balancers in Satisfactory: how each works, why manifolds take time to reach 100% efficiency, and when to actually reach for a load balancer instead.
Satisfactory AWESOME Sink & Coupon Farming Guide: 5 Fast Strategies
The five fastest coupon strategies to unlock every non-producible item in the AWESOME Shop (1,895 coupons total): Somersloop-boosted Alien DNA Capsules, crash site loot runs, AFK farming, disposable blueprint factories on unused nodes, and Somersloop-doubled endgame items.