
🎯 The core idea
Unlocking every non-producible item in the AWESOME Shop takes 1,895 FICSIT Coupons — roughly 125.7 billion AWESOME points, confirmed on the current Satisfactory Wiki. These are the fastest coupon strategies that get you there faster than just sinking whatever your factory happens to overproduce: Somersloop-boosted Alien DNA Capsules, dangerous-biome crash site loot, AFK farming, disposable blueprint factories on unused nodes, and Somersloop-doubled high-value endgame items.
- free costs nothing
- cheap small cost
- setup needs preparation
- grind pays off slowly
- skip the thing to stop doing
How the AWESOME Sink and coupons actually work
The AWESOME Sink destroys items for AWESOME points, which are spent printing FICSIT Coupons for the AWESOME Shop. Coupons get more expensive as you print more: per the current Satisfactory Wiki, the first three coupons cost 500 points each, and the cost climbs from there using a stepped formula until coupon 2,998, after which every coupon costs a flat 249,501,250 points. Unlocking every repeatable purchase takes the full 1,895 coupons mentioned above, but unlocking every non-repeatable AWESOME Shop purchase — every one-time item among the shop's unlocks, rather than every repeatable buy — only needs 347 coupons (about 382 million points), a far more realistic near-term goal.
Strategy 1: Somersloop-boosted Alien DNA Capsules


Alien DNA Capsules are made from Alien Remains (Hog, Stinger, Spitter — any source works) through a two-step chain: remains into Alien Protein, then Alien Protein into the capsule itself. Placing a Somersloop into each of the two Constructors in that chain doesn't just double output once — it compounds. One Alien Remain normally yields one Alien DNA Capsule; with a Somersloop in both steps, the same input yields four capsules instead of one. Alien DNA Capsules use a separate point counter from other items, increasing by a flat 1,000 points per group of coupons rather than the standard curve, which makes them a reliably scaling coupon source throughout the game.
Strategy 2: crash site loot from dangerous biomes


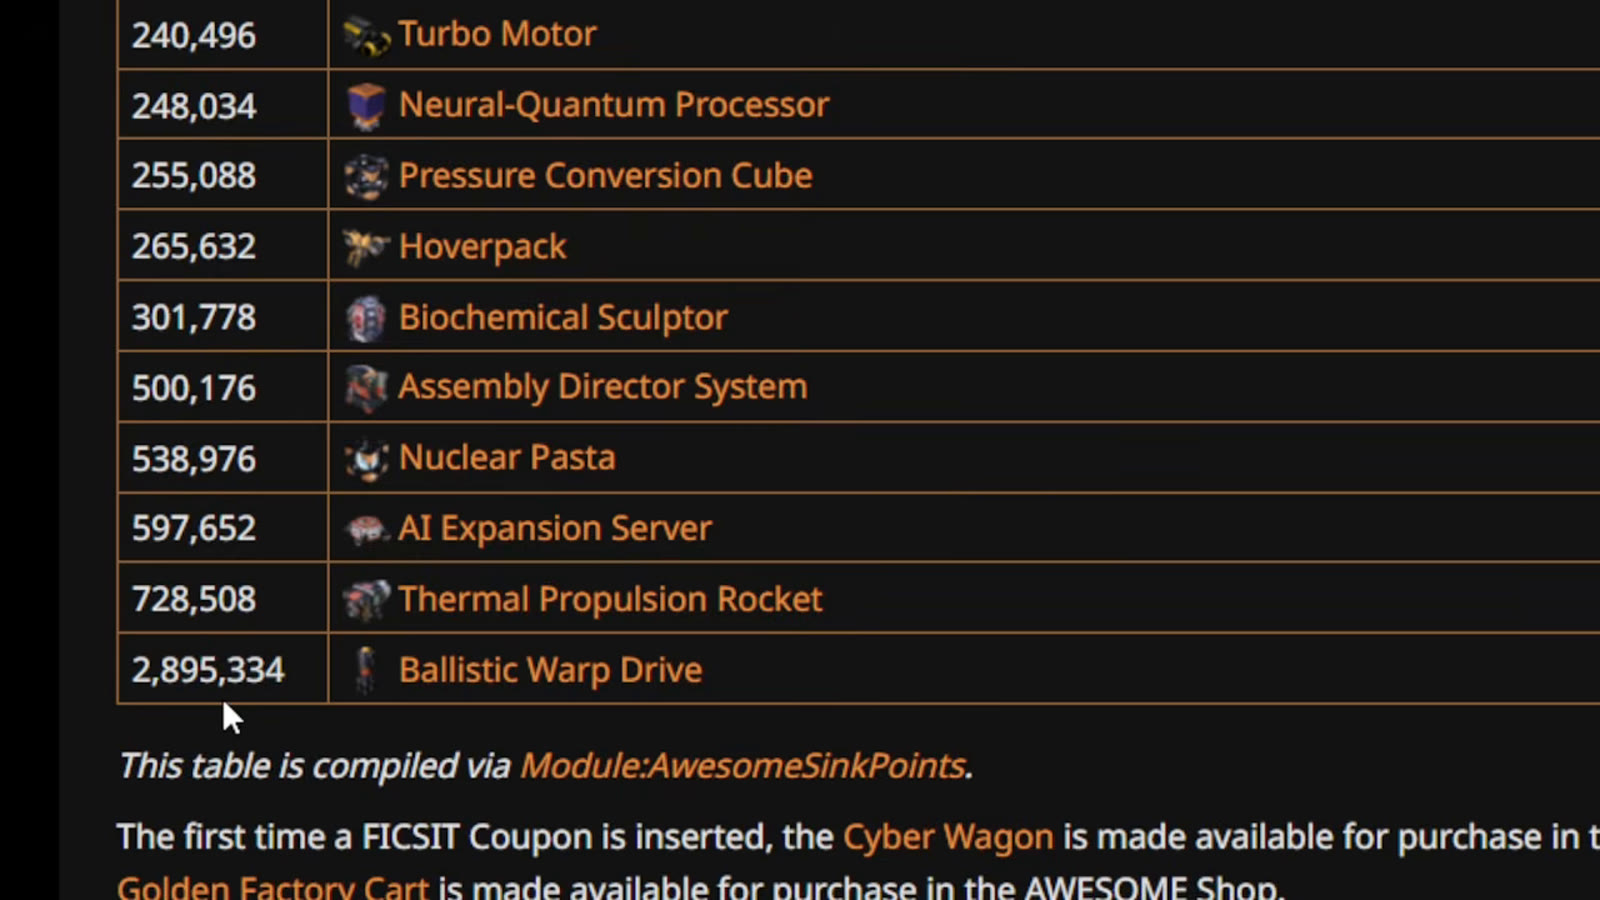
Crash site loot quality tracks biome danger, not proximity to spawn. Sites in calm starting biomes like Grass Fields tend to hold basic parts — iron rods, rotors, reinforced iron plates — which sink for very little (a single Rotor is worth around 140 points). Sites in more dangerous biomes like Titan Forest or the Swamp, guarded by gas pillars and radioactive Hogs, hold far more valuable loot: a Fused Modular Frame can sink for roughly 62,840 points and a Turbo Motor for roughly 240,496 — hundreds of times more than what a starter-biome site typically offers. Since Update 1.1, crash sites can also be deleted after looting for additional materials, though the video notes this yield is less valuable than the initial loot itself.
Strategy 3: AFK farming (coal power only)
Leaving the game running unattended lets any Sink-connected production keep generating points while you're away — but only if your power doesn't depend on biomass. Biomass burners can't be automatically restocked with leaves or wood, so an AFK save relying on them will stall once fuel runs out. Coal power has no such limitation: miners and water extractors both run fully automated, so a coal-powered base can sit AFK for hours without intervention. This is the lowest-effort strategy on this list, but it's conditional on your power setup being automated end to end.
Strategy 4: disposable blueprint factories on unused nodes


A small blueprint containing production machines plus its own AWESOME Sink can be dropped onto any node you're not otherwise using — the video's example uses six Constructors making Concrete from Limestone, sunk immediately with no further setup. A single one of these makes a modest difference, but scattering 20 or 30 of them across unused nodes around the map adds up to a meaningful, largely passive point stream. The main cost is power: that many blueprint factories running simultaneously needs a base with power to spare.
Strategy 5: Somersloop-boost your highest-value endgame item


This is the highest-impact strategy on the list once you've reached the late game. A Ballistic Warp Drive is worth roughly 2,895,334 AWESOME points on its own — and adding Somersloops to double its production rate doesn't double the ingredients required, only the output. Going from 10 to 20 Ballistic Warp Drives per minute this way takes the same input resources as the un-boosted line, turning roughly 28.9 million points per minute into free additional income for the cost of a few Somersloops. This matches the current Satisfactory Wiki's own ranking of the best items to sink: Ballistic Warp Drive tops the list specifically because of how well it benefits from Somersloop boosting, with AI Expansion Server as the best choice once your Somersloop supply runs out, and Assembly Director System as the fallback after that once SAM itself is depleted.
How this guide was fact-checked
The coupon cost formula, the 1,895-coupon/125.7-billion-point figure for every non-repeatable and repeatable purchase, the 347-coupon/382-million-point figure for non-repeatable purchases only, and the ranking of Ballistic Warp Drive, AI Expansion Server and Assembly Director System as the current best items to sink are all confirmed on the current Satisfactory Wiki's AWESOME Sink page. The Content Plan notes for this topic specifically flagged that the best sink item has been retuned across updates and asked for verification against 1.2 — checking confirmed the video's own conclusion (Somersloop-boosted Ballistic Warp Drive as the top strategy) still matches the wiki's current guidance exactly, so no correction was needed. Specific sink-point values for individual items (Rotor, Fused Modular Frame, Turbo Motor, Ballistic Warp Drive) are transcribed directly from the video's own on-screen UI rather than a dedicated wiki table, since those exact per-item figures weren't captured in the page content retrieved for this guide.
What this guide doesn't answer
This guide covers five practical, moderate-effort coupon strategies rather than the theoretical maximum points-per-minute achievable with a fully optimized endgame base (over 480 million points/minute at default clock speeds, per the current wiki) — that figure requires a dedicated late-game build far beyond what any of these five strategies alone produce. It also doesn't cover exact coordinates for high-value crash sites, since the video identifies them by biome type and danger level rather than specific map locations. Finally, it doesn't verify every individual item's point value against the wiki's full sink-value tables — where this guide cites a specific number for an item like Rotor or Turbo Motor, that figure comes from the video's own gameplay footage rather than independently cross-checked wiki data.
Read next
Satisfactory Overclocking & Power Shards Guide
Satisfactory Phase 5 & Endgame Guide: Compact Blueprints for Project Assembly
Satisfactory Space Elevator Phase 1 Guide: The Full Iron Build
A full building-by-building walkthrough of the iron megafactory needed for Space Elevator Phase 1 in Satisfactory: smelters, screws, rotors, reinforced iron plates and the exact Smart Plating recipe.
Satisfactory Somersloop Guide 1.2: Best Uses Ranked
All 106 Somersloops in Satisfactory explained: exact Alien Power Augmenter math, Production Amplifier slot counts by building, and which recipes actually deserve a Somersloop.