
🎯 The core idea
The Blueprint Designer lets you save a chunk of factory — foundations, machines, belts, lights, even train track curves — as a reusable stamp you can drop down again and again, which is what actually lets a Satisfactory factory scale past your first few machines.
- free costs nothing
- cheap small cost
- setup needs preparation
- grind pays off slowly
- skip the thing to stop doing
Unlocking the Blueprint Designer and picking a size

The Blueprint Designer isn't available from the start — you unlock it through the HUB milestones, and there are three versions:
| Blueprint Designer | Unlocked at | Buildable volume |
|---|---|---|
| Mk.1 | Tier 4 — FICSIT Blueprints | 32 m × 32 m × 32 m |
| Mk.2 | Tier 6 — FICSIT Blueprints Mk.2 | 40 m × 40 m × 40 m |
| Mk.3 | Tier 9 — FICSIT Blueprints Mk.3 | 48 m × 48 m × 48 m |
Once unlocked, you'll find the Blueprint Designer in the special section of the build menu. It's a physical structure you build in the world — a platform with an open frame above it — and anything you place inside that frame becomes part of the blueprint. In-game menus sometimes shorten "Mk.2"/"Mk.3" to "Mk2"/"Mk3" — both refer to the same two upgrade tiers in the table above.
Treat each saved blueprint as a modular building block: design a piece once, and every later copy is a stamp of that same modular design, which is the entire point of using blueprints instead of hand-building every factory line from scratch.
Designing, naming and actually saving a blueprint

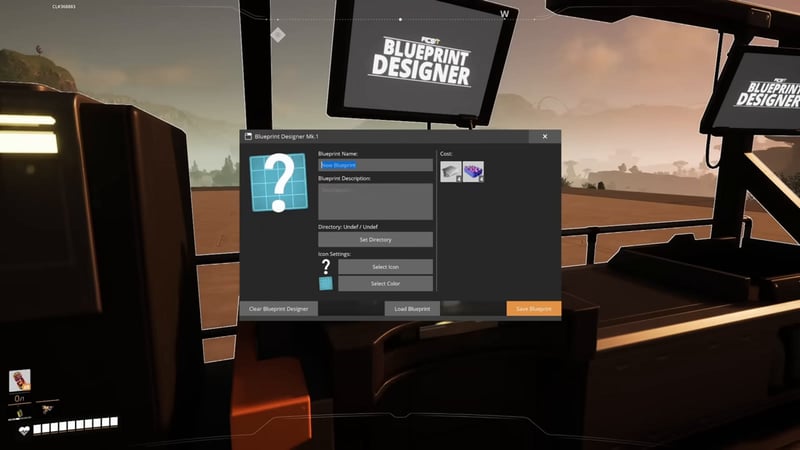
Once you've built something inside the frame — even something as small as a single wall light — walk over to the Designer machine to configure it. You can set a name, an optional description, an icon, and a color (a simple convention: blue for permanent designs, red for temporary test pieces, so you can tell them apart at a glance later).
The single most common mistake here: after configuring the name/description/icon, you have to click Apply Changes, then exit the menu with X — but that only saves the blueprint's metadata, not the blueprint itself. To actually write the blueprint to disk you must press the separate Save Blueprint button before leaving the Designer, or your work is lost.
Organizing dozens of blueprints before it gets out of hand

The blueprint you just saved gets filed into a directory — either an "Undefined" catch-all or a category you create. It's worth creating categories from the start: one save file can easily accumulate over a hundred blueprints (the video's presenter mentions having 120+ in a previous save with no organization), and sorting that after the fact is far more tedious than tagging as you go.
Good starter categories to create: foundations, factory lines, railways/highways, and load balancers — then split each into subcategories as it grows.

You can also hover any blueprint (or color swatch) and press a number key to bind it straight to your hotbar, then hold E to cycle other items in the same category — handy for switching between a handful of blueprints you're placing repeatedly without reopening the menu each time.

Placing blueprints: build modes and the belt/pipe limitation

Building the contents of a blueprint from ground level is awkward — the recommendation is to use a Watchtower for a top-down view, or the Hover Pack with power placed at each corner, so you can see the whole footprint while you work.

When placing a saved blueprint in the world you get two build modes: Blueprint mode, which snaps to the edges of other blueprints and foundations for tight, aligned placement, and default mode, which gives full freedom to nudge it anywhere (hold H to toggle nudge, then use the mouse to fine-tune, holding Control for finer 50 cm increments instead of a full meter).
Conveyor belts, pipes and rails do not connect automatically across a blueprint boundary. You cannot place a belt against the edge of one blueprint and expect it to auto-connect to the next — every cross-blueprint connection has to be built and connected manually.
Building a curved blueprint for trains and highways

A gentle 5° curve (the video's presenter switched from 10° to 5° for a cleaner look) is the go-to for train tracks and highways, because it's shallow enough to snap together smoothly over a long run. Build it on a rotated foundation corner, using 1-meter walls along the inner and outer edges as a barrier — one side left as bare metal, the other painted, purely for visual contrast.
Curved blueprints are directional: a right curve and a left curve are two separate saved blueprints, because their vertices don't mirror correctly if you just try to flip one.

Chaining two curved blueprints edge-to-edge naively creates a visible straight seam between them, because each piece includes a straight foundation segment at its edge. The fix: go back into the Blueprint Designer, cut the leading foundation off the curve, and save that trimmed version separately as a "continued curve" piece — placing that between curve segments removes the seam.
To line pieces up cleanly, either rebuild using the exact same foundation depth as your first piece (e.g. consistently 4 m foundations), or nudge the new piece onto the existing foundation and let it seat naturally.

How this guide was fact-checked
Unlock tiers (Mk.1 at Tier 4, Mk.2 at Tier 6, Mk.3 at Tier 9) and the exact buildable volumes (32 m/40 m/48 m cubes) were cross-checked against the current Satisfactory Wiki (wiki.gg), which was reachable and returned full content. The wiki's dimensions supersede anything implied on-screen in the source video, since the video (Update 1.0, 2024-09-29) covers Mk.1 in detail but doesn't show Mk.2/Mk.3 construction directly. Every workflow step — naming, the Apply Changes vs. Save Blueprint distinction, category/subcategory organization, blueprint build mode snapping, the belt/pipe/rail non-connection limitation, and the curved-blueprint technique — comes directly from frames pulled from the source video and the cleaned auto-caption transcript, cross-referenced against each other for consistency.
What this guide doesn't answer
This guide doesn't cover blueprint sharing between players or across saves (the Keywords list for this topic includes "satisfactory blueprint sharing," but the source video only covers designing and organizing blueprints within a single save, not exporting or importing blueprint files) — that process depends on locating the game's BP save folder and is better suited to its own guide. It also doesn't cover the exact resource cost of building a Blueprint Designer itself, since the video treats that as assumed knowledge; see the Cost panel in-game when placing one, or the wiki's construction cost table, for current figures.
Frequently asked
What tier unlocks the Blueprint Designer in Satisfactory?
The Blueprint Designer Mk.1 unlocks with the FICSIT Blueprints milestone at Tier 4, giving a 32 m × 32 m × 32 m buildable volume. Mk.2 unlocks at Tier 6 (40 m cube) and Mk.3 at Tier 9 (48 m cube), each expanding how much you can fit inside a single blueprint.
How big can a Satisfactory blueprint be?
It depends on which Blueprint Designer tier you've unlocked: Mk.1 gives a 32×32×32 m volume, Mk.2 (Tier 6) gives 40×40×40 m, and Mk.3 (Tier 9) gives 48×48×48 m. These are the current figures from the Satisfactory Wiki, since sizes have expanded since earlier updates.
Why won't my conveyor belt connect between two blueprints?
Conveyor belts, pipes and rails never auto-connect across a blueprint boundary in Satisfactory. Placing a belt against the edge of one blueprint does not link it to the belt in the next blueprint — you always have to build and connect that final segment manually.
How do I save a blueprint without losing my work?
After naming and setting up your blueprint, click Apply Changes — but that only saves the metadata, not the blueprint itself. You must also press the separate Save Blueprint button before exiting the Designer, or your build is lost when you leave.
How do you build a smooth curve for train tracks with blueprints?
Save a shallow 5° curved blueprint (gentler than 10°, which looks blocky), and save separate left and right versions since curves are directional. To chain multiple curves without a visible straight seam, trim the leading foundation off a curve piece and save that as a separate continued-curve blueprint.
Read next
Factory Master-Planning: A Satisfactory Base That Scales
How to plan a Satisfactory factory before the first foundation goes down: location scouting, area logistics, standardized blocking, and reusable blueprints that scale into the late game.
Satisfactory Manifold vs Load Balancer: Which Should You Use?
A full comparison of manifolds and load balancers in Satisfactory: how each works, why manifolds take time to reach 100% efficiency, and when to actually reach for a load balancer instead.
Satisfactory Central Storage Guide: Sorted Storage + Dimensional Depot
Satisfactory Pipes & Fluid Mechanics Guide: Headlift, Flow Rates & Fixes
A complete walkthrough of Satisfactory fluid mechanics: pipe tiers and flow rates, headlift and dynamic pressure, splitting between pipe tiers, valve mistakes, buffers, priority junctions, and how to stop manifolds from sloshing.