
🎯 The core idea
Building in WARDOGS is about making attackers pay. Every supply you spend should either force the enemy to burn time, explosives and Halligan uses, or keep something expensive alive. Learn the hammers and the build menu, place pieces before you swing, hit critical spots from a distance, and use tall walls, murder holes, hedgehogs and fake entrances. Season 02 roughly doubled most build costs, so plan every piece.
- free costs nothing
- cheap small cost
- setup needs preparation
- grind pays off slowly
- skip the thing to stop doing
This WARDOGS building guide covers the general mechanics and the tricks that work anywhere you build: how placing and swinging works, what things cost in build supplies, how to build faster, and the fortification pieces that make attackers miserable. It is based on Mattzila 999's 40-minute video "10 MUST-KNOW Building Tips in WARDOGS" (uploaded 9 September 2026, recorded on the pre-launch build, so Season 01 values), with every number checked against the official Season 02 patch notes from 14 October 2026. Where the video and the patch notes disagree, the patch notes win and the text says so. If you want the full step-by-step base from walls to drill rig, that lives in the WARDOGS FOB guide; this page is the toolbox you build it with. More WARDOGS guides are on the WARDOGS game hub.
Which hammer builds what

setup All building is done with a hammer, and there are three. The small hammer handles the basics, the medium hammer adds bigger pieces, and the large hammer (Mattzila calls it the level 3 hammer) unlocks the full list, including the shelters and structures he uses for most of his designs. Season 02 spells out where the new pieces sit: the Wooden Step needs the small hammer or better, the Large Shelter the medium hammer or better, and the new MG Nest only the large hammer.
Both bigger hammers sit on the Support track. The Season 1 launch changelog put the Medium Hammer unlock at $25,000 and the Large Hammer at Support level 8 with a $75,000 unlock and a $2,400 vendor price. The large hammer is also the fastest: Season 02 made the medium hammer contribute less per swing, while the large hammer's build rate per swing stayed the same. If you plan to build every match, the large hammer is the first Support unlock worth saving for; the WARDOGS money guide covers how to fund it.
Build supplies and what pieces cost

cheap Every piece costs build supplies. Hold a hammer and the bottom-right of your HUD shows the hammer, "BUILD SUPPLIES" and how many you have to spend; the radial build menu shows each item's cost against that total (in the video a repair station reads 121 out of 4,099 in the firing range). The WARDOGS wiki splits stock into four supply types, and only build supplies are spent on construction and repairs; ammo, fuel and mechanical supplies run the weapons and stations.
Season 02 was a full pass on cost, build speed and durability, in the developers' words to make structures "a considered investment" rather than something you spam. The general pieces you will use most:
| Piece | Season 01 | Season 02 |
|---|---|---|
| Wood Base | - | 15 |
| Bremmer wall | 15 | 32 |
| Door | 22 | 80 |
| Gate | 85 | 200 |
| Air raid shelter, bunker, crow's nest | 100 | 200 |
| Large Shelter (new) | - | 250 |
| MG Nest (new) | - | 650 |
So a design that used five doors in Season 01 (110 supplies) now costs 400 in doors alone. Every trick below still works, but count the doors and gates before you start. The weapon emplacement prices (mortar, Stingray, Talon, CIWS, Hot Zone Magnet) are in the FOB guide's Season 02 table.
Placing pieces before you swing

free Building is two separate steps: placing a ghost of the piece, then hitting it with the hammer until it is built. The ghost turns white when the spot is valid, and you can place as many ghosts as you like before you build any of them. Mattzila's hedgehog wall works this way: place one, shift slightly, place the next, and keep going until the line is finished, then build them all. Placing first means you see the whole layout before a single supply is committed.
The HUD shows a Rotate prompt and a Snapping toggle while you place. Keep snapping on for walls and doors so pieces line up without gaps, and turn it off when you want something at an odd angle, such as the diagonal sandbags on a tower top. Two Season 02 changes help here: foundations now fit properly against slopes, stairs and walls, and unfinished pieces collapse as soon as they lose a support instead of floating. That second one matters for tall builds: finish the lower floors before you stack anything on them.
Critical spots and animation canceling

free Mattzila calls this the most important building tech in the game. While you swing at a piece, a yellow X appears on it: that is the critical spot, and hitting it builds faster. Up close the X jumps around and you end up playing aim trainer. Back away until you can only just reach the piece, crouch if it helps, and the X barely moves; at the right distance it stays in one place. The 0.1.2 patch (30 September) also fixed crit spots that reappeared where you had just hit, got pushed into corners or jumped to the far side of a structure.
The second half is animation canceling: click, let go the instant the hammer connects, and click again straight away, instead of holding the button. Combined with the long-distance crit trick, Mattzila says it builds far faster than holding the button down; he uses it on the slow builds like the CIWS, drill rigs and Talons. Note that Season 02 gave critical spots a smaller bonus than before, so the gain is smaller than in his video, and the animation cancel is his technique, not something the patch notes mention.
Tall outer walls against grenades and C4

setup Mattzila's single best design rule: make your outer walls taller than the inside ones. He stacks double-high Hesco walls and puts Bremmer walls on top (he calls them "brambles" in the video; the game calls them Bremmer walls). A tall outer wall stops attackers lobbing frag grenades and C4 over it, soaks up explosive damage and cannot be hopped. Inner walls matter less, apart from around gates.
Season 02 makes this cheaper to do well and more expensive to overdo. Barbed wire and sandbags can now be placed on top of Bremmer walls, but each Bremmer wall costs 32 supplies instead of 15. Put the tall walls on the sides you will be attacked from first. How to lay out the whole perimeter, the bastion towers and the gate airlock are covered step by step in the FOB guide, so this page does not repeat them.
Murder holes: shoot out, stay hidden

cheap A murder hole is a firing slit built from a door. It gives you cover above and below while you shoot out, and you can shut it whenever you are under fire. Because you are the defending team, you can open and close your own doors at will. Mattzila's recipe:
- Place a single Hesco wall, a door, then another single Hesco wall in a row, with snapping on.
- From the outside, place a sandbag as close to the bottom of the door as you can.
- From above, place a second sandbag as far from you as possible so it covers the top half of the doorway.
- Open the door, crouch and lean to peek; close it when shots come back.
The result covers most of your body and leaves a slit you can see and shoot through. He uses them at the last gate before anything valuable, in towers and along upper walls, and he puts barbed wire where attackers could go prone under the slits. Stand a step back from an open murder hole and the darker inside makes you even harder to spot. Since each one needs a door, every murder hole now costs at least 80 supplies.
Compartments and one-way exits

setup Every extra room an attacker has to blow through costs them explosives, time and noise you can hear. Mattzila calls compartmentalization the king of defences: small rooms one after another, each with its own door, before attackers reach anything valuable. How to divide a full base is part of the FOB guide.
The trick he adds here is making the way out easy for you and the way in hard for them. Build the walls high, then add a simple staircase on the inside so defenders can climb up and drop over the wall. Put a small step or block on the outer side so you do not take fall damage on the drop. Nobody can use that route in reverse: the wall is too tall to climb, and a car, Ural or tank cannot get close enough to give an attacker a jump-up. You can do this anywhere, even from the middle of a base out onto the outer wall sections.
A roofed garage for the spawn vehicle

setup A spawn vehicle parked in the open dies to the first mortar or artillery barrage. Mattzila builds it a garage instead: two indirect fire shelters placed side by side, which needs the large hammer. Break out six specific Hesco walls from the shelters to open them up, drive the spawn vehicle in, then barricade the open sides again and leave a single door rather than a gate, because a gate gives attackers an easy C4 point. Players spawning on the vehicle appear either inside or on the roof, so he rings the roof with sandbags to make it a firing platform.
According to the video, nothing breaks that roof for most of a match, and Hesco walls are quick to rebuild if something does. The Season 02 patch notes list air raid shelters at 200 build supplies (up from 100); if that is the same shelter the video uses, the garage now costs about 400 before walls. Season 02 also added the Large Shelter (250 supplies, medium hammer or better), described as a metal shelter for covering key assets. It is the obvious modern alternative for a garage roof, but it is not shown in the video, so check that the vehicle fits before you commit.
Hesco sponges around expensive structures

cheap Big-ticket buildables are the ones you most want to keep standing. Mattzila's habit when supplies are short: ring the structure with single Hesco walls straight after placing it. Mortar splash and other explosives that land next to it hit the Hescos instead, and Hescos can take a beating that the structure itself cannot. Raising it on a platform keeps it further from splash on the ground as well.
He quotes the CIWS at 901 build supplies and the drill rig at 1,351. Both are out of date: the Season 02 patch notes give the CIWS as 1,500 before the patch and 1,200 now, and they list no "drill rig" price by that name, only the Hot Zone Magnet going from 2,250 to 2,750. Also from Season 02: destroying a buildable now pays the attacker cash equal to its build supply cost (and roughly a quarter of that in XP), scaled by how built it is, so an unprotected expensive structure is a juicy target. Where to put the CIWS, how to shield its gunner and how to wall in a drill rig are covered in the FOB guide.
Hedgehog walls to block vehicle routes

cheap Hedgehogs (tank traps) stop vehicles, and a line of them is hard to blow up. Mattzila's favourite use is blocking bridges on the route an enemy team's tanks take, so they have to cross through water where they can get stuck, burn fuel and get shot. Place the hedgehogs in a tight row using the place-first method, then build the whole line. He says each costs 14 build supplies and you do not need a FOB, only build supplies in your backpack, so about 200 supplies covers a couple of bridge sections. Both numbers are from the pre-launch video; the patch notes do not list hedgehogs.
Two Season 02 changes to check before you rely on this. Tank traps can now only be placed on a defined set of surfaces, so test that the bridge deck accepts them. And all three team spawns on Bakurani were moved and given new routes, so the bridge the video blocks may no longer be the enemy's main path. Never block routes your own team's vehicles use.
Trap entrances that go nowhere

setup Mattzila calls this his most evil design. On the side of your base most likely to be attacked, build what looks like an easy way in: a lone door with nothing covering it, followed by more doors and a strip of barbed wire. Attackers blow through door after door and reach a final door with nothing behind it, a dead end surrounded by Hesco walls they cannot climb. Meanwhile the noise tells defenders exactly where they are, and a murder alley or a bunker overlooking the corridor does the rest.
In the video, attackers burn four or five C4 charges on the fake before reaching your real defences. Season 02 changed the maths. Hammers can no longer breach doors or gates, but the Halligan bar now breaches both, has 7 uses instead of 5 and costs $885 instead of $1,100, and each door breached with it pays $100. A trap entrance now mostly costs attackers Halligan uses and time rather than C4, and every fake door costs you 80 supplies. It still works, but keep it short and cover it well; rebuild it after each attack, because most of the server has not seen it yet.
A sniper tower for flat ground

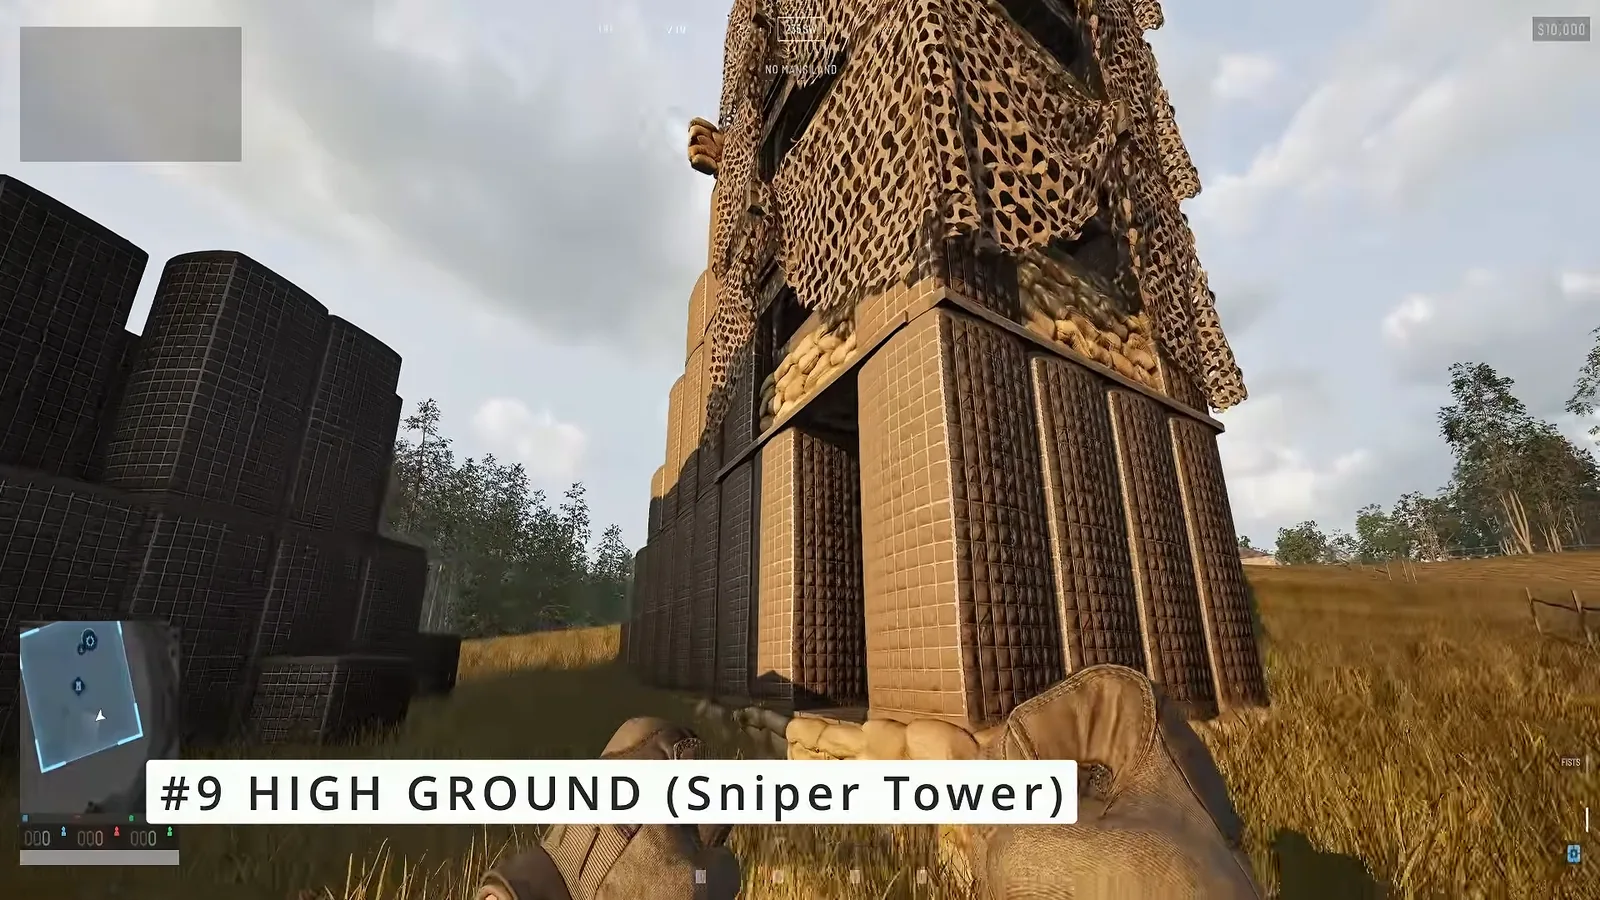
grind In open ground with no buildings nearby, Mattzila builds a four-storey sniper tower. He starts from a recon tent, builds up to height, places a bunker on top, then another bunker on top of that. A ladder leads to the first level, a double Hesco step with sandbags to the second, and staircases above that. The bunkers give camouflage netting, and the top level is a ring of sandbags: a single one in the middle, one flat on each corner, and diagonal ones on the outer edges for cover from every side.
Build each level fully before you add the next; since Season 02, an unfinished piece that loses its support collapses. The video also found that WARDOGS has a building height limit; the exact number is not given anywhere official, but this tower reaches it. Since bunkers went from 100 to 200 supplies in Season 02, two bunkers alone cost 400 now, so this is a late-match build when supplies are flowing. Mattzila himself prefers the lower, more covered levels to the open top. Sniper loadouts and angles are in the WARDOGS sniper guide.
Defending against breaching in Season 02

skip Stop assuming a single closed door keeps anyone out. Season 02 made Assault the base-attacking role: C4 and the Remote Detonator moved to Assault level 4, the new Molotov joined at level 13, and destroying buildables, C4 and IEDs now give Assault XP. The Halligan bar opens doors and gates quietly, while hammers no longer can. The CIWS was also tuned so it shreds light cover but struggles against heavy fortifications.
What still works against all of that is the layering from the earlier sections: tall outer walls so explosives cannot be thrown over, several doors in a row so one Halligan bar is not enough, barbed wire where attackers would hide, and murder holes and towers overlooking every door. Keep your doors shut: closing a door on a friendly FOB now pays $75. And since explosives and placeables can no longer be used from enclosed vehicle seats, attackers have to get out and expose themselves to plant C4. What attackers carry is covered in the WARDOGS Assault guide.
Read next
- WARDOGS FOB guide: the full base build step by step, with every Season 02 emplacement cost.
- WARDOGS strategy guide: how fortifications fit into winning the control zone.
- WARDOGS Season 2 update: every change in Update 0.2.0.
- WARDOGS guide for beginners: roles, money and the basics before you start building.
- WARDOGS SAM Site Guide: How to Build Anti-Air That Works — How to build a Talon 9K-SAM anti-air site on a walled recon tower that snipers, Urals and rockets struggle to break, and how Season 2's reload and restock changes cut two ammo pallets from about 75 missiles to 18.
- WARDOGS Mortar Guide: Aim, Build and Range Your Shots — How to build, aim and supply the L81 mortar in WARDOGS, from a full solo mortar match and a mortar duel, with the Season 02 build cost, ammo and XP changes worked in.
- WARDOGS IED and C4 Guide: Costs, Unlocks and Placement — The $300 IED and C4 explained for WARDOGS Season 2: how to get each, where to plant them on vehicles and FOB walls, and why a badly placed charge does nothing or kills your own squad.
How this guide was fact-checked
- Official Season 02 patch notes (14 October 2026): every Season 02 build supply cost in this guide, which hammer builds the Wooden Step, Large Shelter and MG Nest, the medium hammer and critical spot changes, foundations fitting slopes, unfinished pieces collapsing, barbed wire and sandbags on Bremmer walls, tank trap surface limits, door and gate breaching by Halligan bar only, the Halligan's 7 uses, $885 price and $100 breach reward, the $75 door-closed reward, buildable destroy rewards, C4 and Molotov moving to Assault, CIWS damage against structures, the explosives-from-vehicles change and the Bakurani spawn move.
- Season 1 launch changelog (9 September 2026): Medium Hammer unlock $25,000; Large Hammer at Support level 8, $75,000 unlock, $2,400 vendor price. Update 0.1.2 (30 September 2026): crit spot fixes.
- WARDOGS Wiki (Game Mechanics page): the four supply types and that build supplies pay for construction and repairs. The wiki has no page listing build costs or hammer contents.
- Corrections to the video: CIWS costs 1,200 build supplies, not 901; the 1,351 drill rig cost is the video's figure and is not in the patch notes; Bremmer walls, not "brambles"; doors, gates and bunkers now cost 80, 200 and 200; critical spots give a smaller bonus; trap entrances now mainly drain Halligan uses rather than C4.
- From the video only: the critical spot distance trick and animation canceling, the murder hole, garage, sniper tower and trap entrance designs, the hedgehog cost of 14 and the existence of a height limit.
What this guide doesn't answer
- A complete base build order: that is the FOB guide's job; this page only covers the techniques.
- Exact health values for walls and structures: neither the patch notes nor the wiki publish them.
- The exact building height limit: the video found it but gives no number, and nothing official does.
- Every buildable's Season 02 price: the patch notes only list the pieces whose cost changed or were added, so Hesco walls, sandbags, barbed wire and hedgehogs have no current official number.
- How to attack a base: covered from the attacker's side in the Assault guide.
Frequently asked
How do you build faster in WARDOGS?
Hit the yellow critical spot (the X) on the piece you are building. Back away until you can only just reach it, so the X stays in one place, and animation cancel: click, let go the moment the hammer connects, then click again. The large hammer also builds fastest, because Season 02 cut the medium hammer's progress per swing while the large hammer's rate stayed the same. Crit spots give a smaller bonus since Season 02.
How much do walls, doors and gates cost in WARDOGS Season 2?
Season 02 roughly doubled most build costs: a Bremmer wall is 32 build supplies (was 15), a door 80 (was 22), a gate 200 (was 85), and a bunker, air raid shelter or crow's nest 200 (was 100). The new Large Shelter costs 250 and the MG Nest 650. The patch notes do not list new prices for Hesco walls, sandbags, barbed wire or hedgehogs.
Can you breach doors with a hammer in WARDOGS?
No. Since Season 02, doors and gates can no longer be breached with a hammer. The Halligan bar now breaches both doors and gates, has 7 uses instead of 5, costs $885 and pays $100 for each door breached. C4 and the Remote Detonator moved to Assault level 4, so build several doors in a row and cover them with murder holes and towers.
Which hammer do I need to build everything in WARDOGS?
The large hammer. It is a Support unlock at level 8 for $75,000 with a $2,400 vendor price, and it is the only hammer that builds the new MG Nest. The medium hammer ($25,000 Support unlock) builds the new Large Shelter, and the small hammer builds the basics including the new Wooden Step.
What is a murder hole in WARDOGS building?
A firing slit made from a door: place a single Hesco wall, a door and another single Hesco wall, then put one sandbag low in front of the door and a second one higher up so only a gap remains. Open the door, crouch and lean to shoot out, and close it when you take fire. Each one needs a door, so it costs at least 80 build supplies in Season 2.
Read next
WARDOGS FOB Guide: How to Build a Defended Base
A full WARDOGS FOB build in the right order: where to place it, which walls to build first, two-gate airlocks, barbed wire, compartments, and where the CIWS, mortar and Talon go. Includes a solo and duo mini FOB and every build cost Season 2 changed.
WARDOGS Money Guide: Best Ways to Make Money Fast
Which WARDOGS earning methods actually pay: a four-way cash-per-hour test of hot zone fighting, building, flying and supply runs, plus revives, spotting and the spawn vehicle. Every payout is checked against the Season 2 patch notes, which cut pallet, spotting and drill rig income.
WARDOGS SAM Site Guide: How to Build Anti-Air That Works
How to build a Talon 9K-SAM anti-air site on a walled recon tower that snipers, Urals and rockets struggle to break, and how Season 2's reload and restock changes cut two ammo pallets from about 75 missiles to 18. Also compares the Talon with the CIWS, Verba and new Gepard.
WARDOGS Mortar Guide: Aim, Build and Range Your Shots
How to build, aim and supply the L81 mortar in WARDOGS, from a full solo mortar match and a mortar duel, with the Season 02 build cost, ammo and XP changes worked in.