
🎯 The core idea
Layali Grove solo is bigger and richer than Zero Dam, but the map itself isn't what kills most runs — it's treating half-real, half-bot lobbies carelessly, over-buying key cards, and defaulting to the same two hotspots everyone else hits. This guide is a solo player's economy and mindset playbook for the map, not a room-by-room callout list.
- free costs nothing
- cheap small cost
- setup needs preparation
- grind pays off slowly
- skip the thing to stop doing
Layali Grove's map: the named POIs worth knowing

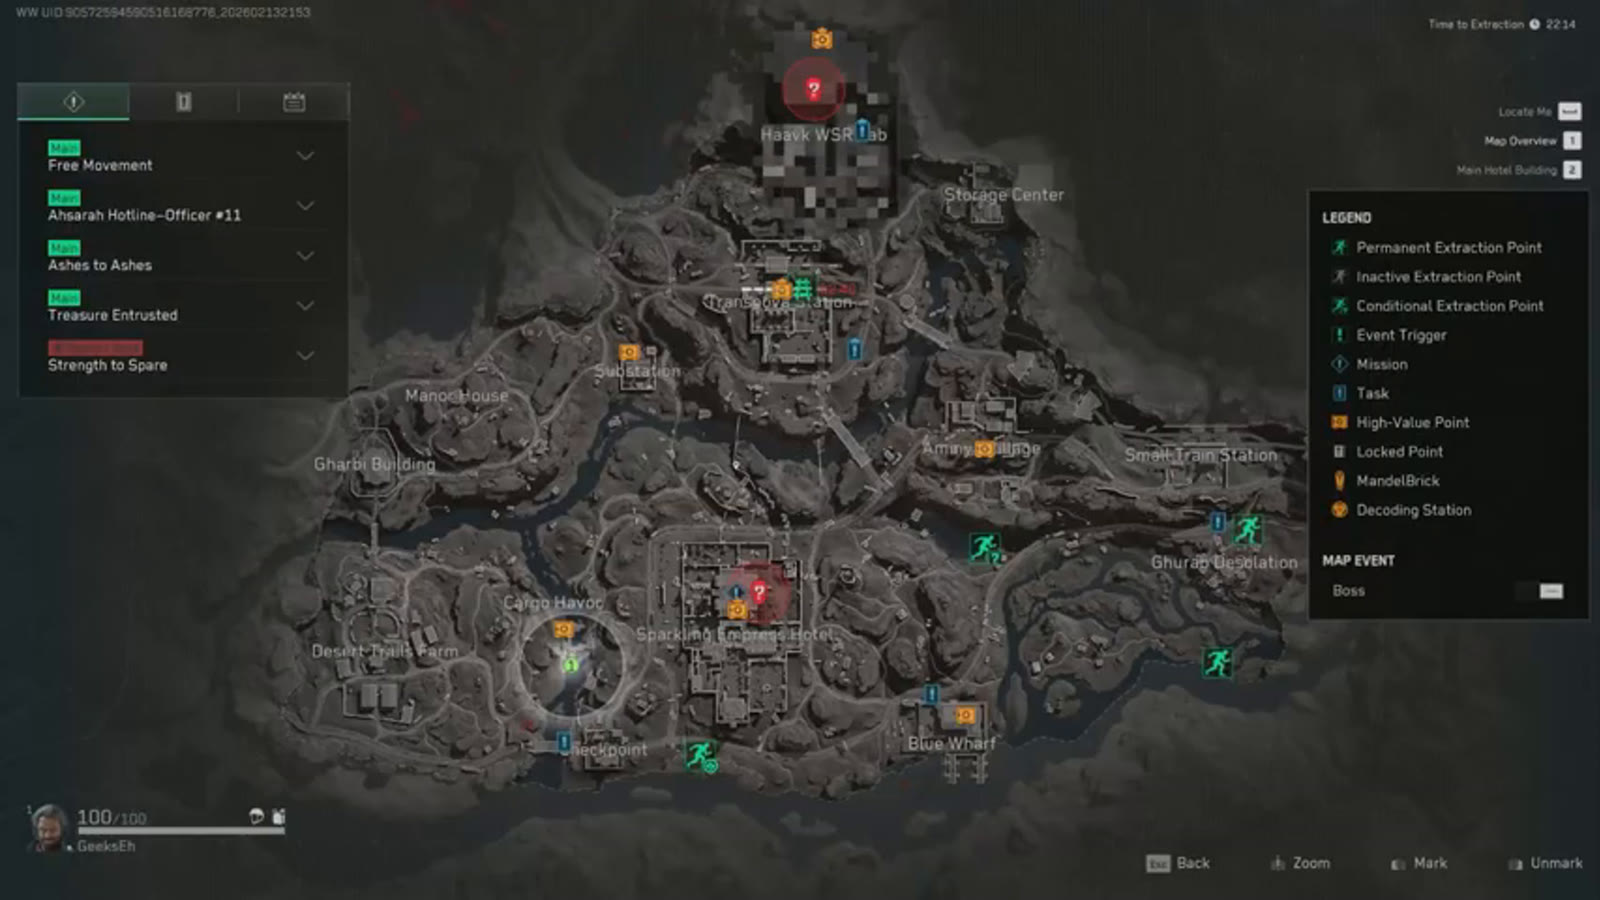
Layali Grove's named locations, confirmed on the in-raid map: Haavk WSR Lab, Storage Center, Transformer Station, Substation, Manor House, Gharbi Building, Amiriyah Village, Small Train Station, Ghurab Desalination, Cargo Havoc, Desert Trails Farm, Sparkling Empress Hotel, Blue Wharf, and Checkpoint. Most players default to the Lab and the Hotel because both have safes and well-known red-item spawns, which is exactly why they're also the most contested and most thoroughly picked-over areas on the map.
Every player is a real player until proven otherwise

The compound bow: total operator freedom through silence

Buying a base compound bow (66,000–75,000 alloy, no attachments needed, just two stacks of blue ammo) is described as a genuine game-changer for solo play. The core reason: noise reveals your position to every player on the map, and different weapons carry very differently — a silenced pistol is audible from roughly 150 meters, while the bow carries only about 30 meters. Without a silent clear option, many solo players feel locked into Hackclaw or Luna specifically for their built-in silent-takedown tools; the bow removes that pressure and frees you to run any operator you actually want to play.

The bow isn't free to run: it occupies your second weapon slot, eats into carry capacity, and pushes you toward the overweight threshold faster. If you drop a well-geared enemy, you can simply toss the bow and take their gear instead — so the investment isn't wasted even in a good fight.

Stop over-buying key cards — with one exception
Layali Grove's main task key cards are priced high specifically because so many task lines route through this map — but most of those locked rooms are missed more often than hit. Unless a mission is time-gated and needs completing right at spawn, it's cheaper to simply check the room again later in the raid: eventually another player unlocks it for you, and you keep your alloy.

The one exception worth buying: the Lab Building Archive Room key, at roughly 1.1 million alloy. The room can be peeked into from outside before committing, so the actual workflow is to walk up, check whether a red item has spawned on the floor, and only use the key if something is actually worth taking — keeping the key's durability intact on an empty check.
Missions and the paid extract are free money and a safety net
HVT missions are worth prioritizing since they only require eliminating a single AI target — especially easy and silent if you're already running a bow. Standard enemy-elimination missions work too, provided you keep the noise down. Keeping enough alloy on hand for a paid extract matters just as much: it's an extra way out when a player is chasing you or you simply want to lock in your loot before anything goes wrong.
Loot exists well beyond the Hotel and the Lab

Normal-difficulty loot is better, but the sheer number of containers and bags scattered across Layali Grove's easy-mode version rewards a thorough looter regardless. The areas outside the Hotel and the Lab are comparatively untouched, since most players default straight to the two well-known safe locations. A practical way to learn a new map's overlooked spots: clear and loot an area from memory first, then check an interactive map afterward to see exactly what got walked past, and go back for it — doing this yourself tends to stick better than just studying a map image beforehand.
Winning means extracting, not winning every fight

If your backpack is already carrying decent loot and your goal is the cash, there's no shame in avoiding gunfire you hear in the distance or simply disengaging from a player you run into. Taking every fight makes sense if you went in with nothing to lose and want PvP practice — but if you loaded in to make money, the actual win condition is extracting with what you found, not racking up kills along the way.
How this guide was fact-checked
This guide is sourced from Geekseh's Layali Grove solo tips video (12:13, published 2026-02-20, 21.6K views) and the in-raid map screens and key-card pricing captured from its footage — the Lab Building Archive Room key's 1.1-million-alloy price quoted in narration matches the exact 1,101,808 figure visible on screen. Per this catalogue's own content-planning notes, Layali Grove has not been reworked since this video was recorded, so its named POIs and general layout remain valid; specific key-card contents and prices should still be treated as subject to normal seasonal drift.
What this guide doesn't answer
This guide doesn't give room-by-room loot callouts or a turn-by-turn extraction route — the source video is a mindset-and-economy guide rather than a POI-by-POI walkthrough, and its own advice is to learn overlooked spots yourself using an interactive map rather than memorizing a callout list. It also doesn't cover Layali Grove on Normal difficulty specifically (this guide's advice is framed around the solo, Easy-mode experience), and it doesn't cover team-based strategy, since every tip here comes from a solo-focused source.
Read next
Delta Force Cracked Map Guide: Movement Routes, Climbs and Positioning (Warfare)
A movement-tech focused walkthrough of Cracked's rooftop dash chains, AC-unit and pole climbs, balcony bounces and the Graveyard callout, plus point-holding basics like tank and sniper awareness.
Delta Force Money & Loot Farming Guide: AZ3 Routes (No-Risk Knife/Pistol Run)
A cheap, low-risk knife-and-pistol loot run on Delta Force's AZ3 map: kit setup, spawn map reading, radiation and pass key mechanics, and full north and south routes.
Delta Force Brakkesh Map Guide: All Extracts and Full Tower Tour
Brakkesh's New Tower of Babel gates two of the map's four extraction points behind timed levers and a signal-jammed maze. Full breakdown of every extract on Normal and Hard difficulty, plus a room-by-room tour of the tower.
Delta Force Space City 2.0 Map Guide: Water Routes, Docks, Hudson Boss and Loot Changes (Season 8)
Season 8's Space City 2.0 rework covers every swimmable water route, the new docks area, the Hudson boss encounter, the reworked central-building interior, CEO office keycard spots and the buoyancy flood mechanic — plus what didn't change.