
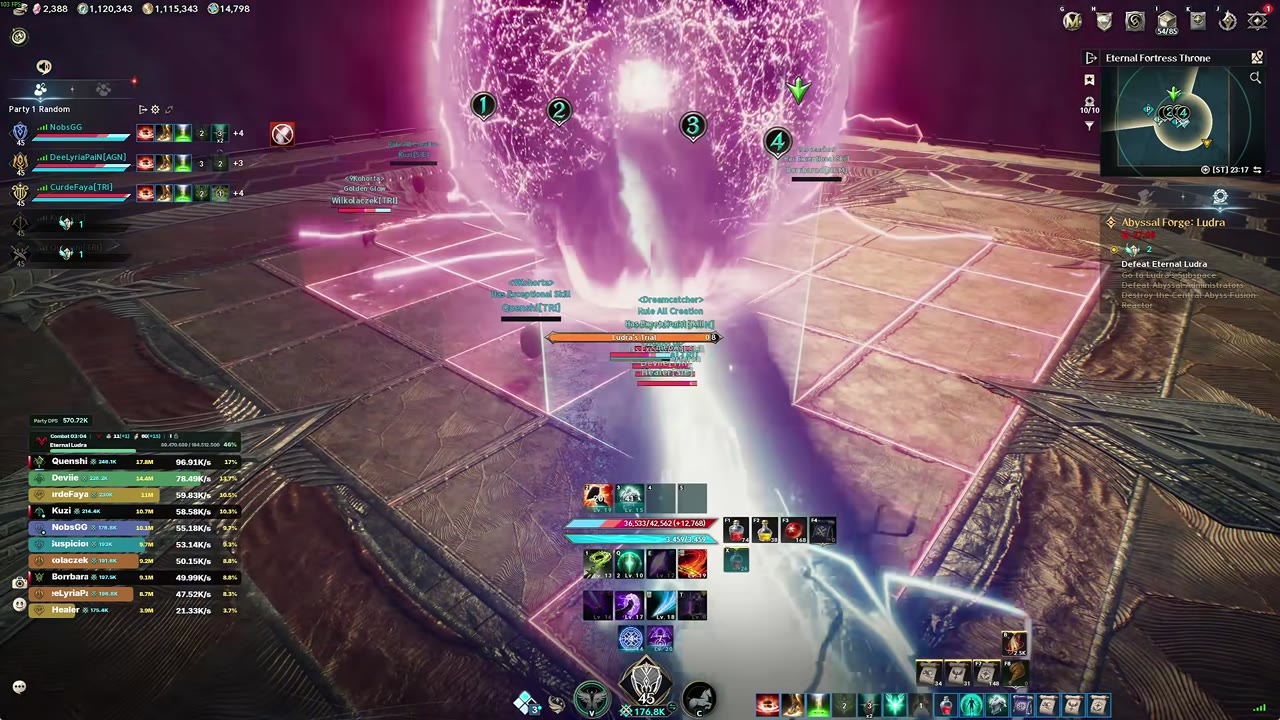
Abyssal Forge Ludra is the first sanctuary raid for 10 players in Aion 2, and almost every wipe on it comes from a mechanic the group did not recognise in time. This page walks through each mechanic, then both phases in the order Ludra casts them, so your raid can assign jobs before the pull and call each attack as it starts.
Quick answer
| What | Answer |
|---|---|
| Red orb | Tank soaks it with Block, always in front of the boss; no block wipes the raid |
| Bingo | Only 1 safe spot among the tiles; run inside it, where you are immune to attacks |
| Bingo setup | Leader marks 4 central tiles with numbers; party 1 stands in them, party 2 outside |
| Tornadoes | Ranged players gather them and drive them away from the melee |
| Zikel lasers | Lasers come from south, then west, east, and finally north |
| Templar Block | Block level 10 to move while blocking |
| Colors | Red players go right, blue go left; opposite colors tether and take massive damage |
| Ure's Area | Enter your color's safe spot about 1 second before the cast ends |
Prepare the raid for Ludra
Zoom your camera all the way out before the pull. This fight allows more zoom than usual, and seeing the whole arena is what lets you read orbs, rings and tornadoes before they reach you.
Agree on positions before anyone touches the boss:
- Tank: stands on the opposite side of the arena from the rest of the raid at the pull 2:40. A Templar tank needs Block at level 10 or higher, because the phase two red orb has to be caught while moving.
- Leader: marks 4 central tiles with numbers for Bingo 1:21, and places a green marker on the north side of the arena. Phase two always starts with Ludra at the north, and the marker gives everyone a fixed reference for every directional call after that 6:22.
- Everyone else: claim a Bingo spot in chat as party and number — "party 1 number 1", "party 2 number 3". Party 1 stands inside its numbered tile; party 2 stands outside its number.
- Ranged players: know in advance that tornadoes are your job.
Soak the orbs and the red orb
Orbs fall several times in the fight. Any orb that reaches the ground deals massive damage to the raid, so every one has to be caught on the way down. They spawn at the same locations every time, which makes them easy to pre-assign.
- 0:29
- only the tank can take it; no block wipes the raid
- 3:05
- Templar needs Block level 10 to move while blocking · 7:40
- 8:09
The red orb is the one mechanic in this fight with no margin. If the tank is out of position or Block is on cooldown when it falls, the whole group dies. Tanks should hold Block for it rather than spend it on a hit they could dodge.
Resolve Bingo in phase one
The arena floor is a grid of tiles. Players are targeted with AoEs, and each AoE that lands on a tile reveals whether that tile is the safe spot. There is exactly one. When someone uncovers it, a distinct sound plays — that is Bingo, and everyone runs inside 0:54. Inside the Bingo cube you are immune to every attack.

A tile that has already been hit by an AoE damages anyone standing on it. Route through unrevealed tiles or tiles you know are clean, not across the ones your raid just bombed.
Follow the phase one sequence
Phase one runs the same sequence every time, so once you know it you can call each attack before it lands.

- 2:40
- 3:05
- no action needed
- 3:34
- players drift to his back; a tank holding ground gets them cleaved · 4:03
- 4:30
Handle tornadoes, eye markers and big hits
These attacks recur across both phases. Each has one correct response.
Eye marker. A player is marked with an eye, and a few seconds later a large AoE lands on them. Carry it away from the group; standing in the stack turns one player's mechanic into everyone's.
Tornadoes. Each tornado follows whichever player is closest to it 4:30. Melee players hug Ludra as tightly as they can so the tornadoes never pick them. Ranged players collect the tornadoes and drag them away from the melee. If kiting in circles is going badly, run in one straight direction instead. A plus-shaped AoE lands while the tornadoes are out 4:57, so keep watching the floor while you kite.
| Attack | What it looks like | Response | Blockable |
|---|---|---|---|
| Eye marker | Eye icon over one player | Marked player leaves the group | — |
| Tornadoes | Tornadoes spawning from the middle | Melee hug Ludra, ranged kite them away | — |
| Double hit | Ludra raises a hand, every player targeted | Dodge or block | Yes |
| Pizza | Large double-hit AoE with one safe slice | Stand in the safe slice, then move to the opposite side | Yes, both hits |
| Floor AoEs | Several AoEs under players' feet, hitting twice | Spread around the arena and dodge the second hit | — |
| Side breath | Breath sweeping from one side to the other | Run to the opposite side | — |
| Whole-arena target | Ludra jumps and targets the full arena | Run all the way out | — |
Pizza is the raid's name for a large double-hit AoE 8:35. The first hit leaves 1 safe spot; the safe spot for the second hit is on the opposite side. Both hits can be blocked, which is the easier option for a tank.
The floor AoEs that hit twice are the hardest of these to learn, because the animation is easy to miss 9:02. Spreading out is the whole answer — it keeps one player's double hit off everyone else.
Beat the Zikel sequence and double jumps in phase two
Phase two opens with Ludra at the north. The new attack here is the double jump: Ludra casts rings across the arena and you jump over each one.
When Ludra flies away in phase two, he starts the Zikel sequence 6:50. Zikel strikes and lasers come at the raid together, and both always follow the same pattern.

| Order | Laser comes from | If you face the first one, look… | Zikel strike |
|---|---|---|---|
| 1 | South | Straight ahead | Left to right |
| 2 | West | To your right | Diagonal |
| 3 | East | Behind you | Through the middle |
| 4 | North | At the boss | Diagonal |
The Zikel strikes rotate counter-clockwise, so once you have the first one placed the rest follow 7:14. Straight after the sequence, orbs fall while Ludra casts another double jump — soak and jump together, and the tank catches the red orb with the jump-block-cancel-jump routine from the orb section.
The first Zikel sequence arrives at around 70% HP. Wait for the first attack to land, then move in and dodge the lasers in order 11:48.
Resolve Colors, the second Bingo and Ure's Area
These three are the late mechanics that end most attempts.

Colors starts when Ludra raises a blue orb in his left hand and a red orb in his right 9:31. Every player is marked with a blue or red aura.
- 10:00
- near an opposite color, you tether and take massive damage
- makes room for the other color running toward you · 13:11
- 10:28
- there is barely time after the second AoE hits
- 1 player per spot
- too early and the immunity runs out before the AoE · 10:55

While Colors is active, every other mechanic you have seen can come in close to random order, including tornadoes, orbs, double jumps and Zikel. Solve each of them without crossing into the other color's half.
The second Bingo is far less forgiving than the first: orbs must be collected much faster. Assign the 4 edge players before the pull so nobody has to decide mid-mechanic who goes for them.
Run phase two in order
Phase two follows the boss's HP rather than a strict loop. At normal raid damage, expect this order 11:22:
Also worth knowing
- The fight gets noticeably harder below 35% HP. Save defensive cooldowns and your most reliable players' attention for the last stretch rather than spending them early.
- Two mini-bosses come before Ludra in the Abyssal Forge. Clear and learn those first; they are part of the same run.
- The tail swipe outside the pull catches players who are not watching for it, and there is no reliable tell yet for when it comes. Staying off Ludra's rear while the tank repositions is the safest habit.
- Whether classes other than Templar can soak the red orb is not settled. The requirement is a block, so check your own class's blocking skill before volunteering.
Frequently asked
Which Ludra attacks can be blocked?
The double hit that every player is targeted with, and the large double-hit area attack nicknamed pizza, can be dodged or blocked. The red orb can only be soaked by the tank, and it requires a block. The ring attacks are handled by jumping over them.
How does the tank pick up the red orb while jumping the double rings?
Jump over the first ring, use Block in mid air, then cancel Block to jump over the second ring. A Templar needs Block at level 10 or higher to be able to move while blocking. Not picking up the red orb with Block wipes the entire group.
How do I know whether I am red or blue in the Colors mechanic?
Spread around the arena as soon as the animation starts, then check your own character, which holds a color the same way Ludra held his red and blue orbs. Red players go right and blue players go left. After that, stay on your own side of the arena so you are never tethered to an opposite-color player.
How should a raid handle the tornadoes?
Melee players stand as close to Ludra as possible so the tornadoes do not target them. Ranged players pick the tornadoes up and drive them away from the melee, moving in one direction to kite them. Plus-shaped area attacks land at the same time, so watch the ground while kiting.
Read next
AION 2 Item Level Progression Guide: From Level 45 to 2,500
A route from level 45 to 2,500 item level that raises combat power at the same time and spends no real money. It is for free-to-play players who want to avoid wasting Odyle Energy and getting gatekept at endgame.
AION 2 Daily and Weekly Routine for Fast Endgame Progression
This guide lays out every daily and weekly activity worth doing in AION 2, which rewards to prioritize, and when to do each one. It is for players at the endgame who want to raise Gear Score and Combat Power as fast as possible.
How the Daevanion Board Works in AION 2
This guide explains how the Daevanion board works in AION 2 and which nodes are worth your points, whatever your class. It is for players who find the board confusing and want a priority order they can apply themselves.
How Crafting Works in AION 2 and How to Get Crafted Gear
Crafted gear is the strongest equipment in AION 2, and this covers how profession ranks, success chances and combos work, and how to level up and gather materials for a crafted weapon. It is written for players starting crafting who want a weapon and accessories they can keep upgrading.