
This route takes you from level 45 to the 2,500 item level breakpoint without spending real money, and it builds combat power at the same pace so groups do not turn you away at endgame. Each stage below gives you the order to run content in, the point to stop, and where to spend what you earn.
Quick answer
| What | Answer |
|---|---|
| Abyss entry | 1,000 item level, then finish the main story quest |
| Gear enhancement | +10 on every piece before moving to Transcendence |
| Transcendence start | 1,900 item level where possible |
| Arcana card value | Blue 60, green 40, white 20 item level |
| Combat power floor | 95,000 at 2,100 item level, ideally 100,000 |
| Stigma Shard | About 100 combat power each, with bonus tiers at levels 5, 10, 15 and 20 |
| Manastone rolls | Gold 4, blue 3, green 2, grey 1 item level |
Reach 1,000 item level after level 45
You cannot enter the Abyss until 1,000 item level, so the first stretch is about collecting every cheap point the open world offers. Daevanion Crystals are the backbone here: each one placed on the Daevanion board adds one item level. On that board, take offensive nodes such as critical hit and attack bonuses before defensive ones like MP or defense, which add far less attack power.
Wisdom Stones come from the same sealed dungeons and unlock skill breakpoints. Level 12 adds an extra slot and a skill bonus, and the stones later help push a skill to level 16.
- 0:31
- 1:30
- push the stronghold meter to 67% first
- monolith at level 30 gives enough to take the amulet to legendary
- green to blue ≈ +15 item level, to legendary ≈ +19 · 2:26
Sealed dungeons, side quests and the upgraded belt and amulet are enough to reach 1,000 on their own.
Enhancement stones are the usual bottleneck. The strongest source before 1,400 is the purple portal that opens at the third hour mark: take it to the other faction's side and run the sealed dungeons there 2:55. The daily dungeon also pays out stones, but the reward grows with how well you do, so leave it until your character is stronger.
Climb from 1,000 to 1,400 item level
At 1,000 you enter the Abyss and the main story quest hands you the gear you will build on for a while. Keep going until the quest log reads level 46, waiting for the next journey.
- 3:25
- it stays in use until the 2,800 item level raid
- 41 item level in total · 3:54
- a failed second attempt throws the gain away
- opens at 1,000, then rises in steps of 50 · 4:23
- keep the rest for Stigma Shards
- step three costs 200 of the currency — only if you need it
- 36 item level · 5:49
- 6:17
- Garuta can drop level 70 gear, equal to 1,400 dungeon drops · 6:45
The blue pieces are the best you can manastone until your first 1,400 dungeon, which is why they get the stones now. The Shugo Festival currency is better spent on Stigma Shards once the cheap crystal steps are gone, since those raise combat power directly.
Farm Urugugu Canyon and Vakron Sky Island for gear
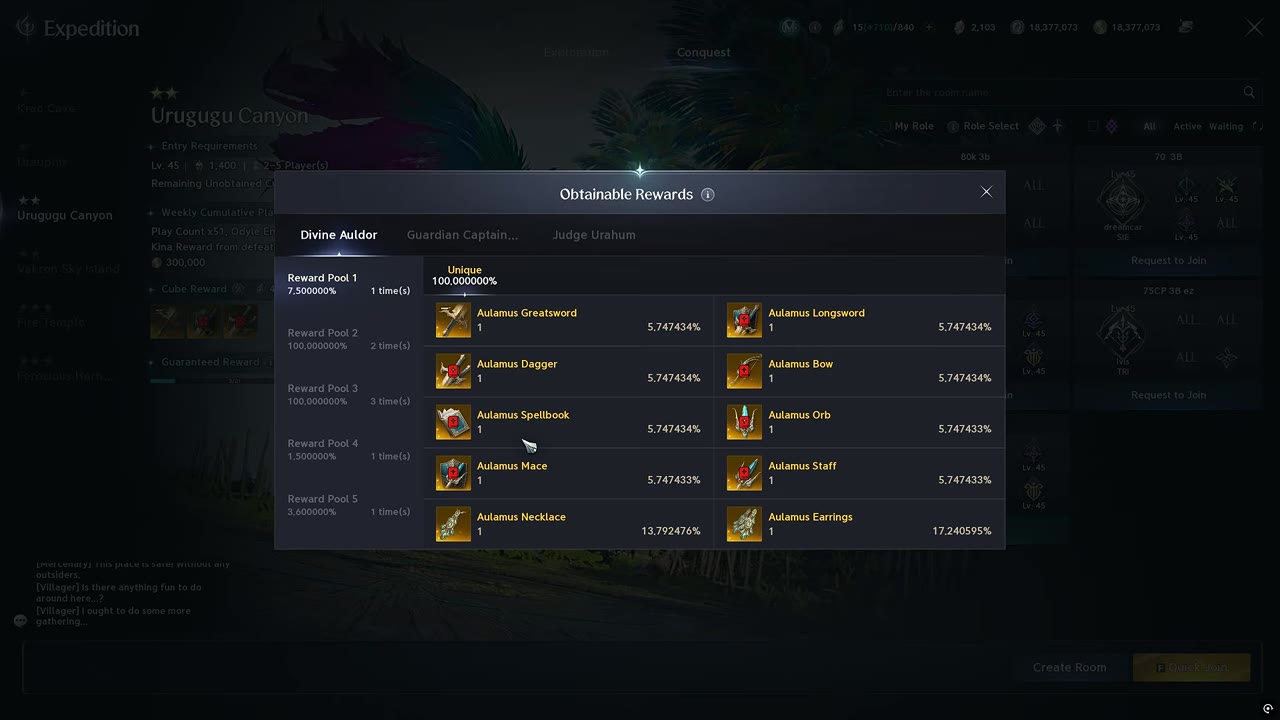
Urugugu Canyon comes first because it drops necklaces, rings, earrings and a weapon, and the attack on that weapon converts well into combat power. Vakron Sky Island follows. The rule throughout is to take the gear change voucher at every pity rather than the item: the voucher lets you claim a guaranteed piece later, for whatever slot is still empty, instead of risking a duplicate. You can wear only one necklace, two earrings and two rings, so a duplicate is a wasted pity.
- 7:42
- 8:11
- usually two to three pities
- 8:40
- finish a pity rather than stopping halfway
- 10:05
- +10 to +11 gets expensive and can fail · 11:01

The odds are better than the reward screen suggests. The chest and the bonus reward pool stack, so each run carries about a 15% chance of an item — roughly one in six or seven. An average pity run lands around three legendaries.
You can try Transcendence with nine pieces and lean harder on enhancement, but past +10 you are trading Odyle Energy savings for kinah and stones at worse rates. Ten pieces is the safer line.
Use Transcendence and Arcana cards to reach 2,500
Arcana cards from Transcendence are the largest item level jump in the route: each blue card adds 60, each green 40 and each white 20. The earlier you start, the weaker the stage you can run, so waiting for 1,900 pays off when your gear allows it.
- 11:31
- start here directly if your progression allows · 12:00
- Research Base is the easier of the two
- 14:25
- 15:24
- 15:53
- expect two to five runs

A full card set added about 220 item level and moved a character from 1,900 to 2,100 in roughly three Arcana runs. A single good Fire Temple or Ferocious Horn run can then carry you from 2,100 to about 2,220.
When choosing between the two 2,100 dungeons, take the one that raises combat power over the one that only raises item level. Ferocious Horn is much harder, so it comes second.
At stage 3 the chance of a legendary card is 62%, against 12% at level three. Every run spent in the 2,200 stage beyond what you need is a run at the worse odds. Blue card upgrades succeed about 50/50, which is why finishing a gold set varies so much between players.
Choose a Manastone or Transcendence route for the 2,500 breakpoint
How close you are decides the route. A small gap is cheapest to close with kinah; a large one is cheaper in runs.
| Route | Best when | What it gives | Cost |
|---|---|---|---|
| Intermediate or superior Manastones | You are 10 to 20 item levels short | Gold 4, blue 3, green 2, grey 1 item level per stone; higher grades roll better effects more often | Intermediate roughly 100,000 kinah, grey superior roughly half a million |
| More stage-3 Transcendence at 2,200 | You are still far from 2,500 | Arcana upgrades and gear drops | Odyle Energy |
| Theo Stones from the black cloud merchant | Only when discounted by about 50% | Put the stone on your weapon | Expensive at full price; ranks below both routes above |
Manastones are sold in the market under consumables 24:57. They are an item level tool rather than a combat power one: a stone adds little combat power unless a blue rolls attack, and that combination is rare.
Build combat power alongside item level
Item level opens content; combat power is what other players check before inviting you. The target to hold is at least 95,000 by 2,100 item level, and most groups at that point look for 100,000 or more. Everything below runs in parallel with the item level route above.
Stigma Shards are the core of it. One shard is worth roughly 100 combat power, and the breakpoints add much more: 500 at level 5, growing at levels 10 and 15, up to 2,000 at level 20 19:41. The skill passives unlocked along the way also lift your damage, which makes clears faster. In the Shugo Festival shop, buy shards until they sell out, then spend the rest on Daevanion Crystals or Odella currency. In Nightmare, buy as many shards as you can and push the highest level you can clear before running other dungeons.
Abyss Points buy more shards in the Abyss shop, and several weekly sources feed them:
| Source | Abyss Points | Notes |
|---|---|---|
| World boss gear handed in at supply request → regular boss | Green 10,000, blue 13,000, gold more, up to 100,000 | Join every world boss train you see 20:10 |
| Battlefield | Three runs at 4,000 = 12,000 a week | 5-minute matches, about 15 minutes for one extra shard a week; check the timer, it is not always open |
| Siege portals | Roughly 10,000 per portal | Left, middle and right portals, 2 minutes of kills each |
| Command merchant scrolls | Varies | Work like Abyss side quests; also pay Odyle Energy and Shugo keys |
For sieges, check the siege timer in the Abyss. When it is counting down, click the left, middle or right portal to teleport in, then kill as many enemies as you can in 2 minutes 21:36. Three portals in 6 minutes come to 30,000 Abyss Points and three shards. Afterwards, buy every scroll from the command merchant nearby; it costs kinah and pays back well.
A gold Archon card needs five Mysterious Crystals. It lets you pick the gold card you want and add two extra effects, which is one way to take a skill to level 16 22:32. The crystals come from three places:
- Grind surplus Arcana cards in the grinder for the first crystal.
- Buy the second in the season shop under growth.
- Earn up to three more from the Tower of Trials in Challenge Season by scoring 4,000 or higher. That needs a clear time of 3 minutes 26 seconds in Ascension Trials on hard or above, which means at least 2,000 item level and strong damage.
Keep any legendary with percentage-based effects — damage boost, combat speed, critical damage — for Soulbinding instead of dismantling it or feeding it to enhancement. In the season shop, save for the wings: they add combat power, attack bonus, accuracy, cooldown and defense bonus.
Beat the Research Base, Fire Temple and Ferocious Horn bosses
Research Base
The first boss has two mechanics. When it summons a giant red circle, jump over it or you are stunned. When it sends out wisps, collect only one colour; once you have enough, they draw a circle around you — stand in it and keep attacking 12:57.
The later boss sends a line of marching soldiers across the platform. Stay out of their path and keep near the centre, where a knockback leaves room to recover. When a blue line tethers you to another player, move apart until the chain triggers, then everyone gets into the area attack — whoever stands in it alone is killed 13:26.
In the final phase the boss's stagger bar becomes breakable. Break it in that window or the party is pushed off the platform and wipes. Once it breaks, the fight is effectively over.
Fire Temple
The final boss opens with waves, then projectiles. Dodge, then run diagonally between them for the most space. Her front swipes hit too hard for most classes to stand in, so dodge behind her 17:18.
Her most dangerous phase summons fallen angels. Their first attack usually misses; the second teleports behind you. Watch the yellow line and dodge at the last second to perfect-dodge through it.
Ferocious Horn
- Clone attack: if your circle is small, get inside it; if it is bigger, nobody enters it. Getting this wrong kills the whole party 17:47.
- Claws: they kill instantly whatever you are doing, so dodge behind them.
- Dash: the boss always dashes three times.
- Red puddles: never stand in them, and kite the boss away from them. Tanks dragging the boss into a puddle is the most common reason melee players die here.
- Black hole: at low health the boss summons one. Stand between the black hole and the boss 18:46. If you die in this phase, stay down unless the boss is on the opposite side, or you will pull your team into it.
Also worth knowing
- A pity takes 21 runs, or 11 with a membership, for both Urugugu Canyon and Vakron Conquest — plan your energy around that.
- Hold the Vakron Exploration pity chest until Conquest has pitied at least once. Claiming it later lets it fill a gear slot that is still empty.
- Choosing both skills on a gold Arcana card costs 15 stones per Arcana, not 5.
- You only need enough feathers to max the monolith, not every feather in the Abyss.
- The Pet Genus is a large combat power boost that this route does not cover. If your item level falls short for Transcendence stage 4, a Gold Chalice can be crafted instead.
A failed Nightmare run is supposed to cost no ticket, but some players report being prompted to re-enter at the cost of one. Check your ticket count after a failure.
Frequently asked
How do Gear Vouchers work in Vakron Sky Island?
Claiming the gear change voucher at a pity lets you take the guaranteed reward later as insurance against duplicate items. Clear the Conquest version first and hit its pity, which can take two to three rounds, then take the voucher. Claim the Exploration pity chest only afterwards, for the piece you are still missing.
Should I run Urugugu Canyon or Vakron Sky Island first?
Run Urugugu Canyon until you hit pity once, then move to Vakron Sky Island. After that, add up the drop percentages shown for the pieces you still need in each dungeon and keep running the one with the higher total until it pities again. Finishing a pity is better than stopping halfway.
When should I start Transcendence in AION 2?
Start at 1,900 item level if you can, because Arcana cards then give a large item level jump. At 1,600 you can run each Transcendence dungeon once at the first stage to get cards. Equip whatever cards drop at that point.
How do I get the five Mysterious Crystals for a gold Arcana card?
Grinding surplus cards in the Arcana grinder gives the first crystal, and the season shop under growth gives the second. The Tower of Trials in Challenge Season gives up to three more once you reach a score of 4,000 in Ascension Trials. That takes a clear time of about 3 minutes 26 seconds on hard difficulty or above, which needs roughly 2,000 item level and strong damage.
Read next
AION 2 Daily and Weekly Routine for Fast Endgame Progression
This guide lays out every daily and weekly activity worth doing in AION 2, which rewards to prioritize, and when to do each one. It is for players at the endgame who want to raise Gear Score and Combat Power as fast as possible.
AION 2 Skill Level 16: How to Raise Skills Past the Cap
Wisdom stones stop raising a skill at some point, but three other systems keep adding levels: Daevanion boards, Arcana cards and rerolled gear stats. This guide is for players whose active and passive skills have stopped leveling.
AION 2 Ranger Endgame Build: Rotation, Gear, Arcana and Stigmas
Covers the high-end AION 2 Ranger setup: rotation and macro, skill levels, gear stat lines, Arcana cards, power systems and stigmas. Aimed at Rangers around 2.1k to 2.8k item level who want maximum damage before the next raids.
How the Daevanion Board Works in AION 2
This guide explains how the Daevanion board works in AION 2 and which nodes are worth your points, whatever your class. It is for players who find the board confusing and want a priority order they can apply themselves.