
🎯 The core idea
Moder is Valheim's fourth boss, a 7,500-health frost dragon in the Mountains. Find her altar with a Vegvisir, carry three 200-weight Dragon eggs to it, and fight her from behind hoe-raised earth pillars. Wear frost resistance, eat Mountain food, shoot her while she flies and hit her hard whenever she lands. Her 10 Dragon tears unlock the Artisan table, and her 1.0 power adds +300 carry weight.
- free costs nothing
- cheap small cost
- setup needs preparation
- grind pays off slowly
- skip the thing to stop doing
Moder location: the Vegvisir in Frost Caves and Mountain ruins

free You don't need to search every peak for the Moder location. Like every boss, her Forsaken altar is revealed by a Vegvisir. The video calls it a "rune", but the frame above shows the real prompt: "Vegvisir: Moder, Register location". Read it and the nearest altar appears on your map.
The video finds its Vegvisir inside a Frost Cave, the dungeon with the icicle-covered entrance. The Valheim wiki agrees that Frost Caves may contain one, and its Moder page adds that they also sit at the top of ruined structures in the Mountains. Check both. Frost Caves hold Cultists, Ulvs, Bats and the odd Stone Golem, so go in with silver-tier gear, not your Swamp kit.
If you came here from the earlier bosses, this is the same loop as the Eikthyr boss guide, the Elder guide and the Bonemass guide: find the Vegvisir, gather the offering, prepare, then summon.
Valheim dragon eggs: where to find them and how to carry them

grind Moder needs three Dragon eggs. You take them from Drake nests, the rock-and-ice nests with a glowing pink egg in the middle. Per the wiki, each world has 200 of them, always above 100 metres altitude on fairly flat ground. Each nest has up to three Drakes guarding it, each with a 66% chance to spawn, and they don't respawn. The egg itself grows back 8 hours after you take it.
The hard part is the weight. Each egg weighs 200, as the video says and the wiki confirms, and eggs can't go through a wooden portal. The video's fix is the Megingjord belt from Haldor the trader, which the wiki prices at 950 coins for +150 carry weight. You can see the creator wearing it in the HUD.
Don't haul eggs across the sea. The wiki notes that there are almost always three nests in the same Mountain biome as the altar. Move one egg at a time if you have to, and clear the Drakes first so nothing knocks you off a slope while you're overloaded.
Gear for the cold: frost resistance from wolf armor or Frost resistance mead

setup The Mountains apply Freezing, and Moder brings it with her. Her aura forces Freezing even outside the biome. Per the wiki, Freezing stops all natural health regeneration, cuts stamina regeneration by 60% and deals 1 damage per second. You need frost resistance before you summon her.
You have three ways to get it, and they don't stack:
| Source | Where it comes from | Notes |
|---|---|---|
| Wolf fur cape | Workbench: 4 Silver, 6 Wolf pelt, 1 Wolf trophy | What the video wears. Leaves the chest slot free |
| Wolf hide chestpiece | Forge: 20 Silver, 5 Wolf pelt, 1 Chain | Part of the Wolf set the video recommends |
| Frost resistance mead | Mead ketill: 10 Honey, 5 Thistle, 2 Bloodbag, 1 Greydwarf eye | Makes 6 meads after fermenting. Lasts 10 minutes |
The video recommends the full Wolf set: the Drake helmet (20 Silver, 2 Wolf pelt, 2 Drake trophy), the Wolf hide chestpiece and the Wolf hide trousers. The creator swaps two pieces. They wear the Wolf fur cape for the frost resistance and a Root harnesk in the chest slot. Per the wiki, the harnesk is Resistant to pierce, which suits Moder's bite and icicles, but it's also weak to fire.
They also wear an Iron Brooch, a trinket added in 1.0. Per the wiki it fires automatically once you build 65 adrenaline and gives +50 health and +20 armor for 30 seconds. You craft it at the Forge from 5 Iron, 5 Ancient bark and 1 Leech trophy.
One catch from the wiki: frost resistance doesn't stop Freezing while you're Wet. Don't fight her right after a swim or in the rain.
Moder weakness: fire, plus the weapons and arrows that work

free The wiki's resistance table gives Moder exactly one weakness: fire, at 1.5x damage. She takes normal damage from blunt, slash, pierce and poison. She's immune to frost, spirit and stagger. So leave the Frostner at home. Her frost immunity makes it worse than a plain Iron mace.
The video's loadout:
- Iron mace for melee. Per the wiki it deals 55 blunt at base quality.
- Shield of Roots, the 1.0 round shield made from Finewood and Writhan roots. It has 48 base block armor and no movement penalty. The video mentions the Silver shield (60 base block armor, -5% movement) as the common alternative, and the wiki's strategy page says it parries her claw swipe easily.
- Draugr Fang, fully upgraded. It's a silver bow with pierce plus poison damage.
- Obsidian arrows: 52 pierce each, crafted 20 at a time from 8 Wood, 4 Obsidian and 2 Feathers at a level 3 Workbench.
The video says players are split between fire and obsidian arrows. The wiki settles it: arrow effectiveness runs Needle > Obsidian > Fire > Poison. Even with her fire weakness, fire arrows hit slightly softer than obsidian ones, but they're easier to craft. Watch your bow's durability too. The wiki warns that a bow can break mid-fight in solo play. If it does, switch to melee and keep going.
Food and meads for the Moder fight

cheap The video eats Onion soup, Eyescream and Wolf skewers, and the wiki's numbers show why that mix works:
| Food | Health | Stamina | Duration | Recipe |
|---|---|---|---|---|
| Onion soup | 20 | 60 | 20 min | 3 Onion, level 2 Cauldron |
| Eyescream | 21 | 65 | 25 min | 3 Greydwarf eye, 1 Freeze gland, level 3 Cauldron |
| Wolf skewer | 65 | 21 | 25 min | 1 Wolf meat, 2 Mushroom, 1 Onion, level 3 Cauldron |
The video calls Onion soup the best food available here. The wiki disagrees on that detail. Eyescream gives more stamina (65 vs 60), and Onion soup is second best. Onion soup's real advantage is that you only need one crop to make it. You get Onion seeds from chests in the Mountains.
For potions, the video brings Medium healing mead and Minor stamina mead. Both are brewed as a mead base at the Mead ketill (the video's "meat kettle") and then fermented for two in-game days, which gives six of each. Per the wiki, Medium healing mead restores 75 health over 10 seconds and Minor stamina mead restores 80 stamina over 2 seconds. Each type has a 2-minute cooldown. If you have Tasty mead, the wiki lists it as another good stamina option. Get the Rested buff before you leave base too.
Build earth pillars with the hoe before you summon

setup This is the single most useful thing the video does. Around the altar, the creator uses the hoe's Raise ground option several times on the same spot to build tall earth pillars. When Moder breathes ice, you step behind a pillar and the beam hits the dirt instead of you. The wiki's boss-strategy page recommends exactly this.
Her attacks deal heavy chop and pickaxe damage, so natural rocks and trees around the altar break. The video shows her smashing boulders, and the wiki confirms it. Raised terrain is your cover. Build several pillars around the altar so there's always one nearby when she lands somewhere new.
A few more setup tips from the wiki's strategy page:
- Clear Drakes and Stone Golems from the area first.
- Start in the morning. At night, starred Wolves and Fenrings can join in.
- Keep a forge or a portal close in case your weapons break.
- Moder can attack large exposed buildings she sees, so don't build a fancy shelter right next to the altar.
How to summon Moder at her Forsaken altar

cheap To summon Moder, put all three Dragon eggs on her Forsaken altar. The frame above shows the three pink eggs in place on the altar. Per the wiki, you can set the eggs on the platform without starting the fight. That frees up carry weight, so you can bring them in one at a time and summon once you're ready. Like every boss, she can be summoned again as often as you bring eggs.
When the third egg goes in, she rises and the "Moder is enraged" banner appears. Go straight to your pillars. In the video the creator opens with the bow from cover and doesn't rush in.
Moder attacks and how to avoid each one

free The wiki lists four attacks. Two are melee swipes she only uses on the ground. The other two are frost attacks with long range:
| Attack | When | Damage | Cooldown | Range | How to handle it |
|---|---|---|---|---|---|
| Bite | Grounded | 120 pierce | 30 s | Within 7 m, 8 m arc | Block, parry or roll. Don't stand at her head |
| Claw | Grounded, either claw | 110 slash | 30 s per claw | Within 10 m, 12 m wide arc | Parry with a Silver shield or roll away |
| Ice barrage | Airborne | 16 icicles, each 30 pierce + 200 frost | 8 s | 5–25 m | Run sideways, roll or block. Put terrain between you |
| Cold breath | Grounded | Up to 200 frost | 8 s | 30 m beam, she tracks you | Get behind a pillar before it starts |
Every attack also deals 200 to 1,000 chop and pickaxe damage. That's why she wrecks rocks, trees and buildings. The Cold breath is the attack that hurts most in the video. The creator takes a big hit from it in the open, then waits behind a pillar to heal. With frost resistance on, the frost part of the breath and the icicles drops to half.
Moder's flight phase and the ice barrage

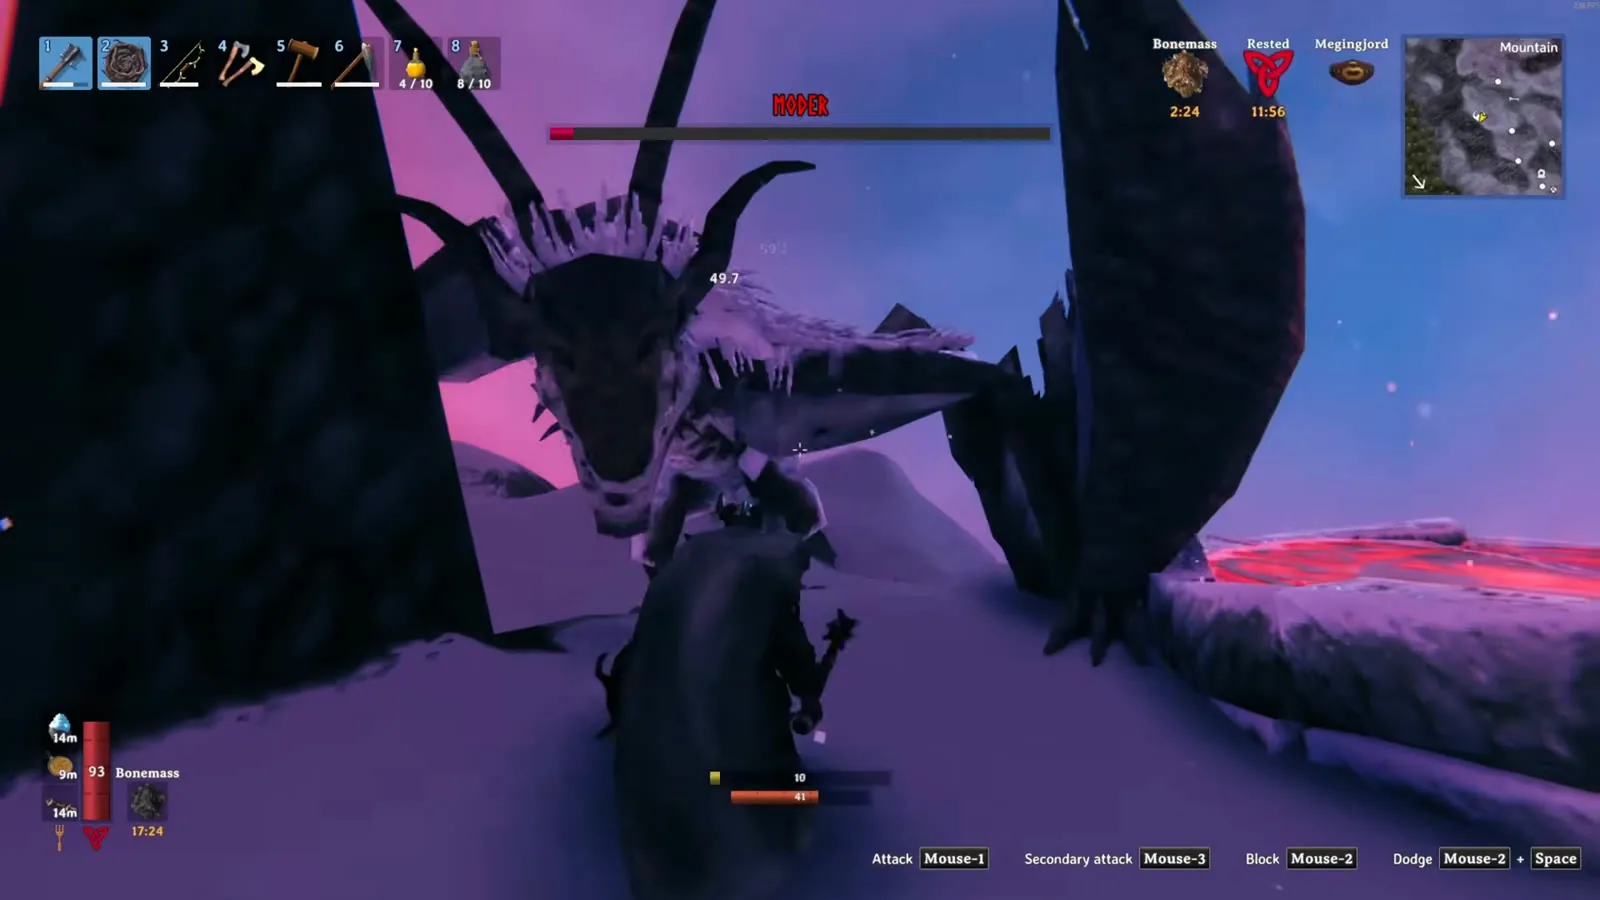
free Moder switches between flying and landing. While she flies, she fires the Ice barrage. Per the wiki, the icicles leave player-sized ice crystals in the snow that fall apart after 30 seconds. Each crystal only has 10 health, so you can break any that block your path. The frame above shows the crystals standing between the player and the pillars.
Flight is bow time. The video's tip is to stay near your pillars and shoot. A bow won't do huge damage, but it's the safest way to chip at her while you wait for her to land. She's a big target, but the creator notes she moves around a lot, so expect to miss some shots. Don't chase her across ledges. In the video she lands near a cliff, the creator refuses to follow her onto it, and later she falls off the mountain on her own. Losing your footing costs more than a few seconds of waiting.
Fighting Moder in melee when she lands

setup The wiki's strategy page puts it plainly: you do the most damage in melee when she lands. The video does the same. After the breath, the creator closes in with the Iron mace, parries the claw swipe and lands heavy hits until she takes off again.
Three details help here:
- Parry, don't just block. The video shows a parry opening up big damage. The Iron mace has a 2x parry bonus, and both shields in this guide can parry.
- Stay close to her body. Per the wiki, the Cold breath only fires at targets 5 to 20 metres away, but that's measured from the centre of her body, about 5 metres behind her head. Hugging her is hard, but it can shut off the breath. The wiki even notes you can get stuck underneath her, out of reach of her attacks.
- She doesn't climb well. If she can't see a flat path to you, she barely moves until she flies again. That's the wiki's reason to fight on rough ground near your pillars.
For an even safer bow-only plan, the wiki describes digging a hole beside the altar and shooting straight up from under her. It also says to expect to need 300+ arrows and a fully upgraded bow for it.
Moder solo: handling Stone Golems, wolves and Drakes

setup The whole video is a Moder solo fight, and the scariest moment isn't the boss. Partway through, a Stone Golem walks into the arena and the creator has to drink a Medium healing mead to survive it. Per the wiki, a Stone Golem has 800 health, takes double damage from pickaxes, half damage from slash and pierce, and is immune to fire and frost. The Iron mace's blunt damage hits it at full strength.
That's why the wiki says to clear Drakes and Golems before you summon. It also suggests trenches against golems and a pattern of overlapping Workbenches around the area. They stop creatures from spawning and can even pull Moder's attacks away from you. In the video the creator also uses the Bonemass power for 25% less physical damage, which helps against these extra creatures. See the Bonemass guide for how to unlock it.
Moder drops: Dragon tears and the Artisan table

free When she dies, "Moder is in tears" appears across the screen. The video ends before it shows the loot, so here's the wiki's drop table: 10 Dragon tears and 1 Moder trophy, every kill.
Dragon tears are what the fight unlocks. Each Artisan table costs 2 Dragon tears and 10 Wood. The wiki says you need it to build these within 40 metres:
- Blast furnace (for Black metal later)
- Spinning wheel (for Linen)
- Windmill (for Barley flour)
- Stone oven
So the Artisan table is your gateway to the Plains economy. You must have a roof and 70% cover to use it. Ten tears is enough for five tables, so you can put one in each base. The wiki also says Dragon tears glow when you put them on an item stand.
Killing Moder changes the world too. It stops the "A cold wind blows from the mountains" raid and allows "The horde is attacking!" if you haven't beaten Yagluth yet. The Bog Witch also starts selling the Scythe handle, Toadstool, Fragrant bundle and Mountain peak pepper powder.
Moder power: hang the trophy at the Sacrificial Stones

free Take the Moder trophy to the Sacrificial Stones where you first spawned and hang it on her stone to unlock the Moder power. This is the part older videos get wrong. Before 1.0, her power only gave a tailwind while sailing. The wiki's 1.0 patch notes rebalanced every Forsaken power, and Moder's now gives you all of this for 300 seconds:
| Effect | Value |
|---|---|
| Sailing | Always tailwind while you steer |
| Carry weight | +300 |
| Movement speed | +10% |
| Frost | Resistant (-50%) |
The +300 carry weight is the part you'll use most. It makes hauling Silver, Obsidian or another set of Dragon eggs easy. Per the wiki, all Forsaken powers share a 20-minute cooldown, which sleeping or logging out doesn't reset, and the power also affects other players within 10 metres. The tailwind only changes the wind direction, not its strength, and only while you're steering.
How this guide was fact-checked
The source is MrCoreRPG's Valheim 1.0 Moder video, uploaded on 24 September 2026, about two weeks after 1.0 launched. The live patch at the time of writing is 1.0.20. The wiki's version history from 1.0.00 to 1.0.20 shows no change to Moder's attacks or drops. The only 1.0-era change that matters here is the reworked Forsaken power, which the video doesn't cover. One 1.0.17 fix removed an invalid Shield of Roots variant on PlayStation 5, which doesn't affect the shield's stats.
From the community Valheim wiki (Fandom), which wins wherever it and the video disagree. Its Moder page was last edited on 13 September 2026, after the 1.0 launch.
- Health (7,500) and the resistance table
- The four attacks: damage, cooldowns and ranges
- Altar locations through the Vegvisir
- Dragon egg weight, nests and respawn
- Megingjord price and carry bonus
- Freezing and frost resistance sources
- Food, mead, arrow and shield stats
- Stone Golem resistances
- The drop table and Artisan table recipe
- The world events and Bog Witch unlocks
- The 1.0 Moder power and the shared 20-minute cooldown
The wiki.gg mirror refused automated access, so every wiki fact comes from Fandom.
From the video's own footage:
- Finding the Vegvisir in a Frost Cave
- The gear swap: Root harnesk, Wolf fur cape and Iron Brooch
- The Iron mace, Shield of Roots and Draugr Fang loadout
- The hoe-raised pillars
- Bow during flight and mace when she lands
- The Stone Golem showing up mid-fight
- Using the Bonemass power
Corrections to the video:
- "Rune": the marker is a Vegvisir. Per the wiki, it's in Frost Caves and also at the top of Mountain ruins.
- Best food: the video calls Onion soup the best food. The wiki gives Eyescream more stamina (65 vs 60).
- Fire vs obsidian arrows: the video leaves it open. The wiki ranks obsidian above fire despite her fire weakness.
- Drops: the video doesn't show the loot. The 10 Dragon tears and 1 trophy come from the wiki.
What this guide doesn't answer
- Group scaling and how many arrows you need: the video is a solo run and never counts arrows. Group fights change both, and that's a separate topic.
- The Root harnesk and Draugr Fang recipes in full: they're Swamp-tier gear. They belong in a gear progression guide, not a boss page.
- Silver mining and the Wishbone: you need silver for the Wolf set, but finding silver veins is covered by the Bonemass guide's Wishbone section and a future Mountain guide.
- Yagluth, the next boss: the Plains fight needs different preparation, starting with Fire resistance barley wine.
- Deep North content: the 1.0 Deep North boss is a separate fight, and nothing here applies to it.
- Mods and world modifiers: everything here assumes default 1.0 difficulty.
Frequently asked
How do you summon Moder in Valheim?
Place three Dragon eggs on Moder's Forsaken altar in the Mountains. Find the altar by reading a Vegvisir in a Frost Cave or at the top of a Mountain ruin. Each egg weighs 200 and can't go through a portal, so take them from Drake nests near the altar. Haldor's Megingjord belt (+150 carry weight) helps a lot.
What is Moder weak to?
Moder takes 1.5x damage from fire and normal damage from blunt, slash, pierce and poison. She is immune to frost, spirit and stagger, so frost weapons like the Frostner are a poor choice. The wiki still ranks Obsidian arrows above Fire arrows, and Needle arrows above both.
How do you beat Moder solo in Valheim 1.0?
Wear frost resistance (Wolf fur cape, Wolf hide chestpiece or Frost resistance mead), eat Mountain food such as Onion soup, Eyescream and Wolf skewers, and build earth pillars around the altar with the hoe. Shoot her with a bow while she flies, hide behind a pillar from her Cold breath, and hit her with an Iron mace or similar weapon whenever she lands. Clear Stone Golems and Drakes from the area first.
What does Moder drop and what are Dragon tears for?
Moder always drops 10 Dragon tears and her trophy. An Artisan table costs 2 Dragon tears and 10 Wood. You need it to build the Blast furnace, Spinning wheel, Windmill and Stone oven within 40 metres, so it opens up the Plains-tier crafting chain.
What does Moder's Forsaken power do in Valheim 1.0?
Since the 1.0 rebalance, Moder's power lasts 300 seconds and gives a constant tailwind while you steer a ship, +300 carry weight, +10% movement speed and 50% frost resistance. It shares the 20-minute cooldown with every other Forsaken power and also affects players within 10 metres.
Read next
Valheim Fader Guide: How to Summon & Beat Him (1.0)
How to find, summon and beat Fader, Valheim's seventh boss, in 1.0: Bell fragments from Charred Fortresses, a Flametal loadout with barley wine, every attack with its cooldown and health threshold, a phase-by-phase solo plan, plus Kindled Ribs and his Forsaken power.
Valheim The Queen Guide: How to Find & Beat Her (1.0)
How to find and beat The Queen, Valheim's sixth boss, in 1.0: Infested Mines, the Sealbreaker, a melee build with the Demolisher and Iron Brooch, her attack table, the safe entrance, a magic alternative and her Majestic carapace drop.
Valheim Yagluth Guide: How to Summon & Beat Him (1.0)
How to find, summon and beat Yagluth in Valheim 1.0: 5 Fuling totems, Fire resistance barley wine, a Frostner and Padded armour loadout, his three fire attacks and how to dodge each, plus the Torn spirit drops and his +10% damage power.
Valheim Bonemass Guide: How to Summon & Beat Him (1.0)
How to find, summon and beat Bonemass in Valheim 1.0: the crypt Vegvisir, 10 Withered bones, Poison resistance mead, a blunt iron loadout, his three attacks and a kite-and-heal plan, plus the Wishbone and his blocking power.