
🎯 The core idea
Most PoE2 deaths are not bad luck. Big hits come in two kinds: ones a good build can tank, and boss slams with a red glow that no amount of stats will save you from. Cap your resistances first, give your build one main defence (armour, evasion or energy shield) plus a few cheap extra layers, and move out of the slams you can't tank.
- free costs nothing
- cheap small cost
- setup needs preparation
- grind pays off slowly
- skip the thing to stop doing
Version note: Written for 0.5.x, reviewed 2026-11-17 — the 1.0 full release on 11 December 2026 adds Acts 5 and 6, a passive tree makeover with "hundreds of new stats", more than 70 revamped uniques and rebalanced support gems. Expect the act-by-act resistance penalty steps, keystone locations, unique item values (Cloak of Flame, the ailment charms) and lineage gem numbers in the tables below to change. The layered approach itself is not expected to change.
This PoE2 defense guide (the game itself spells it "defences") follows the structure of Arkk's hour-long defence video and checks each mechanic against the community wiki. It explains what each defence actually stops, so you can see which layer your character is missing instead of copying stats blindly. If you are brand new, read the Path of Exile 2 beginner guide first and come back once your character reaches Act 2.
Why you still get one-shot in PoE2

free The video's main point, and the most useful idea in this guide: boss damage comes in two kinds. Normal hits, which a well-built character is meant to absorb, and the big "tank buster" slams. These are wound-up attacks, often marked with a red glow and an audio cue, that kill almost any character no matter how much you invest in defence. If you have been asking why your character keeps getting one-shot, this split is usually the answer: either you tried to stand in the second kind, or your defences are too thin for the first kind.
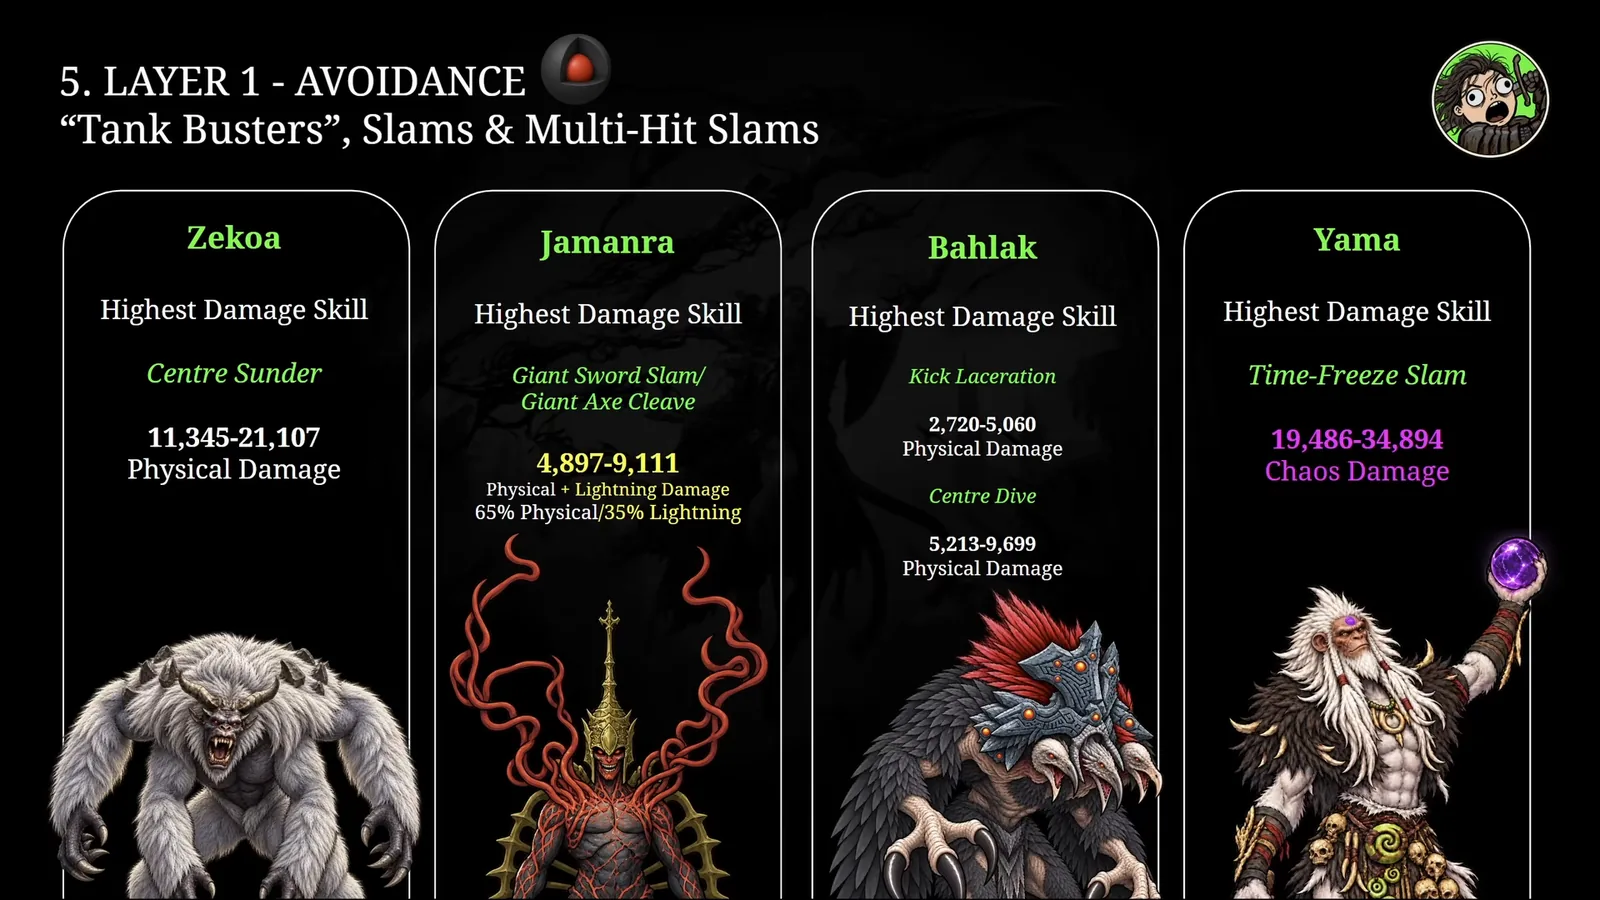
Arkk's slide of endgame bosses makes the scale clear. Compare these numbers with his own level 100 character later in this guide, who has about 12,800 life plus energy shield:
| Boss | Attack named in the video | Damage shown on the slide |
|---|---|---|
| Zekoa | Centre Sunder | 11,345–21,107 physical |
| Jamanra | Giant Sword Slam / Giant Axe Cleave | 4,897–9,111 (65% physical, 35% lightning) |
| Bahlak | Kick Laceration / Centre Dive | 2,720–5,060 / 5,213–9,699 physical |
| Yama | Time-Freeze Slam | 19,486–34,894 chaos |
These figures come from the video's slides, not from official data, so read them as rough scale. The lesson is in the shape: some attacks are meant to be dodged, not tanked. So the plan for not dying has two halves. Build layers for the damage you can survive, and learn the windups of the attacks you can't.
Campaign boss checkpoints for life and resistances

The same problem starts in the campaign. Arkk lists a target life total and resistance focus for each act boss in 0.5. One of them, Doryani's Triumph in Act 3, has a smash attack that can hit for more than the life total he recommends for that point. A full-power hit from the middle of the area is meant to be dodged, even in the campaign.
| Act boss | Life the video recommends | Resistances to have | Biggest hit (from the slide) |
|---|---|---|---|
| Count Geonor (Act 1) | 500–700 | Cold, about 30% | Wolf Teleport Slam, 325–420 physical |
| Jamanra (Act 2) | 800–1,000 | Lightning, about 50% | Giant Sword Slam / Giant Axe Cleave, 325–420 physical + lightning |
| Doryani's Triumph (Act 3) | 1,200–1,600 | Fire, lightning, cold at 75% | Explode Smash, 1,600–2,080 physical |
| Tavakai (Act 4) | 1,700–2,100 | All resistances at 75% | Ancestral Spirit Slam, 1,450–1,880 physical |
The slide figures assume you stand in the centre of each slam, where it hits hardest. At the edge you take noticeably less. Treat the life targets as the video's rule of thumb, not as official numbers. The 1.0 campaign adds two more acts, so the later checkpoints will move.
Damage types and damaging ailments

Monsters can hit you with five damage types: physical, fire, cold, lightning and chaos. Damage arrives either as a hit (all at once) or as damage over time. The damage over time you need a plan for comes from three damaging ailments:
| Ailment | Damage type | Bypasses energy shield? | Charm that stops it (0.5.x) |
|---|---|---|---|
| Bleeding | Physical over time | Yes, hits life directly | Staunching Charm (unique: Sanguis Heroum) |
| Poison | Chaos over time | Yes, hits life directly | Antidote Charm (unique: Arakaali's Gift) |
| Ignite | Fire over time | No | Dousing Charm (unique: Beira's Anguish) |
The wiki confirms what the video stresses: bleeding and poison damage skip energy shield and drain life directly. A character with a huge energy shield pool but low life can die to a poison stack while its shield is still full. The wiki adds one point the video skips: chaos damage from hits removes twice as much energy shield as its value, so chaos hurts energy shield builds twice over.
cheap The fix the video recommends is charms. They fire automatically when the condition happens (you start bleeding, you get poisoned, you get ignited) and make you immune to that ailment for a few seconds. Your belt decides how many charm slots you have, so check it when you upgrade.
Thinking in defensive layers

The video's model is a core with five layers around it. Each layer stops damage at a different moment:
| Layer | What it does | Examples |
|---|---|---|
| Core | The pool that kills you when it runs out | Life, energy shield, Runic Ward, mana with Mind Over Matter |
| 1. Avoidance | The hit never lands | Evasion, block, parry, dodge roll, positioning, map filtering |
| 2. Pre-mitigation | The hit is made smaller before your defences apply | Enfeeble, less critical damage taken, physical taken as another type |
| 3. Mitigation | Your defences reduce the landed hit | Resistances, armour, deflection |
| 4. Recovery | You refill afterwards | Regeneration, leech, energy shield recharge, flasks |
| 5. Extras | Situational top-ups any class can use | Charms, omens, lineage support gems, unique flasks |
Arkk's diagnosis of most one-shots is simple: players have one or two layers, and each is thin. You don't need everything. The video's closing advice is at least one building block in every layer, plus one strong layer (usually mitigation or the core pool) for the hits you are meant to survive.
Life, energy shield and Runic Ward

Life is the only pool that kills you when it hits zero. Energy shield sits on top of it and takes damage first, and the two refill differently. Life regenerates through normal regeneration. Energy shield recharges on its own once you stop losing it. The wiki gives a base delay of 4 seconds, which matches the video. Any further energy shield loss restarts that delay.
Runic Ward came in with 0.5.0 and is a last line of defence. If a hit would take your life to zero and you have Ward, you drop to 1 life and the Ward absorbs the rest. If the Ward runs out before the damage does, you still die. The wiki says it comes from Expedition-related items and regenerates on its own. Arkk's gear tip, which is his opinion and not a rule: many multipliers scale the armour, evasion or energy shield on your body armour and helmet, so look for Ward on gloves and boots instead.
Two keystones change the core, and you can find both on the PoE2 passive tree:
| Keystone | Effect (0.5.x wiki) | Why players take it |
|---|---|---|
| Chaos Inoculation | Maximum life is 1; immune to chaos damage and bleeding | Pure energy shield builds. Poison is chaos damage, so it is covered too. |
| Mind Over Matter | All damage is taken from mana before life; 50% less mana recovery rate | Turns a big mana pool into a second life bar, useful when life is reserved or small |
The wiki adds a useful detail about Chaos Inoculation: your stun and ailment thresholds are still worked out from the life you would have without it, so taking it doesn't make you easier to stun.
Avoidance with evasion, block, parry and dodge roll

Avoidance means the hit does no damage at all.
- Evasion gives a chance to evade enemy hits, based on your evasion rating against the attacker's accuracy. The video describes it as attack defence. The wiki is more generous: against monsters, evasion works on spells as well as attacks. It is also not pure luck. A hidden "entropy" counter guarantees that hits land at about your expected rate, which means you don't get long unlucky streaks.
- Blind lowers an enemy's accuracy (the wiki gives 20% less accuracy and evasion), which raises your evade chance against it. Blind and evasion work well together.
- Block needs a shield and stops all damage from a blocked hit. You can still be stunned by a blocked hit, and you can't block while stunned or frozen.
- Parry uses a buckler to catch a hit and counter-attack.
- Dodge roll is on every character. The video says it gives no invulnerability, and the wiki agrees. It avoids projectiles and melee attacks only during roughly the first half of the roll. Time it to the swing, not after.
skip The key limit: evasion and block do nothing against boss skills with a red glow and audio cue. Those are exactly the tank busters from the first section. Deflection, covered under mitigation, still works against them.
cheap The video's example of a cheap avoidance boost is Wind Dancer, a Spirit buff. It builds stages of more evasion and, when you are hit, uses them up to knock nearby enemies back. The PoE2 skill gems guide explains how Spirit reservation works.
Positioning and movement speed

free Arkk's boss footage shows the least glamorous defence: walking. He keeps circling behind the boss, waits for the warning glow, steps out of the slam, then goes back in to hit. That only works because his character is fast. Movement speed lets you reach a safe spot before the slam lands and get out when a pack starts to surround you.
Other free habits from the same section:
- Stay behind bosses and large monsters where you can.
- Don't fight on ground effects (burning, chilled or shocked ground). They add damage or ailments while you think you are safe.
- Learn each boss's tank buster once, at a level where a mistake doesn't end your run.
Filtering dangerous map mods with regex

setup Some threats come from the map, not the boss. Arkk's fix is a regex: a short search string you paste into your stash or vendor search box to highlight waystones with modifiers you don't want. He builds his on the community generator Path of Regex 2 (poe2.re) and pastes the string, including the quote marks at both ends, into the search bar. The same string works on the trade site.
The mods he filters for most builds:
- Reduced maximum player resistances, which quietly undo your resistance cap.
- Increased monster damage, and increased monster critical hit chance combined with critical damage bonus. Together these produce many of the endgame one-shots.
- Chilled or ignited ground patches.
- Monsters that keep regaining energy shield, which is hard on weaker early-map builds.
Which mods are deadly depends on your build, so pick your own list. Maps and waystones are covered in depth in the PoE2 endgame guide.
Pre-mitigation with curses and damage conversion

Pre-mitigation makes the hit smaller before your armour or resistances apply. The video names three kinds:
- Enemies deal less damage. The usual tool is the Enfeeble curse. The wiki lists a 20–29% "less damage" curse, depending on gem level. Arkk runs it on most of his characters.
- Reduced extra damage from critical hits. This lowers how hard enemy crits land.
- Physical damage taken as another type. Cloak of Flame, for example, takes 50% of physical damage as fire. The wiki confirms the 0.4.0 change from 40% to 50%. Converted damage is then reduced by the matching resistance. Paired with Chaos Inoculation, physical taken as chaos is ignored entirely.
Stun and ailment thresholds

Thresholds decide how big a hit has to be before it stuns you or applies an elemental ailment.
- Stun threshold starts equal to your maximum life. Each hit has a chance to light stun you based on its damage compared with your life. Light stuns are short (about half a second on the wiki), and players are usually not heavy stunned except while blocking, parrying or similar actions. Raising stun threshold makes these interruptions rarer.
- Elemental ailment threshold starts at half your maximum life. It controls how easily cold, fire and lightning hits chill, freeze, ignite or shock you.
- Stun recovery shortens how long you stay locked once a stun lands.
The video calls being stunned "freezing your character in place". On the wiki, the long lockouts come from freeze and from heavy stun buildup while blocking or parrying. A normal light stun is a fraction of a second. Even so, interruptions during a boss windup are how the second kind of hit catches you, which is why this belongs in your defence plan.
Resistances, armour and deflection

This is the layer most defence lives in.
Elemental and chaos resistances
free Cap your fire, cold and lightning resistances before anything else, and keep them capped all game. The game lowers your elemental resistances as you progress, so gear that was enough in Act 1 is short by the endgame. Chaos resistance follows the same cap rules but has no penalty. Raise it once the elements are done.
| Point of progression (0.5.x) | Elemental resistance penalty |
|---|---|
| Act 2 | −10% |
| Act 3 | −20% |
| Act 4 | −30% |
| Interlude, area level 54–59 | −40% |
| Interlude, area level 60–64 | −50% |
| Endgame, area level 65+ | −60% |
The default maximum resistance is 75%, and each point of maximum resistance above that can raise it to a hard ceiling of 90%. Every point there is worth a lot, because it cuts the damage you still take, not the damage you avoid.
Armour
Armour reduces physical damage from hits. It works best against many small hits and badly against one huge slam, because the reduction depends on how big the hit is compared with your armour. It never reduces damage over time, and total physical reduction is capped at 90%. Some items and passives let a share of your armour apply to elemental or chaos damage too.
| To prevent this share of a hit | You need armour equal to |
|---|---|
| One third (33%) | 5 × the hit's damage |
| Half (50%) | 10 × the hit's damage |
| Two thirds (66%) | 20 × the hit's damage |
| Three quarters (75%) | 30 × the hit's damage |
| 90% (the cap) | 90 × the hit's damage |
That table explains the one-shot problem in numbers: a 20,000 damage slam would need more armour than a character can realistically have.
Evasion and deflection
setup Deflection is the evasion player's mitigation. On a successful deflect, a hit deals 40% less damage. Most deflection rating scales from your evasion. Unlike evasion, the wiki says deflection still works against red-glow boss attacks. Arkk recommends Pathfinder-style evasion builds stack both.
cheap His mitigation example is Defiance Banner. Once you build up Glory by attacking, you plant a banner whose aura gives more armour. The wiki says it also gives more evasion and movement speed, which the video doesn't mention.
Recovery: regeneration, leech and recharge

grind Recovery is the layer people skip, and it matters most for builds that rely on one big pool. Arkk's examples:
- Energy shield builds want faster start of energy shield recharge and higher recharge rate, so the shield comes back between hits.
- Mana-stacking builds (Mind Over Matter) want mana regeneration, mana leech and mana on kill, because the keystone halves mana recovery.
- Life builds use life regeneration, leech, life on kill and flask recovery.
A note from the slide worth repeating: in the Trial of Chaos, some conditions can make flasks unusable, so a build that only recovers through flasks is in trouble there.
Extras: charms, flasks, omens and lineage gems

The last layer is gear and consumables that most classes can use. From Arkk's slide (0.5.x, values per the video unless noted):
- Ailment charms: the bleeding, poison and ignite charms from the damage types section.
- Omen of Resurgence: restores life when a hit drops you to low life. He warns that a big enough hit still kills you outright.
- Olroth's Resolve: a unique life flask that, per the wiki, is linked to Runic Ward in 0.5.
- Rite of Passage: a unique that, when you kill a rare or unique enemy, briefly possesses you with an Azmeri spirit. He says almost every endgame build uses it. The bear spirit grants life and stun threshold.
- Seraph's Heart: a lineage support gem. The wiki gives "enemy hits have 20% chance to treat all your resistances as being 90%" while the supported buff is active.
- Her Declaration: a lineage support gem that intimidates enemies entering your presence.
skip Don't chase these before your resistances are capped and your main defence is in place. They top up a working setup. They don't rescue a missing layer.
A level 100 defence profile, stat by stat

Arkk finishes by walking through his 0.5.5 (Forbidden Rites) level 100 Oracle on poe.ninja. Here is the profile mapped to the layers:
| Layer | What his character uses |
|---|---|
| Core | Small life pool (about 1,400), about 11,400 energy shield, some Runic Ward, Mind Over Matter because Atziri's Communion reserves life |
| Avoidance | 175% movement speed for repositioning |
| Pre-mitigation | Enfeeble plus Temporal Chains (slows enemies) through Whispers of Doom, which allows a second curse |
| Mitigation | Resistances capped (one shows lower only because part of it sits on a swap weapon), Seraph's Heart |
| Recovery | Energy shield recharge and mana regeneration |
| Extras | Her Declaration, charms |
His point is that this is a simple profile. It still reached level 100 because every layer has at least one piece and one layer (energy shield) is deep. Your character will look different. Check that it has something in each row.
Read next
- Path of Exile 2 beginner guide: the whole game in order, from the campaign to maps
- PoE2 best class for beginners: which class gives you which defence by default
- PoE2 passive tree guide: where the defence clusters and keystones sit and how to respec into them
- PoE2 skill gems guide: Spirit, curses and the support gems behind several layers here
- PoE2 endgame guide: waystones, map mods and the pinnacle bosses with tank busters
- Path of Exile 2 game hub for every guide on the game
How this guide was fact-checked
- Source video: "PoE 2: Stop Getting One-Shot | Complete Defense Guide" by Arkk (uploaded 16 October 2026, 59 minutes, recorded on 0.5.5). The layer model, the boss damage slides, the act-by-act life targets, the regex workflow and the example character all come from the video and are credited as such.
- poe2wiki.net (read 17 November 2026) confirmed: bleeding and poison bypass energy shield; chaos damage removes double energy shield; the 4-second energy shield recharge delay; Runic Ward behaviour; Chaos Inoculation and Mind Over Matter text; evasion and block failing against red-glow boss skills; deflection working against them; the dodge roll window and no invulnerability; the 75% default and 90% hard resistance caps; the resistance penalty table; the armour rule of thumb and 90% cap; stun and ailment threshold bases; Blind, Enfeeble, Wind Dancer, Defiance Banner, Cloak of Flame, Seraph's Heart and the three ailment charms.
- Corrections and additions to the video: evasion also works against monster spells, not just attacks. Chaos damage costs energy shield builds double. Defiance Banner gives more evasion and movement speed as well as armour. Light stuns are a fraction of a second, and long lockouts come from freeze or heavy stun while blocking. The charm names misheard in the auto-captions are Sanguis Heroum, Arakaali's Gift and Beira's Anguish.
- Official news (Steam announcements for Path of Exile 2) was checked for 1.0. It confirms Acts 5 and 6, a passive tree makeover, revamped uniques and support gem rebalancing on 11 December 2026, but publishes no new defence numbers yet. That is why the version note is there.
- Numbers not confirmed anywhere official (boss damage ranges, life targets, Omen of Resurgence, Rite of Passage) are attributed to the video.
What this guide doesn't answer
- Exact defence numbers for 1.0: the patch notes aren't out yet. This guide will be updated once they are.
- Full build recommendations: which defence suits which class is covered in PoE2 best class for beginners, and full endgame builds come after the 1.0 patch notes.
- Every boss's tank buster timing: that needs a boss-by-boss guide, not a mechanics overview.
- Crafting resistances onto gear: currency and crafting have their own guide.
- Hardcore-specific defence thresholds: the advice here is softcore-first. Hardcore players should aim well above it.
Frequently asked
Why do I keep getting one-shot in Path of Exile 2?
Usually for one of two reasons. Either your defences are too thin, with uncapped resistances or only one weak defensive layer, or you are standing in a boss tank buster: a wound-up slam, often marked by a red glow and audio cue, that is meant to be dodged rather than tanked. Cap your elemental resistances, give your build one strong defence (armour, evasion or energy shield), and move out of red-glow attacks.
What is the resistance cap in PoE2?
The default maximum for fire, cold, lightning and chaos resistance is 75%. Modifiers to maximum resistance can raise it up to a hard cap of 90%. In 0.5.x your elemental resistances are also lowered as you progress: -10% in Act 2, -20% in Act 3, -30% in Act 4, then up to -60% in the endgame, so gear that capped you early will not cap you later.
Is armour, evasion or energy shield better in PoE2?
None is best on its own. Armour reduces physical hits and works best against many small hits, but it is weak against huge slams. Evasion lets you avoid monster attacks and spells entirely, but not red-glow boss skills, so evasion builds add deflection. Energy shield is an extra pool on top of life that recharges, but bleeding and poison bypass it and chaos damage removes twice as much of it. Pick the one your class and gear support, then add other layers.
Does bleeding and poison bypass energy shield in PoE2?
Yes. Bleeding and poison damage skip energy shield and drain life directly, so a character with a large energy shield and low life can die to them while the shield is still full. Fixes include the Staunching Charm for bleeding and the Antidote Charm for poison, or Chaos Inoculation, which makes you immune to chaos damage (poison included) and bleeding but sets your maximum life to 1.
What does Runic Ward do in PoE2?
Runic Ward, added in 0.5.0, is a last line of defence. If a hit would take your life to zero while you have Ward, you drop to 1 life and the Ward absorbs the rest of the damage. If the remaining damage is more than your Ward, you still die. It comes from Expedition-related items and regenerates on its own.
Read next
PoE2 Ascendancy Trial Guide: Sekhemas and Trial of Chaos
How PoE2 ascension works: four trials that each give two ascendancy points, where the Trial of the Sekhemas and Trial of Chaos keys come from, and how to survive a Sekhemas run with the right relics, rooms and boons. A version note flags what to re-check at the 1.0 release.
PoE2 Skill Gems Explained: Supports, Spirit and Uncut Gems
How skill, support and spirit gems work in Path of Exile 2: cutting and levelling gems with uncut gems, gem slots and Jeweller's Orbs, support capacity, Spirit and quality. Checked against the 0.5 patch notes, with what changed since the 0.4-era source video.
PoE2 Passive Tree Guide: How to Plan, Path and Respec
How the Path of Exile 2 passive tree is laid out and how to plan a short route from your class start to the clusters your build needs. Covers attribute nodes, weapon set passives and what respeccing costs in gold.
PoE2 Campaign Guide: Acts 1-4, Interludes and Boss Tips
An act-by-act Path of Exile 2 campaign guide for Acts 1-4 and the three Interludes: the bosses that kill new players, permanent quest rewards worth the detour, and when to swap gems and gear before maps.