
🎯 The core idea
Every PoE2 ascendancy trial pays out the same thing: two ascendancy points, four times, for eight in total. You choose between two trials each time. The Trial of the Sekhemas, opened with a Djinn Barya, is a room-by-room run where a separate Honour bar is your real life. The Trial of Chaos, opened with an Inscribed Ultimatum, is an Ultimatum-style arena where you pick the danger. Learn one well, plan your relics, and every ascension becomes routine.
- free costs nothing
- cheap small cost
- setup needs preparation
- grind pays off slowly
- skip the thing to stop doing
Version note: Written for 0.5.x, reviewed 2026-11-17 — the 1.0 release on 11 December 2026 adds Acts 5 and 6, the Shadow (Assassin, Infiltrator) and the Duelist (Knight, Master-at-Arms), and reworks the Infernalist, Blood Mage and Acolyte of Chayula. GGG's 1.0 announcement says nothing about changing the trials themselves, but the key levels, floor counts and room counts in the tables below are 0.5.x values and are the first thing to re-check after the 1.0 patch notes.
How ascension works in PoE2

Your class is permanent, but its ascendancy is earned. Each time you clear an ascension trial at the right level, you get two ascendancy points to spend on your ascendancy's small passive tree. The first clear also asks you to pick which ascendancy of your class you want. There are four ascensions, so a finished character has all eight PoE2 ascendancy points, and that is the whole answer to how to ascend: clear trials, spend points. If you still need to decide which ascendancy to take, our poe2 best class for beginners guide compares them; this page is about the trials.
The two trials are interchangeable. Any ascension can come from either one, as long as the key you use is high enough level and the run has the required number of floors or rounds. Most players take the first point pair from the Sekhemas in Act 2 simply because it comes first, then mix and match. Since patch 0.2.0f you can also re-ascend into a different ascendancy of the same class, but that also means running a trial again.
| Ascension | Points after it | Trial of the Sekhemas (0.5.x) | Trial of Chaos (0.5.x) |
|---|---|---|---|
| 1st | 2 | Balbala's Barya from Act 2, one floor | Chimeral Inscribed Ultimatum from Act 3 |
| 2nd | 4 | The other campaign trial | The other campaign trial |
| 3rd | 6 | Level 60+ Djinn Barya, 3 floors | Level 65+ Inscribed Ultimatum, 10 trials |
| 4th | 8 | Level 75+ Djinn Barya, 4 floors and the final boss | Level 65+ Inscribed Ultimatum, 10 trials and the Trialmaster with all three Fate fragments |
The table follows Maxroll's trials page for patch 0.5.3. The 0.5.5 patch notes did not change these thresholds as far as we could find, but treat the numbers as the part most likely to move at 1.0.
Opening the Trial of the Sekhemas with a Djinn Barya

free The Trial of the Sekhemas sits in the Vastiri desert in Act 2. You reach it from the desert map in town, and the door needs a Djinn Barya. Your first one is a quest item: kill Balbala, the Traitor, the djinn sealed in the Traitor's Passage, and she leaves Balbala's Barya behind. She also gives you your first relic, which matters for the next section.
Later Barya drop as normal loot in the late campaign and in maps (our poe2 endgame guide covers mapping), and the item's level and "Number of Trials" line tell you which ascension it can grant. A higher-level poe2 djinn barya is the one you want for the third and fourth ascensions; you can also buy them from other players. Check that line before you go in: a key below the required level or floor count still gives you a run, just not the ascension. And failing a run destroys any treasure keys you were carrying.
Trial of Chaos and the Inscribed Ultimatum

setup The poe2 trial of chaos is the game's version of the Ultimatum league from Path of Exile 1, which is why players also search for it as the poe2 ultimatum trial. It is in Act 3; the first key, the Chimeral Inscribed Ultimatum, drops from Xyclucian, the Chimera in the Chimeral Wetlands. Later Inscribed Ultimatums drop in maps, and one even shows up in the fourth-floor Sekhemas loot in our source video.
Each trial is a single arena with an objective. Before each round you choose one modifier from a small offer, and those choices stack, so the run gets harder the longer you go. The final room is the Trialmaster. Because you choose the danger up front, the Trial of Chaos suits builds that can read a modifier list and say "no" to what kills them.
The 0.5.5 patch (Forbidden Rites, September 2026) overhauled it. According to the patch notes as summarised by kami-labs: you can now leave a Trial of Chaos at any point and resume later from the same room, each room ends with its own reward chest, completion rewards are currency and Soul Cores only, and a finished 10-trial Ultimatum can be continued twice for an extra Trialmaster fragment each time. Older videos that warn "one death and the run is gone" predate this.
Sekhemas or Chaos: which trial to run

There is no wrong answer, only a better fit. Use this as a rough guide:
| You are… | Lean towards | Why |
|---|---|---|
| Tanky, with lots of life or energy shield | Trial of the Sekhemas | Honour scales off your life and energy shield, and relics add Honour resistance on top |
| Fragile but fast and careful | Trial of the Sekhemas | Escape and gauntlet rooms reward movement and dodging more than raw defence |
| Strong but bad at dodging traps | Trial of Chaos | No trap gauntlets; you pick which modifiers you accept |
| A melee build | Trial of Chaos, or Sekhemas with ranged help | z3r0pointflux calls melee on the fourth Sekhemas floor a miserable experience and summons a Bone Cage-style blocker to stay at range |
| Short on time | Trial of Chaos since 0.5.5 | You can leave and resume later |
| Farming currency as well | Trial of the Sekhemas | Relics, Time-Lost jewels and chase uniques, plus carries you can sell |
The rest of this guide focuses on the Sekhemas, because that is what the source video covers in depth.
Honour, relics and the relic altar

setup Inside the Trial of the Sekhemas you have a second bar called Honour. It is based on your life and energy shield, every hit you take also removes Honour, and if it empties the run fails. Flasks, regeneration and leech do not restore it; only boons, shrines and some merchant options do. Watch both bars: z3r0pointflux points out that if your life hits zero you still die, even with Honour left.
Relics are what you control before you enter. They are trial-only items that you slot into the relic altar next to the entrance, and they only work inside the trial. His priority list is simple and worth copying:
- Honour resistance first. It reduces how much Honour each hit takes away.
- Maximum Honour next. More buffer for the fourth floor.
- Maximum Honour resistance. A vase relic with this mod raises the cap; in the video his relics show 85% Honour resistance against an 80% cap.
- Then utility. Mods that reveal an extra room on the map, give the merchant an extra choice, or add more keys and sacred water.
None of his relics are top tier; he says a usable setup like his cost him around 30 Exalted Orbs in that league. Keep every relic you find, because good rolls sell well and you can improve them with crafting currency.
Reading the trial map and choosing rooms

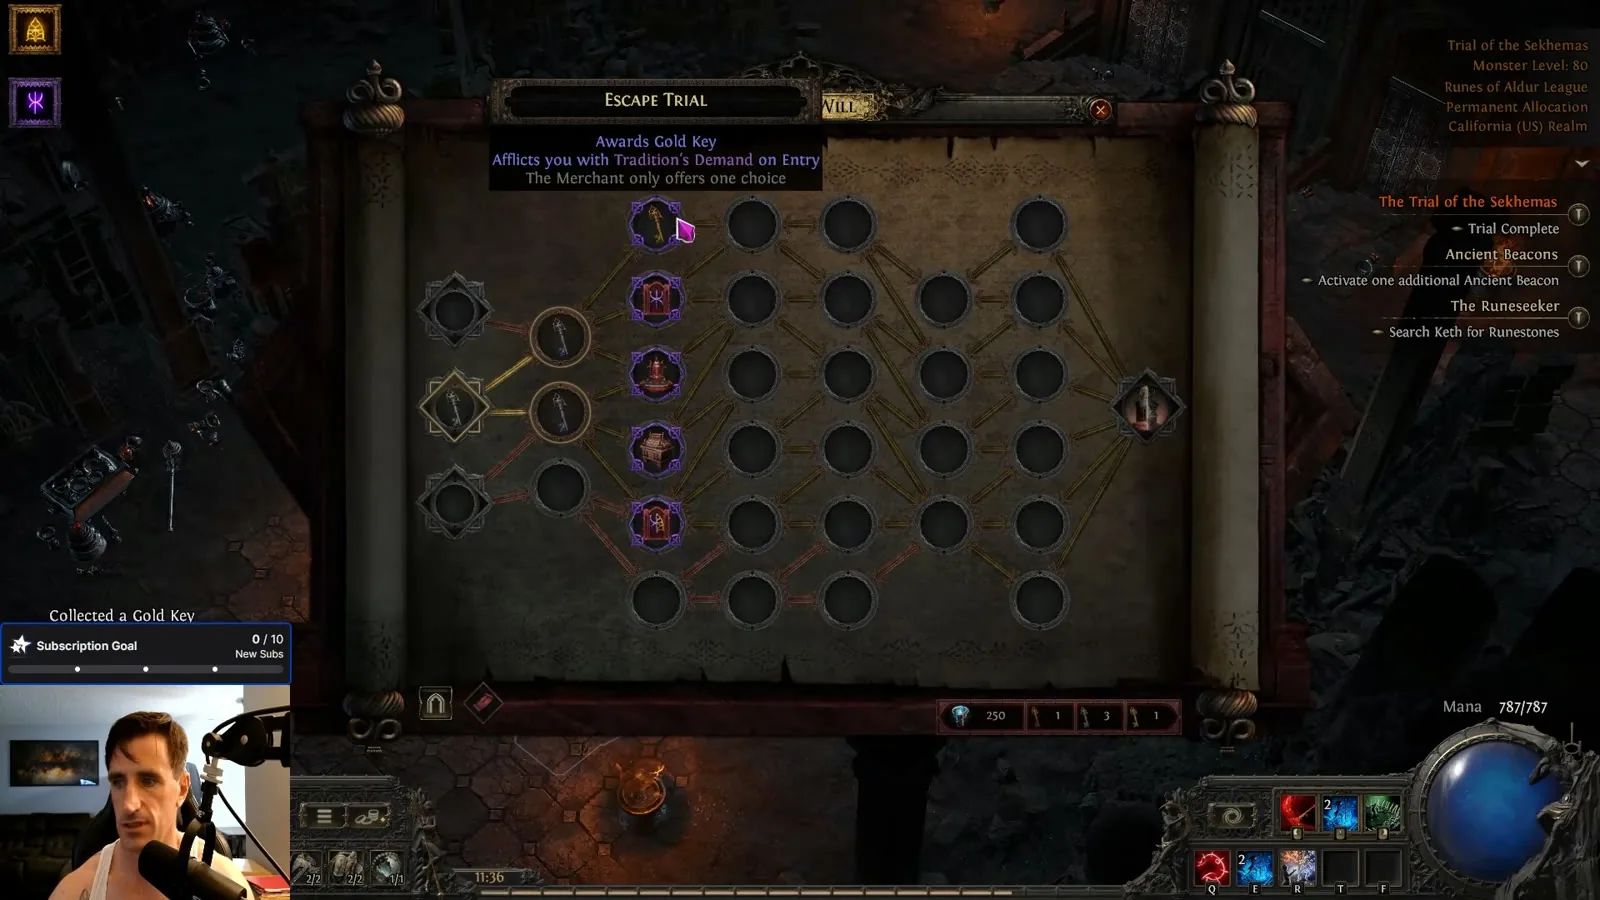
free A run has four floors, each laid out as a grid of rooms with arrows showing where each room can lead. Hovering a room shows its type, its reward (a key, a sacred water fountain, a shrine, a merchant, a pledge) and, if the room has a coloured outline, the affliction you take when you enter.
The habit that saves the most runs is looking one room ahead. Avoid paths where the next step is a single room you cannot see yet, because you are then forced into whatever affliction it carries. A room that branches into two or three visible options keeps your choices open. A relic or boon that reveals an extra room makes this much easier, which is why z3r0pointflux keeps one on his altar permanently.
Pledges are the trade-off rooms: you accept a deal such as giving up a boon to remove an affliction. Most offers are poor, but on the fourth floor they can rescue a run that picked up something deadly earlier.
The six room types in the Trial of the Sekhemas

Every room ends when you complete its objective. Knowing the fastest way through each one is most of the time you save:
| Room | Objective | How to clear it fast |
|---|---|---|
| Ritual | Kill the ritual casters at each doorway | Often the quickest room; some have a single ritual and take seconds |
| Hourglass | Pull the lever, then survive the timer | Hunt the rare monsters, each kill knocks time off the clock |
| Escape | Disable crystals before the timer ends | Sprint between crystals and dodge roll when a monster wakes up; each crystal adds time |
| Chalice | Activate the chalice, kill the rare monsters it marks | Follow the markers; the room does not kill leftover monsters, so stay alert on the way back |
| Gauntlet | Find the exit through trap corridors | Learn the trap timings; spinning fire traps can ignite you |
| Boss | Kill the floor boss | Learn its few big attacks; a guaranteed merchant waits after floors one to three |
His advice is not to chase particular room types but to let the afflictions decide your route, and to practise gauntlets until they stop scaring you. Once you can run them cleanly they are often the fastest rooms on the map.
Afflictions, boons and the three bad choices

skip Afflictions are permanent penalties for the rest of the run; boons are the positive versions you buy or earn. Sooner or later every route offers three bad options, and the trick is to pick the one a future boon can cancel.
His examples make the logic clear. A damage penalty can be outweighed by a later damage boon. An affliction that makes monsters slow you down with stacking chains has a matching boon. But afflictions that hide the map ("afflictions are unknown", or seeing one fewer room ahead) cannot be fixed, and an affliction where monster hits remove a percentage of your life, mana and energy shield is a run-ender on the later floors, because some monsters and the final boss hit you dozens of times in a burst. skip those whenever any other path exists.
Afflictions that do nothing to your build are free picks. An armour character does not care about "you have no evasion", and a life character ignores "less energy shield".
The merchant and sacred water

cheap Sacred water is the trial's own currency. It comes from fountains in rooms, from floor bosses, and in small amounts from monsters you kill on the way, so pick it up without backtracking for it. You spend it at the merchant on boons, Honour restores and relic effects.
There is a guaranteed merchant after the boss of each of the first three floors, plus any merchant rooms you path through. z3r0pointflux often saves water for those guaranteed shops, but buys early if the shop offers more sacred water found or reduced merchant prices, because those snowball for the rest of the run. Other boons he rates highly: an extra room revealed on the map, increased movement speed, a cheat-death effect that restores life and Honour at low life, and anything that makes monsters slower or weaker.
Undoing afflictions with the right boon

free The payoff of choosing fixable afflictions shows up here. On the third floor of his run he takes an affliction that makes traps faster, because the alternatives would cost him sacred water or merchant choices. At the third-floor merchant he then buys the boon that makes traps slower, and the affliction is gone in practice.
The same pattern works for damage, life and Honour penalties. Before you accept an affliction, ask whether a boon you have seen before cancels it. If yes, it is the safe pick.
Floor bosses and surviving the fourth floor

grind Each floor ends in a boss arena. The early bosses are about stepping out of one or two big area attacks; the third-floor boss burrows, poisons and whips its tail across an arena that also has floor traps. The fourth floor is where runs die: monsters hit Honour much harder, ranged packs pile on, and getting knocked down or surrounded is often fatal. z3r0pointflux stops sprinting through fourth-floor escape rooms for exactly that reason.
The fourth-floor boss, Zarokh, the Temporal, is the one that finishes your fourth ascension. Its rapid lightning barrage is why the "lose life on hit" affliction is so dangerous to carry into the fight. His dream outcome is a "moment's peace" boon right before the boss room, which stops you taking damage until the next room is done.
Keys, the Keth Forge and what the trial pays

grind Rooms award bronze, silver and gold treasure keys, and each key opens one cache in the final reward room. Gold keys are the ones to chase. Leftover sacred water can be turned into extra keys at the Keth Forge in that room, so finishing with a big stockpile is never wasted.
Beyond the ascension itself, the run drops relics, Time-Lost jewels (which you can combine into a Time-Lost diamond at the reforging bench), and rare uniques from the final boss. z3r0pointflux says the best chase uniques need a level 80 Djinn Barya and that the rarest ones drop very rarely, so treat them as a lottery.
There is also a market for ascension carries. Before the fourth-floor boss you can leave through the map button, invite buyers to your party and let them wait in the altar room while you kill the boss; they then walk in and claim their ascension. Carry prices in the video were a few Divine Orbs each in that league, which will not hold in a fresh 1.0 economy.
Read next
- PoE2 best class for beginners: pick the ascendancy before you spend the points.
- PoE2 passive tree: how ascendancy points fit next to the main tree.
- PoE2 skill gems: the skills your ascendancy will be boosting.
- PoE2 endgame guide: where higher-level Djinn Barya and Inscribed Ultimatums drop.
- PoE2 defense guide: life and energy shield also decide how much Honour you get.
- All guides in our Path of Exile 2 game hub.
How this guide was fact-checked
- Source video: "ULTIMATE Beginners Guide to Trial of the Sekhemas | Path of Exile 2 0.5" by z3r0pointflux (uploaded 14 June 2026, 37 minutes), played in the Runes of Aldur league with a monster level 80 Barya. Room types, relic priorities, affliction logic, merchant choices, boss notes, keys, the Keth Forge and carries come from his on-screen run. His opinions (best rooms, relic cost, run time, carry prices) are attributed to him.
- Official announcements: Steam news for PoE2 (the 1.0 full release post, the 0.5.5 Forbidden Rites announcement and FAQ). These confirm the 1.0 date, the new classes and ascendancy reworks and that 0.5.5 brought a major Trial of Chaos overhaul for every league.
- poe2wiki.net answered our automated requests with a bot check, so we could not cite it. Instead we used Maxroll's trials of ascendancy page (updated for 0.5.3) for key sources and ascension thresholds, and kami-labs' summary of the 0.5.5 patch notes for the Trial of Chaos changes.
- Corrections and clarifications: The auto captions mangle names: "trial of the sacrum" is the Trial of the Sekhemas, "cath forge" is the Keth Forge and the fourth-floor boss is Zarokh. He spells it "honor"; the game uses Honour. He says the boss rooms give "three guaranteed merchants"; that is one after each of the first three floor bosses, as his run shows. His video covers only the Sekhemas; the Trial of Chaos section here is from written sources, not the video, and reflects the 0.5.5 rework that came after his upload. The 0.5.5 notes also add inherent bonuses to Sekhemas runs from area level 65 to make up for Atlas passives not applying inside, which his video predates.
What this guide doesn't answer
- Which ascendancy to choose: that depends on your class and build; see the class guide linked above.
- A full Trial of Chaos modifier list: modifiers and room types changed in 0.5.5 and may change again at 1.0, so we kept that section to how the trial works.
- Exact drop rates and prices: relic, jewel and unique values depend on the league economy, which resets at 1.0.
- Every boon and affliction: the list is long and patch-dependent; we covered the decisions, not a catalogue.
- How the Shadow and Duelist ascendancies work: they arrive with 1.0 on 11 December 2026 and were not in the game when this was written.
Frequently asked
How do you get ascendancy points in PoE2?
Clear an ascension trial: the Trial of the Sekhemas (opened with a Djinn Barya) or the Trial of Chaos (opened with an Inscribed Ultimatum). Each of the four ascensions gives two points, for eight in total. The first two come from the campaign trials in Acts 2 and 3; the last two need higher-level keys from late campaign and maps.
Where do I get my first Djinn Barya in Path of Exile 2?
Kill Balbala, the Traitor, in the Traitor's Passage in Act 2. She drops Balbala's Barya, which opens the Trial of the Sekhemas from the desert map in town, and she also gives you your first relic. Later Djinn Barya drop as loot in the late campaign and in maps, or can be bought from other players.
What is the Trial of Chaos in PoE2?
It is PoE2's Ultimatum-style ascension trial in Act 3, opened with an Inscribed Ultimatum; the first one drops from Xyclucian, the Chimera, in the Chimeral Wetlands. You clear a series of arenas, picking one modifier before each, and fight the Trialmaster at the end. Since patch 0.5.5 you can leave and resume a run and every room has its own reward chest.
Should I do the Trial of the Sekhemas or the Trial of Chaos?
Either one counts for any ascension. The Sekhemas suits tanky or fast characters who can dodge traps, because a separate Honour bar based on life and energy shield is what you protect. The Trial of Chaos suits builds that would rather pick their risks from a modifier list, and melee builds that struggle on the fourth Sekhemas floor.
How do I stop failing the Trial of the Sekhemas?
Stack Honour resistance and maximum Honour on your relics first, look one room ahead on the map, and only accept afflictions a later boon can cancel. Avoid afflictions that hide the map or make hits remove a percentage of your life, because the fourth-floor boss hits many times in a row. Spend sacred water on boons like more sacred water, cheaper merchant prices and movement speed.
Read next
PoE2 Defense Guide: Resists, Armour, Evasion and ES
Why Path of Exile 2 characters get one-shot and how to layer resistances, armour, evasion, energy shield and Runic Ward so it stops happening. Built on Arkk's defence video and checked against the wiki, with the resistance penalty and armour tables.
PoE2 Skill Gems Explained: Supports, Spirit and Uncut Gems
How skill, support and spirit gems work in Path of Exile 2: cutting and levelling gems with uncut gems, gem slots and Jeweller's Orbs, support capacity, Spirit and quality. Checked against the 0.5 patch notes, with what changed since the 0.4-era source video.
PoE2 Passive Tree Guide: How to Plan, Path and Respec
How the Path of Exile 2 passive tree is laid out and how to plan a short route from your class start to the clusters your build needs. Covers attribute nodes, weapon set passives and what respeccing costs in gold.
PoE2 Best Class for Beginners: Every Class and Ascendancy
Which Path of Exile 2 class and ascendancy a new player should pick, judged on range, defences, button count and cost rather than ladder popularity. Covers all eight classes, a 0.5 ascendancy tier list and what 1.0 changes.