
In Total War: Warhammer 3, winning battles consistently comes down to matching your units to the enemy’s archetypes and prioritizing threats. This guide is a full Total War: Warhammer 3 unit counters list: it shows how to counter every core unit type — including how to deal with flying units, cavalry and chariots, artillery, and enemy spellcasters — so you can quickly decide who should be targeted, how to neutralize their impact, and when to redirect your forces.
Quick answer
| What | Answer |
| --- | --- |
| Main principle | Target the unit type that gives the enemy damage, not the one that only holds the line. |
| Best answer to ranged infantry | Fast cavalry or monsters |
| Best answer to artillery | Fast cavalry or monsters |
| Best answer to shot cavalry | Bog them down in melee or pin them with range |
| Best answer to front-line monsters | Defensive anti-large front line plus ranged fire |
| Best answer to spellcasters | Hit them hard before they can cast | | Best answer to flying units | Missiles, your own flyers, or single-target magic — infantry cannot reach them |
How to counter flying units in Total War: Warhammer 3
Flying units are the one archetype that ignores everything above. They do not walk into your line, so no amount of anti-large infantry or shield wall stops them — they fly over it and land on your artillery, your missile blocks or your lord. Every counter to a flyer is therefore one of three things: shoot it, meet it with your own flyer, or hit it with magic and abilities.
Terrorgheist and Zombie Dragon
The two Vampire Counts flyers are large single entities, which cuts both ways. They tear apart missile blocks and low-leadership infantry, and the Terrorgheist's scream can rout a unit outright. But a single large model is also the easiest thing in the game to focus: concentrated armour-piercing missile fire kills either one quickly, because every shot that hits, hits the same target. Keep a missile block held in reserve rather than firing it at the enemy line, and shoot the dragon the moment it commits.
Griffons, Manticores and Frost Phoenixes
Griffon (Empire), Manticore (Warriors of Chaos and Norsca) and Frost Phoenix (High Elves) are the mid-weight flyers, usually carrying a lord or hero. They are far more dangerous while airborne than after they land: once a Griffon or Manticore is in melee with anti-large infantry it stops being a threat and starts being a target. Bait the landing, pin it, and bring missiles onto it while it is stuck.
Harpies and other chaff flyers
Harpies and similar cheap flyers are not meant to win a fight. They exist to reach your artillery and your unattended war machines while your attention is on the main line. The answer is not a good unit — it is any unit. Leave one cheap cavalry or infantry block behind your guns for exactly this, and the whole tactic fails.
Best anti-air units in Total War: Warhammer 3
There is no dedicated anti-air unit in this game, which is why the question is asked so often. What works is missile infantry with a clear firing lane — Dwarf Quarrellers and Thunderers, Empire Crossbowmen, Sisters of Avelorn, Glade Guard — plus your own flyers to contest the sky, and single-target damage spells for the big ones. Factions with weak missiles feel this gap most: if your roster cannot shoot, plan to trade your own flyers instead.
Choose the right target first

Not every enemy unit needs to die right away. Line holders—typically units with high defense, armor, resistance, strong leadership, and often shields—are built to stall battles. They rarely inflict serious damage themselves. Instead, the most dangerous units are the enemy’s damage dealers: monsters, ranged troops, or specialized melee attackers. If you focus all your attention on line holders, you may lose the battle to units that do most of the killing.
Deal with the enemy’s high-threat units first. Once those are removed, line holders lose their purpose and can be cleaned up efficiently. Rear attacks from missiles or cavalry are ideal in this phase: attacking from behind reduces the effectiveness of shields and charge defense, letting you break stalemates with armor-piercing damage.
If line holders are all that remain, prioritize units and tactics that can flank, deliver strong rear attacks, or unleash armor-piercing fire. Avoid grinding them down head-on unless you have no other options. When the target is heavily armored, use units or weapons with high armor-piercing values for efficiency 0:31.
Break melee infantry by role
Melee infantry fall into three main roles: line holders, damage dealers, and flankers.
-
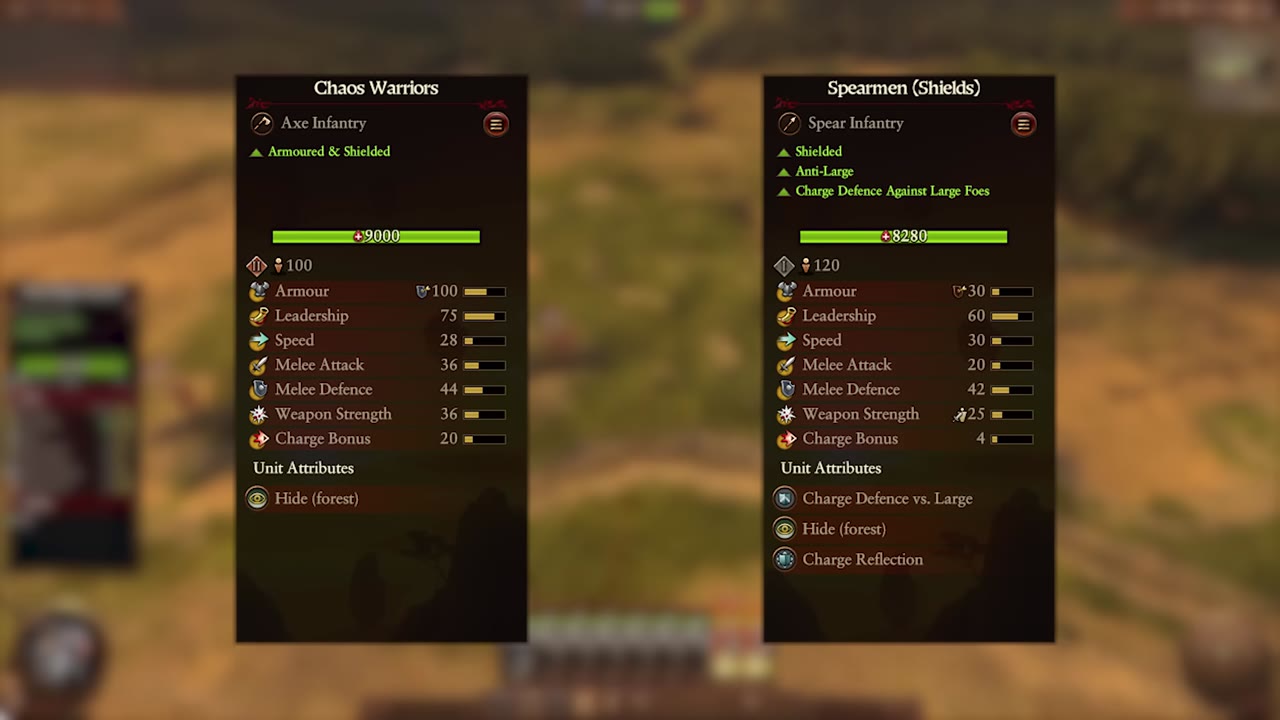
Line holders have the highest defense, armor, resistance, leadership, and often shields. Their main job is to anchor the line and absorb attacks, buying time for more powerful units to do the real damage. You can see this in units like Chaos Warriors and Empire Spearmen, who tend to withstand punishment but struggle to inflict it.
-
Damage dealers trade defense for high attack and weapon strength. They may have special bonuses against infantry or large targets, as seen in units like Dwarf Hammerers or Black Orcs. These units can devastate regular troops quickly, but their lower defense and lack of shields make them vulnerable to ranged fire and shock attacks. Engage them with armor-piercing ranged units—or, if your faction lacks strong missiles, overwhelm them quickly with your own high-damage units by surrounding and focusing them 1:41.
-
Flankers are fast infantry, like Nasty Skulkers or Daemonettes, who can slip past the frontline and attack rear units. Their power comes from mobility, not direct combat strength. Pinning flankers down with regular melee or cavalry neutralizes their threat, as they struggle in one-on-one fights with strong defenders.
Damage dealers and flankers both lose effectiveness if forced into a fair fight, especially against tough melee or cavalry units. Focus fire can also make short work of them as they try to flank or reposition 2:27.
Counter ranged infantry before they set up

Ranged infantry deal much of an army’s damage, so removing them quickly changes the outcome of most battles.
-
Arcing-fire ranged units like crossbowmen or Sisters of Avalon can shoot over lines from the back. The cleanest countermove is sending in fast cavalry or monsters that can bypass the enemy frontline and strike before defenders react. Mobility is always the priority—use units with high speed to reach the vulnerable back line 3:54.
-
Line-of-sight shooters such as Empire Handgunners or Chaos Dwarf Blunderbusses require a clear angle to fire. Disrupt their formation, cover their sight with tall units, or swing fast-moving troops around their flank. They become exposed if their firing lane is blocked.
If your faction lacks mobility, deploy shielded infantry to absorb ranged fire and let your own monsters or missiles break through to the back line. Most ranged infantry are lightly armored and have low melee stats, so anything with reasonable attack can finish them once engaged. Just make sure the unit is shattered or wiped out, as routed ranged troops can return to firing if left unchecked 4:52.
Shut down cavalry and chariots


Cavalry and chariots are designed for mobility, shock, and chaos in the back line. Their counter depends on their specific role:
-
Sustained combat cavalry like Grail Guardians or Chaos Knights hold up well in melee with high armor, shields, and defense—less charge, more staying power. Handle them by keeping strong melee, anti-large units, and ranged support nearby. Once pinned and surrounded, their large hitbox makes them vulnerable to concentrated fire, so focus ranged units or defensive infantry on their location 5:58.
-
Shock cavalry such as Blood Knights or Dragon Princes specialize in quick, high-impact charges but don't stay in combat long. If you can stop their movement and trap them in melee or with ranged units, they fall quickly due to lower defense 7:19. Surround them to prevent retreat; if they escape, they're likely to get picked apart as they cycle charges.
-
Missile cavalry and skirmish units have poor melee stats and rely on mobility. Chase them with faster cavalry or monsters, or use your own ranged fire. Once caught, they go down easily.
-
Chariots are high-mass units with strong charge bonuses but low staying power. Once stuck in melee, their awkward size prevents escape, and they take massive damage per second from any unit capable of fighting 8:51. Anti-large and armor-piercing attacks boost efficiency, but any strong melee can pin and delete them.
If defending against mounted threats, prioritize keeping your ranged and vulnerable units protected, use anti-large or defensive troops for holding, and counterattack with fast-mover units only when sure you will win the matchup.
Stop beasts and monsters from breaking your line

Monsters and beasts pose unpredictable threats—some flank like cavalry, others smash front lines. Deal with them based on their approach:
-
Flanking monsters (warhounds, dragon ogres) aim for your back or exposed shooters, the same job Harpies do from the air. Counter them as you would cavalry: intercept with fast melee, cavalry, or tough infantry. Warhounds in particular can be handled by any unit competent in melee.
-
Front-line monsters (trolls, Chaos Spawn, and the Skaven Hell Pit Abomination) are best answered by defensive anti-large infantry like Longbeards or Halberdiers. These units can anchor your line and take the brunt of monster attacks, dealing consistent damage as they do 10:44. Surrounding monsters with multiple units maximizes the hits per second due to their large hitboxes.
-
Ranged fire is effective against large monsters, provided you have clear line of sight. Focus fire with armor-piercing missiles to delete high-value targets before they can break your formation.
When facing heavily armored monsters, prioritize weapon strength and armor-piercing on your response units. Swarm tactics amplify damage and speed up the kill.
Remove artillery and war machines fast

Artillery and war machines inflict heavy losses before your army closes the distance, so act fast.
-
Artillery is usually protected in the back line, firing over troops. The quickest answer is fast cavalry or monsters able to flank the entire army, bypassing defenders and shutting down the guns before they rack up damage 11:14.
-
If you have comparable artillery with range and accuracy, counterbattery fire can destroy weapons, leaving units functionally useless. This is risky—it requires accuracy and sacrifices the option to target other threats.
-
War machines (like the Steam Tank) are usually single entities with strong resistance. Focus them with overwhelming armor-piercing ranged fire or surround with high-damage melee and anti-armor units. Armor-piercing is key for efficiency.
Artillery and war machines should always be a high-priority target—stopping them early preserves your own forces and changes the dynamics of the battle.
Deal with lords and heroes safely


Lords and heroes anchor armies with unique abilities and high stats, but their counter depends on their specialization.
-
Front-line melee lords (Gor-Rok, Vlad von Carstein) are durable, dish out area damage, and can wreck infantry blobs. Focus fire or concentrate surround damage to delete them—it’s risky to commit your own characters directly, so try to catch them in vulnerable positions or use spells for single-target damage when possible 12:39.
-
Duelists are specialized for one-on-one combat—very high defense and armor-piercing attacks. Only send in your own heroes if they are stronger or have backup; otherwise, surround and whittle them down like other tough melee units 13:38.
-
Ranged lords (snipers and shooters) tend to be harder to reach quickly. Use solid troops or expendable units to shut down their ranged attacks; wait for the battle to progress before committing valuable melee units for the kill.
-
Spellcasters are high-priority but often fragile 14:35. Rush them with fast cavalry, monsters, or dedicated duelists to prevent them from casting. Pure spellcasters have low stats in all combat roles; hit them hard with anything that can reach before their spells inflict losses.
For all lord and hero types, focus fire and surround tactics amplify damage and minimize risk to your own valuable units.
Anti-large units list for Total War: Warhammer 3
"Anti-large" is a bonus on the unit card, not a unit type, and it is the single most useful thing to read before a battle. Any unit carrying it does extra damage to cavalry, monsters, chariots and flyers — the four archetypes that otherwise decide fights.
| Role | Examples | Use it against |
|---|---|---|
| Anti-large spear infantry | Empire Spearmen, Lothern Sea Guard | Cavalry charges and landed flyers |
| Anti-large halberd infantry | Halberdiers, Longbeards (Great Axes) | Front-line monsters and war beasts |
| Anti-large missiles | Skink Javelins, armour-piercing crossbows | Terrorgheists, dragons, chariots |
| Anti-large cavalry | Demigryph Knights | Enemy shock cavalry and flankers |
The trap is treating anti-large as a substitute for armour-piercing. They answer different questions: anti-large is about the size of the target, armour-piercing about how much armour it wears. A heavily armoured monster needs both.
How to beat an army of Vampire Counts monsters
A full Vampire Counts monster stack is the matchup players lose most often, because the usual advice — hold the line, grind them down — is exactly wrong against it. Vampire Counts units crumble when their leadership breaks, and they have no missiles at all.
- Kill the lord and the heroes first. Their army's leadership is propped up by characters. Remove them and the crumbling does most of your work.
- Never grind a Terrorgheist or Zombie Dragon head-on. Pin it with anti-large infantry and shoot it.
- Bring missiles you would not normally take. They have nothing to shoot back with, so your archers fire uncontested for the whole battle.
- Watch for the Hell Pit Abomination if you are facing Skaven instead — it is not a flyer and not a Vampire Counts unit, but it is the other monster that punishes a head-on grind. It regenerates and it explodes on death; surround it, focus it, and keep your lord out of the blast.
Also worth knowing
-
Gunpowder and artillery are widely considered universal counters. If your faction can field powerful guns or artillery, especially armor-piercing pieces, they solve most matchup problems—particularly against tough cavalry or monsters.
-
Chaos Dwarf artillery, especially Dreadquake Mortars, is a special challenge. Their combination of range, armor-piercing, and suppression effects make them harder to reach and neutralize; extra speed, heavy artillery, or flying units may be needed.
-
Flying units require separate handling. They can bypass lines and defensive tactics described here; use ranged fire, your own flyers, or magic to counter them efficiently.
-
Support units like war drums, corpse carts, or bloated corpses are missing from the archetype list. These play crucial roles in buffing armies or debuffing opponents—target them with fast movers or prioritized ranged fire.
-
Factions with "cheese" (e.g., Ikit Claw, Steam Tank stacks, The Menace Below) can solve many matchups with unique mechanics. Exploit faction strengths and special abilities for outsized effect.
See also: Total War: Warhammer 3 High Ground Bonus — And How To Beat An Enemy Ho — battles
Frequently asked
What beats melee infantry in Total War: Warhammer 3?
Line holders are usually not worth focusing down first. Killing their damage dealers, especially ranged units and monsters, removes most of their value. If they must die quickly, rear attacks with missiles or cavalry work better than fighting them head-on.
How do you counter ranged units?
Fast cavalry or monsters are the cleanest answer because they can get around the front line and hit the back line quickly. Shielded infantry can also absorb fire while your own missiles or monsters push through. Once the target is engaged, make sure it is shattered or wiped out so it does not return to fighting.
What is the safest way to deal with lords and heroes?
The safest approach is to focus them with range whenever possible and hit them before they reach your line. Melee specialists can be surrounded by strong infantry and monsters, while duelists and anti-hero units are better for direct fights. Spellcasters should be interrupted early because their value drops sharply once they stop casting.
How do you deal with flying units in Total War: Warhammer 3?
You cannot block them, so you have exactly three answers: shoot them with missile infantry that has a clear firing lane, contest the sky with your own flyers, or hit them with single-target damage spells and abilities. Infantry only matters once a flyer lands — at that point anti-large units pin it and your missiles finish it.
What are the best anti-air units in Total War: Warhammer 3?
There is no dedicated anti-air unit in the game. In practice the job falls to missile infantry such as Dwarf Quarrellers and Thunderers, Empire Crossbowmen, Sisters of Avelorn and Glade Guard, backed by your own flyers. Factions with a weak missile roster feel this most and generally have to trade flyers instead.
How do you counter a Terrorgheist or a Zombie Dragon?
Both are large single entities, which makes them the easiest targets in the game to focus: every missile that hits lands on the same model. Hold a missile block in reserve rather than firing it into the enemy line, pin the dragon with anti-large infantry when it commits, and concentrate armour-piercing fire on it.
How do you beat an army of Vampire Counts monsters?
Do not grind it head-on. Vampire Counts units crumble when leadership breaks, so kill the lord and heroes first and let the crumbling do the work. They also carry no missiles at all, which means your own archers fire uncontested for the entire battle — bring more of them than you normally would.
What does anti-large actually do in Total War: Warhammer 3?
Anti-large is a bonus printed on the unit card, not a unit type. It adds damage against cavalry, monsters, chariots and flyers. It is not a substitute for armour-piercing: anti-large is about the size of the target, armour-piercing about how much armour it wears, and a heavily armoured monster needs both.
Read next
How to Counter Cavalry and Anti-Large Units in Total War: Warhammer 3
This guide compares elite anti-large infantry across three matchups: cavalry, monstrous infantry, and a single-entity monster. It is for players who want to know which infantry units trade best into large targets and which ones stay useful after the fight.
How to Beat the Chaos Dwarfs in Total War: Warhammer 3
This guide covers the main campaign and battle counters for Chaos Dwarfs, including how to handle their corruption, underground movement, elite garrisons, and late-game armies. It is aimed at players who want a practical matchup plan rather than a faction overview.
How to Beat the Skaven in Total War: Warhammer 3
This guide explains how to counter Skaven on the campaign map and in battle, with an emphasis on scouting, leadership pressure, and shutting down their ranged threats. It is aimed at players who struggle to pin Skaven down before they ambush, flood, or overwhelm an army.
Total War: Warhammer 3 Artillery Guide: Every Gun Ranked
A ranked breakdown of the strongest artillery, grouped by weapon type and faction access. It is for players who want the best picks, the key stats that make them strong, and a few practical deployment notes.