
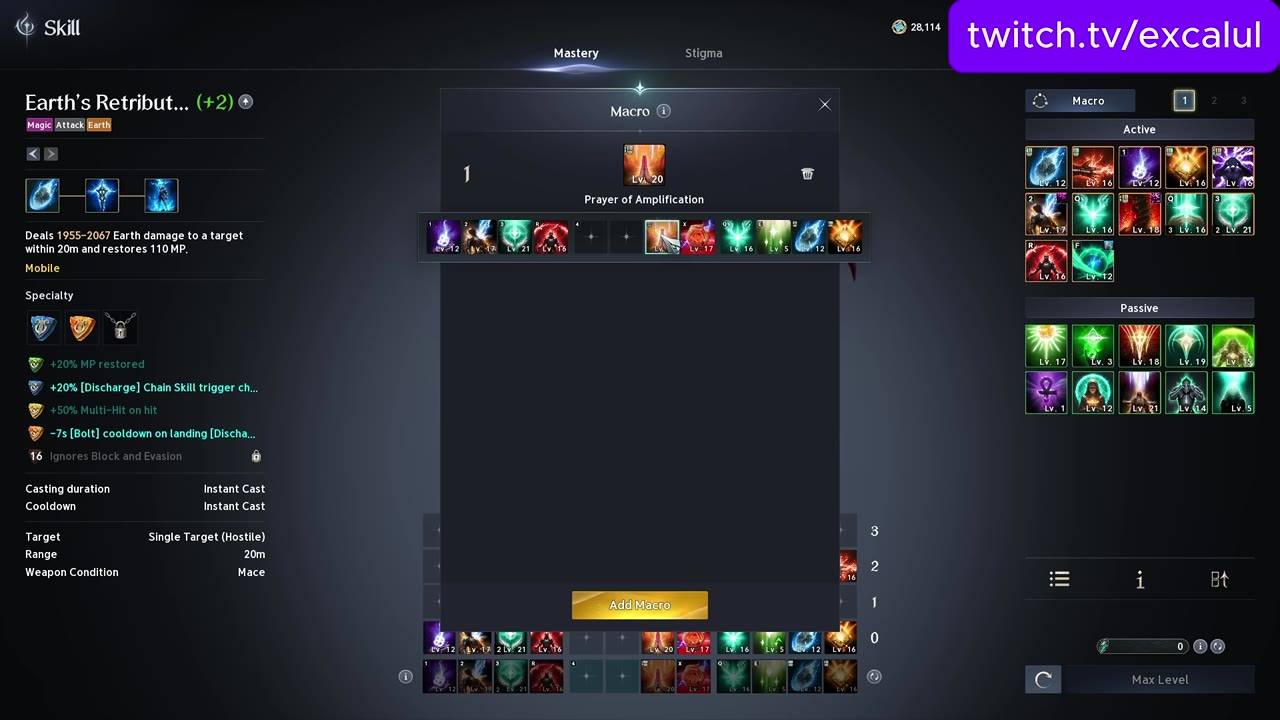
This build turns the Cleric into one of the highest damage dealers in a dungeon party without giving up the big heals. You will set the specialties for every damage and healing skill, open a fight in the right order, bind a macro that fires your damage stacks, and pick the stigmas, Arcana, titles and pet wheel stats that hold the build together.
Quick answer
| What | Answer |
|---|---|
| Main spam | Condemnation, with Chain of Torment on the target |
| Key stigma | Earth Punishment (guaranteed Condemnation crit from level 5) |
| Opening | Attack buff, Earth Punishment, Chain of Torment, then Bolt |
| Bolt usage | Cast on cooldown |
| Big heal | Radiant Recovery, cooldown 12 seconds base, 9 with specialty |
| Arcana | Blue bell and two-set magic armor |
Choose specialties for your damage skills
The whole build rests on one interaction: Chain of Torment opens the target up for Condemnation, and Condemnation refunds its own cooldown every time it crits. Everything else either feeds that loop or fills the gaps while it is down. Pick specialties in this order of priority:
| Skill | What it does for you | Specialties to take | At level 16 and beyond |
|---|---|---|---|
| Condemnation | Main spam skill; castable only while Chain of Torment is on the target 2:55 | Fourth specialty: resets its cooldown on a critical hit | 16: multi-hit (otherwise 12% damage on fewer targets). 20: all three remaining specialties 3:25 |
| Chain of Torment | Lowers the enemy's damage tolerance so the whole party hits harder, and enables Condemnation | Duration and debuff strength, so it stays up longer | — |
| Bolt | Single-instance AoE charge skill with very high damage; cast on cooldown 0:29 | Skill speed, and more damage when fewer targets are hit | 16: the crit specialty, which guarantees the crit |
| Right click | Your second-highest damage skill | Second specialty, plus the fourth or fifth | Get it to 16 as early as you can |
| Left click | Filler that feeds Bolt | Extra Discharge proc chance; the fourth specialty makes Discharge cut Bolt's cooldown | — |
| Divine Aura | High-ranking damage skill | Damage | 16: minus 10 seconds, for much better uptime |
| Stagger skill | Cooldown reduction when a boss is staggered | — | Only worth casting at 16; skip it otherwise |
| Debilitating Mark | Makes you tankier by cutting the enemy's damage boost | — | Only worth slotting for hard content |
Left click is easy to undervalue. It does little damage by itself, but each Discharge proc shortens Bolt's cooldown, so dropping left click out of the rotation means fewer Bolts per fight.
The level 16 specialties on Bolt, right click, Divine Aura and Condemnation are where most of this build's damage comes from. If you can only push a few skills to 16, push those.
Specialize your heals
You still carry the party's healing, and three skills do nearly all of it.
Light of Regeneration is a heal over time with a 30-second cooldown and a 30-second duration, so cast it every time it comes back and it never drops. At level 16 take the damage tolerance and move speed specialties; below 16, take incoming heal instead 1:58.
Healing Light is a single-target heal that restores you and the party member with the lowest HP at the same time. Take the two extra charges so you can cast it more often. At level 16 add the minus two seconds cooldown specialty, then HP restored.
Radiant Recovery is your big AoE heal and the most important of the three 2:27. Take extra consecutive use and the cooldown reduction, which brings it from 12 seconds down to 9. Once it reaches level 20, add HP restored.
| Heal | Type | Core specialties | Upgrade |
|---|---|---|---|
| Light of Regeneration | Heal over time, 30s cooldown, 30s duration | Incoming heal | 16: damage tolerance and move speed |
| Healing Light | You plus lowest-HP ally | Two extra charges | 16: minus two seconds cooldown, then HP restored |
| Radiant Recovery | Big AoE heal | Extra consecutive use, cooldown 12s → 9s | 20: HP restored |
Some dungeons punish you harder for a lingering debuff than for missing health. In those, slot debuff removal on Radiant Recovery in place of the 5% heal bonus — the Fire Temple debuff is the usual example.
Run the opening rotation and set up the macro
The macro holds two skill stacks: the right-click stack in the first macro, and the Condemnation stack in a second one you create with Add Macro 4:21. Keep the attack buff outside the macro so you can time it yourself. Putting it in is fine if you want a relaxed setup for easy dungeons.

To bind it, open key settings, go to General, and assign the macro a hotkey. A side mouse button works well, because you will be holding it down together with left click.
Then open every fight in this order:
- makes every Condemnation crit
- 4:51
- keeps damage up until Chain is back
- Discharge procs shorten the wait
The failure to watch for is Condemnation going quiet. If the macro is firing but Condemnation is not landing, Chain of Torment has fallen off the target — that is your cue to fill with left and right clicks rather than keep mashing the macro.
Pick your stigmas and passives
Earth Punishment is the stigma the build depends on. At level 5 it makes Condemnation land as a guaranteed critical hit, which is what turns the cooldown-reset specialty into a reliable loop. At level 20 it stays active for 20 seconds, cutting the downtime between windows, so get it to 20 as early as you can 5:20.

The rest of the loadout depends on your party:
| Situation | Change |
|---|---|
| No Chanter in the party | Run Mantra and level it as a high priority |
| Chanter in the party | Drop Mantra; slot resurrection or another heal |
| Solo content | Earth Punishment 20, attack buff 20, then Mantra as high as possible; Aura can sit at level 1 to 5 5:49 |
| Hard content | Replace Noble Aura with another heal, or with Benevolence, a heal over time |
Benevolence earns its slot once you clear content quickly: it keeps the party topped up passively, so you can stay focused on your damage uptime.
For passives, put points where they scale 6:48:
- Earth's Grace and the other main damage passive: as high as possible.
- The heal boost passive: worth leveling, because it scales with your attack and grows as you do.
- Noble Power: good when you have crowd control on you, since it grants damage tolerance.
- Radiant Benediction: scales poorly, so give it only a few points.
- Prayer: leave it at 15 and put the points into Noble Aura instead (see below).
Build Arcana to fix mana and reach level 20
This build burns mana fast. The fix starts with Arcana: run a blue bell and a two-set magic armor bonus 8:13. The most reliable source of the blue card for that set is the parchment. Carry mana potions as well — crafted ones are worth the effort.
The other job of Arcana is pushing your core skills to level 20. Plus four from Arcana on a skill gets it there, and the rest comes from rings.

| Piece | Target | What to roll |
|---|---|---|
| Chalice | Gold | Condemnation and Radiant Recovery levels; plus two on Radiant Recovery here |
| Parchment | Blue | Condemnation plus four; plus two on Radiant Recovery here, for plus four total 9:39 |
| Compass | Gold | An even spread, aiming to get a few skills to 16 |
| Bell and mirror | — | Earth's Grace as high as possible, then heal boost |
| Rings | — | Radiant Recovery and Condemnation, to close the last levels to 20 |
Level Empyrean Lord's Grace too; it is the second damage passive and stacks with Earth's Grace.
If you want Judgment Thunder at level 20, put plus four on it in place of Healing Light and take the remaining two levels from rings 10:09. Whether it deserves that investment is debated — see the last section.
Choose titles, wings and pet wheel stats
Titles and wings to work toward 7:44:
| Item | How you get it | Why |
|---|---|---|
| Unbound by Genus title | Max every pet wheel in the genus | Very strong; the reason to finish your wheels |
| Sentinel's Guard title | Level 30 feathers | Solid pickup on the way |
| Empty Closet title | Long-term progression | Strong goal title |
| Through Hell and Back title | — | Close alternative to Empty Closet |
| Forest Spirit Wings | — | Best for bosses |
| Darkveil Wings | — | Strong across all content |
Each level 10 pet wheel has nine slots. Slots 1, 2, 3, 5, 6, 8 and 9 want the same stats on every wheel; slots 4 and 7 change from wheel to wheel 10:38.
| Slots | Stat to roll |
|---|---|
| 1 and 5 | Attack bonus or max attack |
| 2 and 8 | HP increase percent |
| 3, 6 and 9 | Mostly accuracy, some crit |

| Wheel | Slot 4 | Slot 7 |
|---|---|---|
| Cogni | Crit damage boost or PvE damage boost | Damage tolerance |
| Ferra | Weapon damage boost | Damage tolerance 11:06 |
| Natura | Perfect chance | Damage tolerance |
| Special | Double chance | Damage tolerance |
Also worth knowing
- Level Noble Aura to 20 before Prayer. Most players' base attack is still low, so the +15% attack from level 20 Prayer adds less than Noble Aura at level 20. Stop Prayer at 15.
- Judgment Thunder in the macro is often a damage loss once Condemnation is level 20. Weaving basic attacks with Condemnation keeps Bolt's cooldown ticking down through Discharge and costs less mana. A two-column macro with Condemnation and Judgment Thunder is the alternative; test both on a training target with your own gear.
- Debuff removal on Radiant Recovery can beat the 5% heal bonus in dungeons built around a nasty debuff, such as the Fire Temple.
- Light of Regeneration can go in the macro. Its 30-second duration matches its 30-second cooldown, so firing it from the macro keeps it up permanently without tracking it yourself.
Whether Debilitating Mark belongs in the Condemnation stack or should be cast by hand has no settled answer. Since it only matters in hard content, casting it manually on pulls where you need the extra survivability is the safe default.
Frequently asked
What is the best opening rotation for a damage Cleric in AION 2?
Start with your attack buff stigma, then Earth Punishment and Chain of Torment, and cast Bolt. Hold left click together with the macro button so the stacked skills fire in sequence. Once Chain of Torment drops off the enemy, fill with left and right clicks so damage is not lost, and cast Bolt again whenever it is off cooldown or a Discharge proc has reduced its cooldown.
Should I put Judgment Thunder in my Cleric macro?
Opinions differ and the choice depends on your gear. Many players report that Judgment Thunder is a damage loss once Condemnation is at level 20, and that weaving basic attacks with Condemnation uses less mana. A two-column macro with Condemnation and Judgment Thunder is the alternative if you prefer it, so test both on a training target.
Which Cleric skills should I level to 20 first?
Condemnation and Radiant Recovery are the main targets, since level 20 unlocks their strongest specialties. Earth Punishment should also reach level 20, because it then stays active for 20 seconds. Arcana bonuses of plus four on a skill are the usual way to push these past level 16.
How do I fix mana problems on a damage Cleric?
Use a blue bell Arcana and a two-set magic armor bonus, and carry mana potions, ideally crafted ones. Leaving left click in your rotation also helps, because Discharge procs reduce Bolt's cooldown and restore resources between big casts.
Can I use the damage Cleric build if I have a Chanter in my party?
Yes. With a Chanter you can drop the Mantra stigma and use the slot for resurrection or another heal. Without a Chanter, Mantra is a high priority and should be leveled as far as you can.
Read next
AION 2 Assassin PvE Build: Skills, Macros and Rotation
Covers the Assassin's skill leveling order, stigma choices, skill bar and macro setup, DPS rotation, and the Daevanion, wing, Genus Insight and Pantheon upgrades that raise PvE damage. Written for Assassin players in AION 2 Global who want to stop under-performing in boss fights.
AION 2 Templar PvE Build, Stigmas and Gear Guide
Covers the Templar's PvE skill specs, stigma choices, macro, boss opener, gear stats, Arcana, Pantheon and Pet Genus rolling. Written for Templar players who want to maximise damage in dungeons.
AION 2 Chanter PvE Guide: Skills, Stigmas and Macro Setup
Covers the Chanter's leveling skill setup, stigmas, passives and one-button macro, then the changes that matter from level 45 onward. Written for new Chanter players who want to deal strong damage while buffing a party in PvE.
AION 2 Sorcerer Build: Skills, Passives, Stigmas and Rotation
A PvE Sorcerer build for AION 2 covering skill levelling order, specialties, passives, stigmas, Daevanion boards, the cast rotation and a three-button macro. It is written for players who want strong single-target and area damage against bosses, not just on a training dummy.