
This build gets a PvE Sorcerer doing strong single-target and area damage against real bosses, not only against a training dummy. It covers which skills to level first and which specialties to take, then how to rank passives, stigmas and Daevanion points. The last two sections give you the cast order and a macro that plays the whole rotation while you hold three mouse buttons.
Quick answer
| What | Answer |
|---|---|
| Skill order | Wish of Concentration, Flame Arrow, Firestorm, Blaze, Bitter Cold, Hellfire |
| Top passive | Robe of Flame first |
| Stigma level | Level 5 minimum on every stigma in use |
| Hellfire specialty | +30% damage and multi hit |
| Wish at level 16 | Cast first before level 16; move to the end of the rotation at level 16 |
| Macro delay | 10 ms under 50 ping; 15 to 20 ms above 50 ping |
| Easy bindings | Flame Arrow on left click, macro on right click, Hellfire on mouse button 4 or 5 |
Level your skills in the right order
Level skills in this order: Wish of Concentration, Flame Arrow, Firestorm, Blaze, Bitter Cold, then Hellfire 4:24. Each skill unlocks breakpoints as it levels, and those are what you are buying. The one that matters most is Wish of Concentration at level 16, because its specialty there cuts every other cooldown.
The specialties to pick for each skill 4:53:
| Skill | Specialty to take | Why |
|---|---|---|
| Flame Arrow | 50% on hit, 5% damage boost | It fires constantly, so a flat boost adds up |
| Firestorm | Skill speed, plus −2 seconds to Hellfire's cooldown | Faster casts and more Hellfire |
| Bitter Cold | Plus one, ignore invasion | Its Land as Critical effect works in PvE, not only PvP |
| Blaze | Multi hit, delayed damage | Mana holds up fine without a mana specialty |
| Flame Scattershot | Mobile, multi hit | Lets you keep moving |
| Winter's Shackles | PvE damage boost | Also feeds the Winter Chain skill |
| Wish of Concentration (before 16) | +10 additional attack, +10 combat speed | Best option until the cooldown specialty unlocks |
| Wish of Concentration (at 16) | −10 seconds to all skill cooldowns | Brings every big cast around sooner |
| Hellfire | +30% damage, ignore block and invasion, Land as Multi Hit | What top parsers run |
Hellfire also offers +30% damage with fire damage over time for 10 seconds on hit. It reads like the stronger option, but the multi hit version out-damages it on bosses. The ignore block and invasion half is aimed at PvP; Land as Multi Hit is the part you want.
Do not judge specialties on a training dummy. Several of them, multi hit effects in particular, do not report properly there. Check the damage meter against a boss before you swap anything.
For a sense of where this lands: a Sorcerer at 87,000 gear score cleared an elite global boss at 24,300 boss DPS on this core 0:59. Hellfire was their top damage source, Blaze second and Firestorm third. That is the same order the levelling priority above is built around.
Choose passives and stigmas
Rank passives like this 5:52:
| Priority | Passive | What it does for you |
|---|---|---|
| 1 | Robe of Flame | Large damage boost; get it first |
| 2 | Fire Mark | Damage; take it right after |
| 3 | Grace of Enhancement | Another PvE damage boost |
| 4 | Robe of Earth | More critical damage while above 50% mana, which is most of the fight |
| 5 | Vitality | Last of the core set |
Grace of Resistance and Absorb Essence are defensive passives. Leave them alone unless you actually need the defence, and even then the stigma swap below is the better fix.
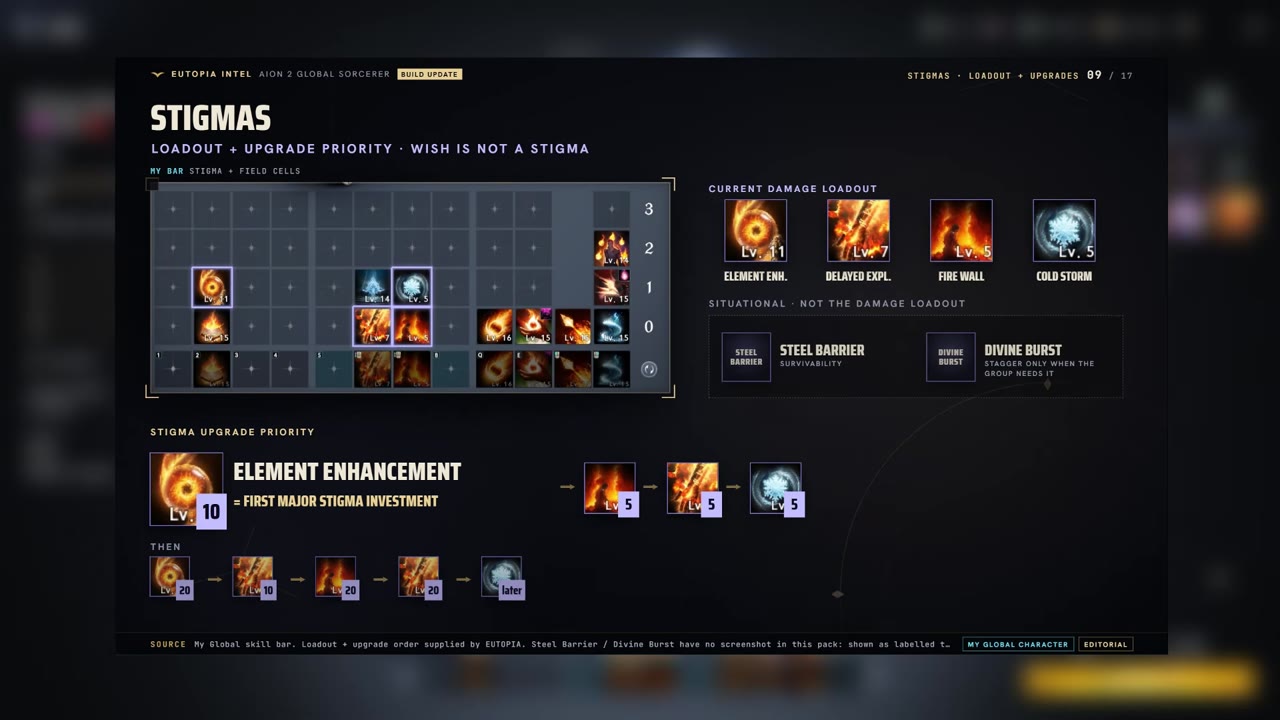
Stigmas follow a similar ladder 6:50. The rule that matters most: get every stigma you have in use to level 5 before pushing any one of them further. Most of them gain extra damage at that breakpoint, and Delayed Explosion also gets a shorter cooldown there.
| Priority | Stigma | Target |
|---|---|---|
| 1 | Element Enhancement | Level 5, then level 10 if you are ahead |
| 2 | Delayed Explosion | Level 5 (cooldown drops at the breakpoint) |
| 3 | Fire Wall | Level 5 |
| 4 | Cold Storm | Level 5 |

If you are ahead of the curve, push stigmas to level 10. Do not run one all the way to 20 while the others sit below their breakpoints. The spread is worth more than the peak.
Swap Cold Storm for Steel Barrier 7:18. It is very strong in harder content and costs you less damage than moving into the defensive passives.
Spend Daevanion points where they count
The Daevanion boards follow the same priority as your skill levelling 7:47. Fill them in this order: Wish of Concentration first, then Firestorm, Flame Arrow, Blaze, Bitter Cold, Winter's Shackles, and Hellfire last.

Across the boards, the nodes worth taking include Flame Scattershot, Fire Mark, Firestorm, Grace of Enhancement, Winter's Shackles and Blaze. Skip the rest until those are done.
Hellfire comes last in the order but still needs a minimum: take it to at least 12 so it reaches its breakpoint 8:16. Going a little past 12 adds a small amount of damage. The real goal on every board is hitting breakpoints, not maxing one skill while another sits just short of its next one.
Run the rotation before and after Wish level 16
The cast order changes once at a single point: when Wish of Concentration reaches level 16. Before that it opens the fight. After that it closes the rotation, because its −10 second cooldown specialty is worth more once everything else is already on cooldown.

The order before level 16 9:44:
- first only while it is below level 16
- early because its cooldown is shorter
- weave Flame Arrow in between everything
- 10:13
Flame Scattershot only works while a boss is staggered, so it stays greyed out on a training dummy. That is expected. Do not drop it from your bar because a dummy test showed it doing nothing.
Casting Fire Wall and Cold Storm straight after Element Enhancement scores higher on a training dummy 11:40. On a boss that moves around, which is most of them on the pull, both ground effects land where the boss used to be. Keep the standard order and throw Delayed Explosion and Winter's Shackles while the boss is still repositioning. Then drop Fire Wall and Cold Storm once it settles. Only use the dummy order on a boss you know stands still.
Decide whether Ice Chain and Frost Burst earn a slot
A damage-share breakdown can make an ice skill look like free damage when it is not. In a test running Ice Chain with Cold Wave, those two skills made up around 15% of the displayed damage 12:39. Sustained DPS still went down, because every ice cast replaced a Flame Arrow and slowed the rest of the fire skills that depend on it.
The rule to take away: a skill showing 15% of your damage does not mean it added 15% to your damage. It means 15% of your damage came from that skill instead of something else, and the something else is usually doing more per second.
Frost Burst is the milder case 13:37. In controlled tests it sometimes gained about 0.8% DPS and sometimes lost 2 to 3%, depending on how often its guaranteed crit landed. There is no consistent sustained gain from forcing it into the core single-target rotation.
| Option | Effect on sustained single-target DPS | Verdict |
|---|---|---|
| Pure fire rotation | Baseline | Default |
| Add Frost Burst | Between about +0.8% and −3% | Fine if the rotation bores you |
| Add Ice Chain with Cold Wave | Lower, despite around 15% of displayed damage | Skip for bossing |
| Add both Ice Chain and Frost Burst | Displaces even more Flame Arrow casts | Never |
If you want more variety, add one of Frost Burst or Ice Chain and accept the small cost. Never both.
Set up the three-button macro
Build the macro on the pre-level-16 order from the rotation section. The goal is one hold of three mouse buttons that plays the full rotation, Hellfire included.

- a skill only shows in the macro setup if it is there
- 14:35
- see the ping table below
- 17:29
- it weaves in between macro casts
- 17:59
If a skill such as Blaze does not appear in the macro setup, it is not on the bottom bar. Either move it there, or put it in one of the extra slots on another macro step. The macro checks that slot whenever it reaches the step.
Delay per step
Do not stack three copies of one ability in a row to slow the macro down. That only adds 30 ms of delay, and typing 30 into the delay field does the same thing more cleanly 15:32. Most setups want far less than 30.
| Your ping | Delay per step |
|---|---|
| Under 50 | 10 ms |
| Over 50 | Test 15 ms and 20 ms |
| Around 100 | 20 ms |
Anything from 10 to 20 ms works well, even into the hundreds of ping 16:01. You can also mix values, with some abilities at 20 and others at 10. Check your ping in game or on a damage meter before you pick a starting point.
What to expect while it runs
You can still move with WASD while holding all three buttons, except during a full Hellfire cast, which roots you for its duration 18:28. The macro does not play a perfect rotation, and it is not meant to close every gap on a training dummy. It is built to keep your casts flowing on a real boss that moves.
Also worth knowing
- Stacking the whole macro does not stop skills being skipped. A full-bar macro produced 654 casts and 1,133 hits against 642 casts and 1,098 hits for a fully stacked one. Blaze, Fire Wall and Cold Storm fired less often when stacked. Stacking only Element Enhancement and Wish of Concentration does help force those two, so stack those and leave the rest on the bar.
- You do not have to hold two mouse buttons for the whole fight. In your mouse software, record a toggle macro that presses and holds two rarely used keys, and map it to a side button. In game, add those two keys as alternate inputs for left click and the macro button. One press then holds both until you press it again, and holding the buttons yourself still works.
- Ice Chain may be a gain before skill level 16. Pure fire is only clearly ahead at level 20 with enough attack speed, and that holds for single target only. This softens the Ice Chain verdict above for low-level skills, so test it on your own character before you drop it.
Flame Arrow sometimes stops firing while you hold both mouse buttons and sweep the mouse to aim at the next target, waiting for the macro instead. There is no known fix yet. If your Flame Arrow casts drop off while you are retargeting, this is why.
Frequently asked
Why is Flame Scattershot greyed out on a training dummy?
Flame Scattershot only works while a boss is staggered, so it never activates on a training dummy. Use it against real bosses during their stagger windows rather than judging it by dummy tests.
Why is Blaze not showing up in my Sorcerer macro?
A skill only appears in the macro setup if it is on the bottom bar. You can also put Blaze or any other ability into the extra macro slots, and when the macro reaches Winter's Chill it checks Blaze as well.
What macro delay should a Sorcerer use in AION 2?
With under 50 ping, 10 ms per tick is a good starting point. Above 50 ping, test 15 ms to 20 ms, and around 100 ping try 20 ms. Typing the delay you need directly works better than stacking three of the same ability in a row, which simply adds 30 ms.
What should a Sorcerer swap in if survivability is a problem?
Swap Cold Storm for Steel Barrier. It is very strong and generally helps in harder content, and it is a better choice than dropping into defensive passives such as Grace of Resistance or Absorb Essence.
Read next
AION 2 Spiritmaster PvE Guide: Skills, Stigmas, Macro and Rotation
This guide covers the AION 2 Spiritmaster's PvE setup from leveling to mid game: which active skills, stigmas and passives to take, how to build the macro and how to run the rotation. It is written for new Spiritmaster players who want a complete, ready-to-use setup.
AION 2 Templar PvE Build, Stigmas and Gear Guide
Covers the Templar's PvE skill specs, stigma choices, macro, boss opener, gear stats, Arcana, Pantheon and Pet Genus rolling. Written for Templar players who want to maximise damage in dungeons.
AION 2 Chanter PvE Guide: Skills, Stigmas and Macro Setup
Covers the Chanter's leveling skill setup, stigmas, passives and one-button macro, then the changes that matter from level 45 onward. Written for new Chanter players who want to deal strong damage while buffing a party in PvE.
AION 2 Cleric DPS Build: Skills, Stigmas, Macro and Arcana
This guide covers a damage-focused Cleric build for AION 2, from skill specialties and the opening rotation to the stigma loadout, macro, Arcana and pet wheels. It is for Clerics who want to deal high damage in dungeons while keeping their healing tools.