
This guide gets a Templar ready for AION 2 dungeons: which skills to spec and which to skip, which stigmas to bring, how to build one macro that covers every fight, and how to open a boss with full burst. It also covers gear substats by slot, Arcana and Pantheon picks, wings, titles and a cheap way to roll Pet Genus.
Quick answer
| What | Answer |
|---|---|
| Core skill | Judgment; spec 5 removes its cooldown from level 16 |
| Fixed stigma | Noble Armor at level 15, never unequipped |
| Top gear stat | Combat speed first, double chance last |
| Opener | Noble Armor, Battlefield Banner, full-charge Punishment, dash Shield Rush, then hold the macro |
| Best wings | Talisra, 210,000 points in the season shop |
| Genus slot | Slot 4 on every board |
Set up your core skills and level 20 specs
Every skill has five specializations. Spec numbers below count from the top of the list down, so spec 1 is the first entry and spec 5 the last.
Judgment is the skill your whole rotation is built around. At level 16, its spec 5 removes the cooldown entirely 0:30, and from then on the goal is to cast it as often as possible. You do not need to change anything before 16: the macro further down performs well at any level. The next breakpoint is level 20, where you can select three specs on a skill.
Judgment is enabled by four skills: Shield Smite, Warding Strike, Shield Rush and Doom Shield. Everything else in the kit either feeds that loop or fills the gaps in it:
| Skill | Role | Keep it? |
|---|---|---|
| Judgment | Main damage; spam it | Core |
| Punishment | Second-highest damage, plus a buff to keep up 100% of the time | Core |
| Vicious Strike | Basic attack held down to animation cancel and restore mana; each hit cuts Warding Strike's cooldown by 2 seconds | Core |
| Annihilate | Good damage, especially when Doom Shield resets it | Yes |
| Hammer | Cast only when no Judgment is available | For now |
| Flash Rampage | Out-damaged by the macro, even on a broken boss | Never |
| Debilitating Smash | Lowers boss defense, which adds no PvE damage | Skip |
Hammer is a stopgap. As cooldown reduction and combat speed climb in later seasons, Judgment approaches 100% uptime and Hammer will likely leave the bar altogether. Flash Rampage looks like a burst button, but holding the macro does more damage 1:56. Debilitating Smash is covered in its own section below.
Pick passives and level your Arcana skills
Skill levels come from three places. The Daevanion board adds +4 and rings add +2, so any skill you want at level 20 still needs 4 levels from Arcana 3:22. That makes several level 20 skills extremely hard to reach. Push Judgment first, then pick one of Punishment or Vicious Strike for the second. Levels past 20 still raise Judgment's scaling, so extra levels on it are never wasted.
Six passives matter for PvE. Fury is the most important by a distance: it raises your front attack damage boost, and every time you block it raises the PvE damage boost of your whole party 4:21. Keeping it active is the reason Shield of Protection earns a stigma slot against bosses that do not attack you often.
The other five to prioritise, on gear and on Arcana alike:
- Insulting Roar
- Impact Hit
- Punishing Benediction
- Enhanced Health
- Ironclad Defense
Choose your stigmas
Until six slots unlock in later seasons, you have to choose which stigmas come into each fight. Two are fixed; the other two depend on your stigma levels, the content and how strong your party is.
| Stigma | Level to aim for | What it does | When to take it |
|---|---|---|---|
| Noble Armor | 15, then leave it | 50% increased Fury and Insulting Roar effect | Always |
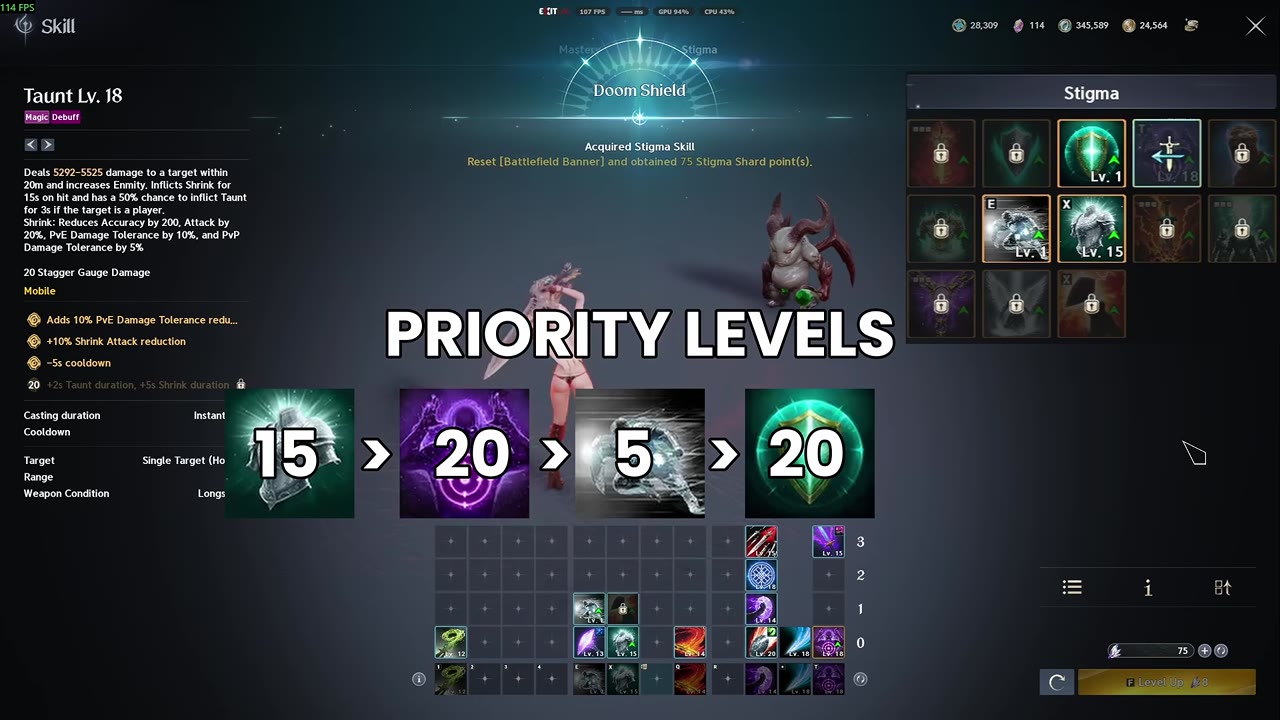
| Taunt | 5, then 15 and 20 | Level 5 gives 10% PvE damage tolerance reduction; 15 and 20 shorten the cooldown and extend the duration | Always |
| Doom Shield | 5, then stop | 3 seconds of Judgment time | Low investment, and the farming build |
| Shield of Protection | Any | Guarantees 100% Fury uptime and takes pressure off the healer | Bosses that rarely attack you |
| Battlefield Banner | 20 | Strong damage boost | Only at level 20; uptime is too low before |
| Empyrean Lord's Punishment | Any | Situational | Some use in the nightmare dungeon; lowest priority |
| Executing Blade | — | Defense reduction | Never |
Noble Armor is the one stigma you never unequip 5:19. Rush it to 15, put it on the bar and stop spending on it.
Taunt boosts the damage of the whole party, not just yours. With levels 15 and 20 shortening its cooldown and stretching its duration, its debuff reaches almost 100% uptime 5:47, which is why it stays in every build here.
Doom Shield only has one relevant level for dungeons: 5. Level it there and move your resources elsewhere — the farming build is the exception, covered next.
Build for fast farming or for dungeons
Swap stigmas between two setups depending on whether you are clearing weak mobs or fighting bosses.

| Build | Stigmas | Use it for | What it needs |
|---|---|---|---|
| Farming | Doom Shield at level 15 is the priority | Abyss Corridors, Pets, Ascension Trial, Daily Dungeon and any content full of weak mobs | Auto target enemy on skill use turned on |
| Dungeon, maximum DPS | Noble Armor, Taunt, Battlefield Banner, Doom Shield | Bosses | Bosses that attack often enough to proc Fury from passive block, and a healer who can absorb the damage |
| Dungeon, low Fury | Noble Armor, Taunt, Battlefield Banner, Shield of Protection | Bosses that rarely hit you | — |
| Dungeon, Banner under 20 | Noble Armor, Taunt, Doom Shield, Shield of Protection | Bosses, before Battlefield Banner reaches 20 | — |
The farming build works because level 15 Doom Shield resets its cooldown every time you kill an enemy 7:14. Once your gear is high enough, Doom Shield and Annihilate alone kill the mobs, so those are the two skills to invest in. Turn on the auto target enemy on skill use setting, then hold the macro and the build clears on its own.
The dungeon build assumes Fury keeps procing from passive blocks 7:44. If your Fury drops off during a fight, the boss is not hitting you often enough: swap Doom Shield for Shield of Protection.
Set up the macro and run the boss opener
Every build uses the same macro. Only the skills placed in its chain change.

Build the macro
- 8:40
- Otherwise Shield Smite can fire before Taunt and waste Judgment
- Hold both to deal damage
Open every boss fight
Keep the rotation going
Once the macro is running, four things are still on you:
- Doom Shield: cast it the moment the Warding Strike Judgment ends.
- Punishment: cast it whenever it comes off cooldown, without spending Judgment charges to do it.
- Boss jumps away: chase it with dash and Shield Rush — that is 2 seconds of Judgment for free 9:38. If you dodge an attack, spend the Shield Rush you gain before any other Judgment source.
- Shield of Protection, if equipped: use it once every 20 seconds, as late as possible, to block a boss attack and refresh Fury, then go straight back to holding the macro.
The boss rotation casts Doom Shield by hand, but the farming build expects it to fire while you only hold the macro. How the two fit together is an open question — check that Doom Shield is actually firing on kills before you trust the farming build to clear by itself.
Why defense reduction does not help
Defense in AION 2 is a flat damage reduction, and penetration cancels it out 10:07. With high enough penetration, a boss's defense is effectively zero before any skill touches it.
Debilitating Smash and Executing Blade only reduce whatever defense is left after penetration. Since that remainder is close to nothing, cutting it further gains almost no damage 10:34, and taking either skill costs you a skill slot and the skill points spent on it. Spend both on Judgment, Punishment or Fury instead.
Prioritise gear stats and soul binding
Until you have crafted gear, treat substats as a priority list and take the highest one each piece offers:
| Priority | Substat |
|---|---|
| 1 | Combat speed |
| 2 | Damage boost |
| 3 | Weapon damage boost |
| 4 | Multi hit |
| 5 | Attack increase |
| 6 | Active skills |
| 7 | Passive skills |
| 8 | Double chance |
Double chance sits last because bosses have a base double chance resist. Below that breakpoint it does almost nothing; once you pass it, its DPS rises sharply 11:03.
By slot:
| Slot | Substats | Skill line |
|---|---|---|
| Weapon and guard | Highest stat totals on any gear; take stats, not skills | No active skills |
| Helmet | Double chance, attack increase | Fury passive |
| Pauldrons | Double chance, critical damage boost | Fury passive |
| Armor | Damage boost | Fury passive |
| Greaves | Attack increase | Fury passive |
| Gloves | Combat speed | Fury passive |
| Cloak | Double chance, attack increase | Fury passive |
| Necklace | Combat speed | Fury passive |
| Rings | — | As many active skills as possible: Judgment, Punishment, Vicious Strike, then Pummel |

Leftover stats go to might or attack, but only after your accuracy and critical requirements are met. The requirements for Ludra are not known yet; hitting those breakpoints still comes first.
Soul binding can save you millions of kinah:
- Check the soul binding stats on every bound piece you pick up, whether from Shugo, world bosses or dungeons 12:59.
- A piece that rolls combat speed, damage boost and weapon damage boost is worth keeping. Level it to max and transfer it into your end game weapon to carry those lines over almost for free.
- Soul bind marketplace gear before you use it as a sing stone. It may roll perfect stats, which saves you sinking gear over and over.
Choose Arcana, Pantheon, wings and titles
Arcana and Pantheon pieces give special stats. Four matter most: Time gives combat speed, Illusion gives reduced cooldown, Wisdom gives double chance and Destruction gives attack increase. Death (critical hit) and Freedom (accuracy) are also useful. Every other special stat is irrelevant to PvE.
| Arcana | Special stat | Skills to look for |
|---|---|---|
| Chalice of Vigor | Time | Judgment, Fury |
| Compass of Vigor | Freedom | Pummel |
| Bell of Magic | Destruction | Fury |
| Mirror of Magic | Wisdom | Impact Hit |
| Parchment | Any set | Judgment |

The Parchment set does not matter: its base stats are worth more than the four-set effect 14:04.
Pantheon artwork drops mainly from field bosses. Some strong pieces are sold in the shop: buy the ones carrying two of the four priority stats first, then the rest of the good ones.
Wings: Talisra is the best pick at 210,000 points in the season shop 14:25. Forest Spirit wings and Nightmare wings are good alternatives, and Ultimate Deva wings are fine if you have nothing better.
Daevanion board: take every offensive node you can reach and skip skills you do not use.
| Title slot | Title | How to get it |
|---|---|---|
| Offensive | Unbound by Genus | Level every Genus board to level 10 |
| Defensive | Saint of Alcard | Reach level 30 on the Alcard monolith |
| Other | Through Hell and Back | Use it until you earn Empty Closet, a long skin grind |
If you are missing a title, open its title info to see where it comes from 15:22.
Roll Pet Genus efficiently
Genus adds little combat power on paper but is one of the best ways to raise your damage. Slot 4 is the most important slot on every board, so every step below protects your resources for it.
- Lock nothing before 10, unless slot 4 already has a top, highly rolled stat · 15:51
- 16:47
- Lock 3, 6 or 9 only if they roll exceptionally
- 17:17
The slots other than 4 want the same stats on every board:
| Slot | Stat |
|---|---|
| 1 and 5 | Max attack |
| 3, 6 and 9 | Critical, accuracy, or power shot bonus if accuracy is already capped |
| 7 | Damage tolerance or PvE damage tolerance |
| 2 and 8 | HP increase percent |
Once you have more resources, roll the second preset the same way.
Also worth knowing
- Double chance on Genus is rated differently by region. Many EU players consider it the most important Genus stat, while players in Asia do not. If your server's top Templars build around it, weigh it against the slot list above rather than ignoring it.
Frequently asked
Should a Templar use Debilitating Smash in PvE?
No. Defense works as a flat damage reduction that penetration cancels out, so bosses end up with almost no defense once penetration is high enough. Reducing the small amount left over adds nothing worthwhile, which makes the skill slot and skill points better spent elsewhere.
Which stigmas should a Templar always equip?
Noble Armor at level 15 stays equipped in every build, and Taunt is the second mandatory choice because it keeps near-constant uptime on a party-wide damage buff. The remaining two slots depend on stigma levels, the content and the party, with Doom Shield and Battlefield Banner as the usual picks.
What are the best wings for a Templar?
Talisra is the best choice and costs 210,000 points in the season shop. Forest Spirit wings and Nightmare wings are good alternatives, and Ultimate Deva wings are acceptable when nothing better is available.
Read next
AION 2 Chanter PvE Guide: Skills, Stigmas and Macro Setup
Covers the Chanter's leveling skill setup, stigmas, passives and one-button macro, then the changes that matter from level 45 onward. Written for new Chanter players who want to deal strong damage while buffing a party in PvE.
AION 2 Spiritmaster PvE Guide: Skills, Stigmas, Macro and Rotation
This guide covers the AION 2 Spiritmaster's PvE setup from leveling to mid game: which active skills, stigmas and passives to take, how to build the macro and how to run the rotation. It is written for new Spiritmaster players who want a complete, ready-to-use setup.
AION 2 Ranger Endgame Build: Rotation, Gear, Arcana and Stigmas
Covers the high-end AION 2 Ranger setup: rotation and macro, skill levels, gear stat lines, Arcana cards, power systems and stigmas. Aimed at Rangers around 2.1k to 2.8k item level who want maximum damage before the next raids.
AION 2 Sorcerer Build: Skills, Passives, Stigmas and Rotation
A PvE Sorcerer build for AION 2 covering skill levelling order, specialties, passives, stigmas, Daevanion boards, the cast rotation and a three-button macro. It is written for players who want strong single-target and area damage against bosses, not just on a training dummy.