
🎯 The core idea
A Valheim 1.0 dedicated server costs nothing to run on your own PC. SteamCMD downloads app 896660 with an anonymous login. You then start the server from a copy of start_headless_server.bat, or from a shell script on Linux. Add -crossplay and players join with a code, with no port forwarding needed. Leave it off and you forward UDP 2456-2457. Update the server after every 1.0.x patch, and back up the whole world save.
- free costs nothing
- cheap small cost
- setup needs preparation
- grind pays off slowly
- skip the thing to stop doing
Why SteamCMD beats the Steam tool for hosting

free There are two ways to install the Valheim dedicated server. You can install the "Valheim Dedicated Server" tool from your Steam library. Or you can use SteamCMD, Valve's command-line Steam client. The Rockuzza Gaming video this guide checks (uploaded on 9 September 2026, the day 1.0 launched) uses SteamCMD, for one practical reason. The library tool runs under your personal Steam account. That account can only run one app at a time, so a spare PC hosting the tool blocks you from playing on your Steam Deck or another machine. SteamCMD logs in anonymously, downloads only the server files and needs no Steam window open.
This makes it a genuinely free server. The server app can be downloaded without buying anything, and the only costs are the hardware and electricity. The Valve SteamCMD wiki is the official download page for the tool. The Valheim wiki on Fandom confirms the server runs on Windows, Linux and macOS. This guide covers the server setup on Windows and Linux.
Hardware and ports before you install

setup The video opens with its own spec sheet: 4 cores, 8 GB of system RAM, 4 GB for the server with 1-4 players, an SSD and 10-20 Mbps of upload. Those numbers are the creator's recommendations. The Fandom wiki lists its own "unofficial" figures, shown below.
| Wiki minimum | Wiki recommended | |
|---|---|---|
| CPU | 4 cores, 2.8 GHz | 6 cores, 3.4 GHz+ |
| RAM | 2 GB | 4 GB+ |
| Storage | 2 GB | 4 GB+ |
The wiki also gives a memory rule of thumb. A fresh world uses about 1.8-2.4 GB of RAM, and each area where players are active adds roughly 100-300 MB. World generation is the CPU-heavy part, so expect spikes while people explore new land. If you play on the same PC that hosts the server, plan for the video's higher numbers.
On ports, the video's slide says UDP 2456-2458. The official Valheim Dedicated Server Manual, shown on screen at 5:20, says the server uses the port you set and that port +1: 2456-2457 by default. The wiki's port table agrees. 2456 is game traffic and 2457 is the Steam query port. Nothing is listed on 2458. The comment inside the stock batch file still says 2456-2458, so forwarding all three does no harm. Only the first two are needed.
Installing SteamCMD on Windows

free Valve's wiki links the Windows download as steamcmd.zip from client-update.steamstatic.com. Create a folder such as C:\SteamCMD, extract the zip into it and double-click steamcmd.exe. On the first run it updates itself, creates its other files and leaves you at a Steam> prompt. The video does exactly this, extracting with Windows' built-in "Extract all" option.
Only download SteamCMD from Valve's page. Re-uploaded copies on random sites are an easy way to pick up malware on a machine that will stay online all the time.
Downloading the server files with app 896660

free At the Steam> prompt, run these three commands in this order. Valve's wiki warns you to set force_install_dir before you log in.
force_install_dir C:\valheim-server
login anonymous
app_update 896660 validate
896660 is the Valheim Dedicated Server app. The game itself is 892970, which is the SteamAppId the start script sets later. The captions once garble this ID as "89660" when the creator explains updates, but the commands in the video description use 896660. Wait for Success! App '896660' fully installed, then type exit.
To avoid typing this every time, save the same thing as a one-line update_server.bat next to steamcmd.exe. The Fandom wiki's version also adds -beta public to pin the default branch:
steamcmd.exe +force_install_dir "C:\valheim-server" +login anonymous +app_update 896660 validate +quit
Linux server setup with SteamCMD

setup The video only covers Windows. The commands below for a Linux server come from the Valve and Fandom wikis. Valve warns never to run SteamCMD as root, so create a steam user first. On Ubuntu, install the packaged SteamCMD:
sudo useradd -m steam
sudo add-apt-repository multiverse; sudo dpkg --add-architecture i386; sudo apt update
sudo apt install steamcmd
sudo apt install -y libpulse-dev libatomic1 libc6
The last line installs the libraries the Fandom wiki says the server needs to connect to PlayFab for crossplay. Then, as the steam user, download the server. The +@sSteamCmdForcePlatformType linux flag makes sure you get the Linux build:
steamcmd +@sSteamCmdForcePlatformType linux +force_install_dir /home/steam/valheim-server +login anonymous +app_update 896660 validate +quit
Next, create a launch script in the install folder, for example start_valheim.sh. It follows the wiki's template, which mirrors the stock Linux script:
#!/bin/sh
export templdpath=$LD_LIBRARY_PATH
export LD_LIBRARY_PATH=./linux64:$LD_LIBRARY_PATH
export SteamAppId=892970

echo "Starting server PRESS CTRL-C to exit"
./valheim_server.x86_64 -name "My Valheim Server" -port 2456 -nographics -batchmode -world "MyWorld" -password "<your-strong-password>" -crossplay

export LD_LIBRARY_PATH=$templdpath
Make it executable with chmod +x start_valheim.sh and run it. If you run a firewall such as ufw and aren't using crossplay, open the ports with sudo ufw allow 2456:2457/udp.
Copying and editing start_headless_server

skip Don't edit start_headless_server.bat itself. The file's own comment says to make a local copy, because Steam overwrites the original on every update. The video copies it to Start-Valheim.bat in the same folder and opens it in Notepad. Your copy will look like this, with your own values:
@echo off
set SteamAppId=892970

echo "Starting server PRESS CTRL-C to exit"

valheim_server -nographics -batchmode -name "My Valheim Server" -port 2456 -world "MyWorld" -password "<your-strong-password>" -crossplay
-nameis the name shown in the server list.-worldis the save name. A new world with that name is created if none exists.-passwordmust be at least 5 characters and can't appear inside the server name. The stock file's comment says this. The video first says six characters, then corrects itself to five.
Use a strong, unique password that you don't use for Steam or anything else. Anyone you give it to can join your world, and it sits in plain text in the batch file. Never show the real password, your public IP or a live join code in screenshots or videos. The video blurs its console for that reason, and every example in this guide uses placeholders like <your-strong-password>.
Double-click your copy to start the server. The first time, Windows Firewall asks for permission, and the manual says to tick every checkbox. The server is ready when the console prints Game server connected. Stop it with Ctrl+C and answer Y. The wiki warns that killing the window can lose everything since the last save.
Every launch flag in the official manual

setup Valheim has no separate settings file. The whole server config is the set of launch flags on that one line. The video's server folder includes Valheim Dedicated Server Manual.pdf, dated 9 September 2026. These are the flags it documents, read from the pages shown at 5:20 and 7:20 in the video:
| Flag | What it does | Default |
|---|---|---|
-name "..." | Name shown in the server list | none |
-port 2456 | Game port. The server also uses port +1 | 2456 |
-world "..." | World to create or load | none |
-password "..." | Join password | none |
-savedir "path" | Folder for worlds and the permission lists | Windows %USERPROFILE%\AppData\LocalLow\IronGate\Valheim, Linux ~/.config/unity3d/IronGate/Valheim |
-public 1 | 1 lists the server in the browser. 0 hides it, so players must use Join IP (good for LAN) | 1 |
-logFile "path" | Writes the log to a file | console only |
-saveinterval 1800 | Seconds between world saves | 1800 (30 min) |
-backups 4 | Number of automatic backups kept | 4 |
-backupshort 7200 | Seconds until the first backup | 7200 (2 h) |
-backuplong 43200 | Seconds between the later backups | 43200 (12 h) |
-crossplay | Uses the PlayFab backend so players on any platform can join | off |
-instanceid "1" | A unique value per server, needed when several crossplay servers run on one machine | none |
-preset, -modifier, -setkey | World modifiers (next section) | none |
The manual sums up the backup defaults this way: one backup about 2 hours old and three more 12 hours apart. The video raises -backups to 5. The 1.0 patch notes also list a -resetmodifiers startup flag that clears modifiers set earlier.
World modifiers and presets on a dedicated server

cheap Server modifiers are the dedicated-server version of the World Modifiers sliders. The manual's rules are simple. -preset sets everything at once and wipes earlier modifiers, so it goes first. -modifier lines come after it, and you can repeat them. The creator's own server uses this line, with the password replaced:
valheim_server -nographics -batchmode -name "My Valheim Server" -port 2456 -world "MyWorld" -password "<your-strong-password>" -crossplay -backups 5 -modifier combat easy -modifier deathpenalty easy -modifier resources most -modifier raids muchless -modifier portals casual
| Flag | Valid values (manual) | What the creator's choice does (wiki) |
|---|---|---|
-preset | normal, casual, easy, hard, hardcore, immersive, hammer | not used |
-modifier combat | veryeasy, easy, hard, veryhard | easy: you deal 110% damage, enemies deal 75% |
-modifier deathpenalty | casual, veryeasy, easy, hard, hardcore | easy: you drop all items and lose 2.5% of skill levels (normal is 5%) |
-modifier resources | muchless, less, more, muchmore, most | most: 3x drops (not fish, trophies or boss drops) |
-modifier raids | none, muchless, less, more, muchmore | muchless: a raid check every ~92 min at a 10% chance |
-modifier portals | casual, hard, veryhard | casual: every item can go through portals, ore included |
-setkey | nobuildcost, playerevents, passivemobs, nomap | not used. nomap removes the map, nobuildcost makes building free |
An admin can also change modifiers live from the F5 console with setworldmodifier and setworldpreset. The wiki notes a catch here. setworldmodifier portals normal does not reset portals. The only way back is setworldpreset default, which resets every key.
Crossplay, join codes and port forwarding

free Valheim 1.0 brought full crossplay, and that now includes the PlayStation 5 and Switch 2 versions. On a crossplay server (-crossplay), players don't connect to your PC directly. Server and players both talk to a Microsoft PlayFab relay. The wiki spells out what that means for you:
- No port forwarding is needed, and that includes ISPs that put you behind carrier-grade NAT.
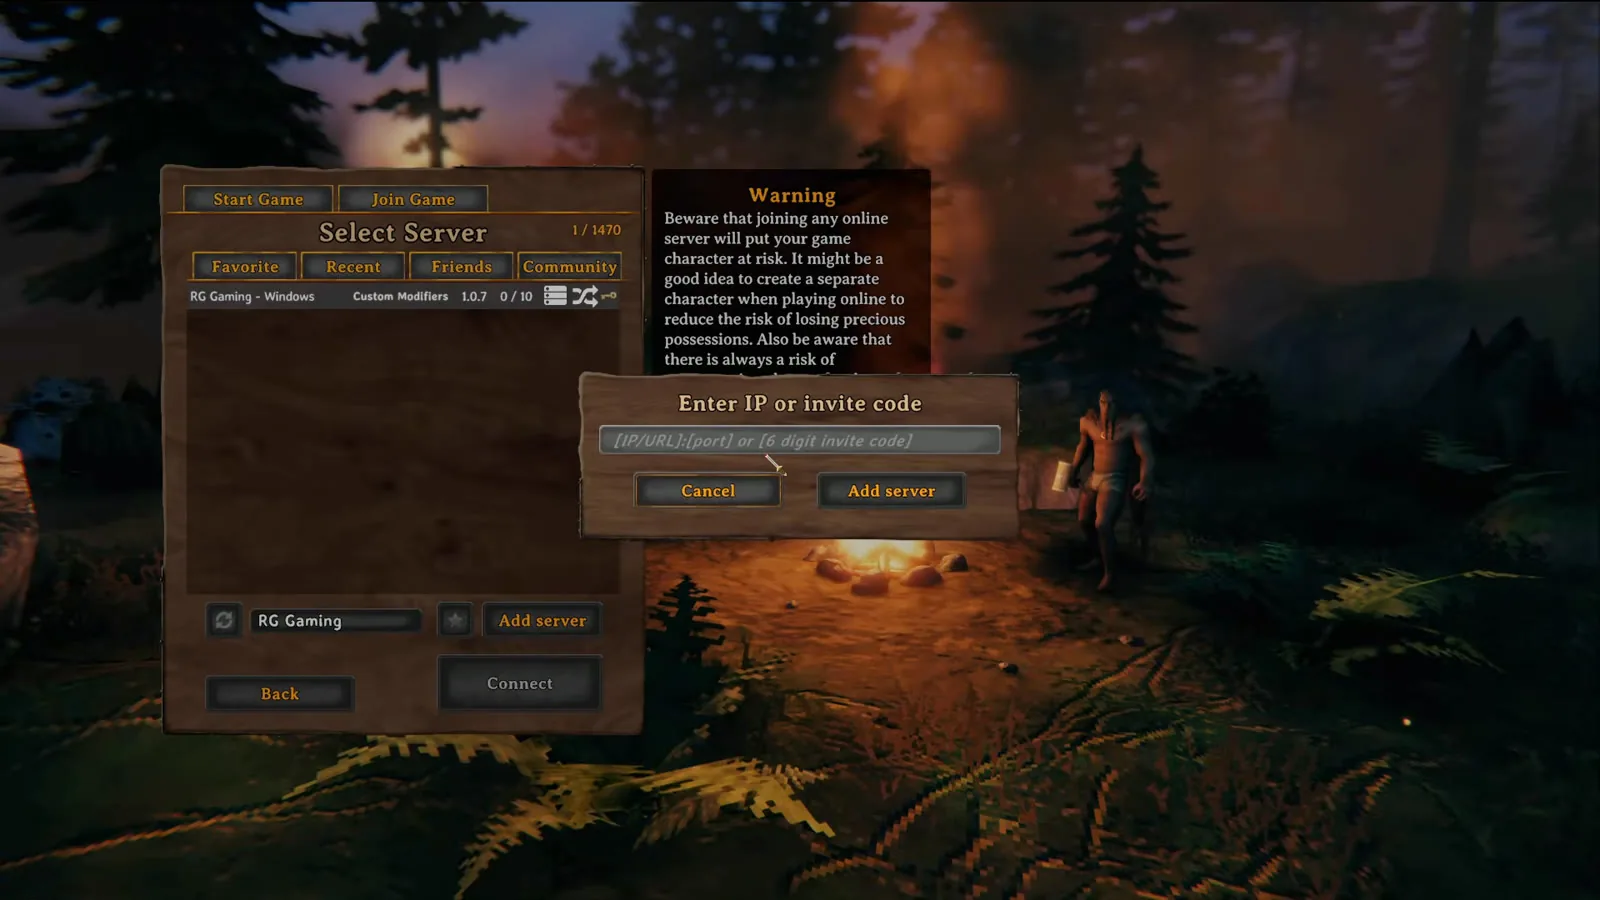
- Players join with the 6-digit join code from the server console. The video shows it in two places in the log. They can also use your public IP and port. A join code changes every time the server restarts, so send friends the new one after each restart.
- LAN and loopback addresses (
127.0.0.1) don't work in crossplay mode. - The extra relay hop adds latency, and the wiki says crossplay players are more likely to see lag and disconnects.
Without -crossplay, the server uses Steam networking directly. Only Steam players can join, and you have to forward the ports yourself. Valheim does not use UPnP. Here's what that port forwarding looks like:
| What | Where |
|---|---|
| Router | Forward UDP 2456-2457 to the server PC's LAN IP |
| Windows Firewall | Allow inbound UDP 2456-2457 |
| Linux ufw | sudo ufw allow 2456:2457/udp |
On Windows, you can add the firewall rule from an elevated command prompt:
netsh advfirewall firewall add rule name="Valheim Server" dir=in action=allow protocol=UDP localport=2456-2457
The video's reason to skip crossplay is mods. Console players can't install client mods, so a group that runs a modpack everyone must install is a PC-only, non-crossplay group anyway.
Fixing a server that isn't showing in the list

setup In the game, go to Start Game, pick a character, then Join Game. The video shows three ways in: Add server with the join code, Add server with <public-ip>:2456, or the Community tab with your server name typed in the filter box. If your server isn't showing, work through these causes:
| Symptom | Likely cause and fix |
|---|---|
| Not in the Community list | Check for -public 1, and check the console says Game server connected. The wiki says Steam's master server checks servers about every 5 minutes, so give it a few minutes. Searching for the exact name is faster than scrolling. |
| Shows up but won't connect | Version mismatch. Update the server after every patch (last section). The server list shows the server's version. |
| Join code rejected | The server has restarted since you got the code. Read the new one from the console. |
| Direct IP times out (no crossplay) | A port isn't forwarded, the firewall is blocking it, or you're behind CGNAT. Switch to crossplay or ask your ISP for a public IPv4. |
| Works on LAN only | Non-crossplay: on the same PC, use 127.0.0.1:2456. On another PC at home, use the server's LAN IP. Players outside need the public IP. |
The wiki's CGNAT check works like this. If the WAN address your router reports starts with 100, or doesn't match the address a "what is my IP" site shows, your ISP probably uses carrier-grade NAT. The server list itself was rewritten in the 0.221.4 Call to Arms update, and those patch notes say it fetches community servers much faster through PlayFab.
Admins, bans and the whitelist

setup Becoming a server admin takes one text file. In the save folder (the default path in the flags table, or your -savedir), the server keeps three lists:
| File | Purpose |
|---|---|
adminlist.txt | Players who can use admin console commands |
bannedlist.txt | Players who can't join |
permittedlist.txt | Whitelist. If it has entries, only those players can join |
Put one ID per line, with no spaces or comments on that line. The wiki describes Steam players by their steamID64. You can find it in the F2 panel in game, in the server console when someone connects, or with a site like steamid.io. On crossplay servers, IDs carry a platform prefix. The 1.0.12 patch note mentions both the older Steam_ style and a newer V_ style, and fixes the lists so both work. The safest approach is to copy the ID exactly as the server console shows it.
Admin rights unlock admin commands only, such as kick, ban and the world-modifier commands. They don't unlock cheats or devcommands. Since the Hildir's Request era, admins can also run save, players, setkey, setworldmodifier, setworldpreset, sleep and skiptime from the F5 console on a dedicated server.
Backups and world uploads with 1.0 chunked saves

setup This is the part most older server guides now get wrong. The Fandom Dedicated servers page was last edited in December 2025. It still says a world is two files, World.db and World.fwl, plus .old copies every 20 minutes. Valheim 1.0 changed that. The 1.0 patch notes describe a new save system that splits world data across chunks, so less data gets written each time and a crash mid-write does less damage. The wiki doesn't document the new file layout yet. Hosting providers' 1.0 docs describe each world as its own folder named after the world, which we couldn't confirm on the wiki. Don't hand-pick files. Copy everything.
How to make a server backup that survives 1.0:
- Stop the server with Ctrl+C so it saves cleanly.
- Copy the whole
worlds_localfolder, compressed. On Windows that's%USERPROFILE%\AppData\LocalLow\IronGate\Valheim\worlds_local. On Linux it's~/.config/unity3d/IronGate/Valheim/worlds_local. If you set-savedir, look inside that folder instead. - Keep a few dated copies somewhere else, like another drive or cloud storage.
The built-in rotation (-backups, -backupshort, -backuplong) works alongside this. It is not a replacement for an off-machine copy.
For a world upload from single player, stop the server. Copy your world's save, meaning the world folder or the .db/.fwl pair for a pre-1.0 world, from your PC's worlds_local into the server's worlds_local. Then set -world to the exact world name. Worlds stored in Steam Cloud sit in a worlds folder instead of worlds_local. Before a pre-1.0 world loads on 1.0 for the first time, keep an untouched copy of the old files. If you transfer files over FTP, use binary mode or zip them first, as the wiki advises. Never run the same world on the server and in single player at the same time.
Updating for 1.0.x patches without losing progress

grind Players can only join when the server and the game client are on the same version. 1.0 has been patched often: 1.0.10/1.0.12, 1.0.14, 1.0.15, 1.0.16, 1.0.17 on 6 October and 1.0.20 on 15 October 2026. Each update means: stop the server with Ctrl+C, run your SteamCMD update command again (the same force_install_dir, login anonymous, app_update 896660 validate), then start your copied batch file. Your copy survives the update because Steam only overwrites start_headless_server.bat.
Two of these patches matter for servers in particular:
- 1.0.17 fixed a rare bug that could erase all objects in parts of the world when a large world-save chunk was split into smaller ones. If you're on an earlier 1.0 build, update and check your backups.
- 1.0.20 (the live patch) fixed the dedicated server running at an uncapped frame rate when a client with v-sync on ran on the same computer, which wasted huge amounts of CPU. If you host and play on one PC, this update is the fix.
The video's server list shows version 1.0.7, the launch-day build, so expect your version number to be higher.
How this guide was fact-checked
- Video: "How to Setup a Valheim 1.0 Dedicated Server with SteamCMD (Full Step-by-Step)" by Rockuzza Gaming, uploaded 9 September 2026. The SteamCMD commands, the batch-file workflow, the creator's modifier line, the join flow and the Windows-only scope come from it. The launch-flag table was read from the official Valheim Dedicated Server Manual PDF shown on screen, dated 9 September 2026 in the server folder.
- Valve SteamCMD wiki (read through a web archive snapshot from 16 October 2026): the download URLs, the Ubuntu install commands, the advice not to run as root, and the rule to set
force_install_dirbefore login. - Fandom wiki, Dedicated servers page (last edited 19 December 2025): the port table, crossplay and CGNAT behaviour, requirements, admin lists, the Linux script template and libraries, graceful shutdown, and the file locations.
- Fandom wiki, Version history (edited 15 October 2026): the 1.0 chunked save system, the 1.0.12 ID fix, the 1.0.17 chunk-split fix, the 1.0.20 frame-rate fix, the
-resetmodifiersflag and the admin commands. - Fandom wiki, World Modifiers (edited 9 September 2026): what each modifier value actually does.
- Corrections to the video: ports are 2456-2457 per the official manual and the wiki, not the 2456-2458 on the video's slide (forwarding 2458 is harmless). Its RAM figures are its own recommendations; the wiki's unofficial minimum is 2 GB. The password minimum is 5 characters, as the video corrects itself. The app ID is 896660, not the "89660" that the captions garble once.
- Corrections to the wiki: the Dedicated servers page predates 1.0. Its 20-minute save interval and two-file backup advice are outdated: the 1.0 manual gives a 1800-second (30-minute) default save interval, and 1.0 saves are chunked. Nothing in this guide was tested by running SteamCMD or a server.
What this guide doesn't answer
- macOS and Docker servers: the wiki covers both, but the video doesn't, and the commands differ.
- Rented server hosts: their panels expose the same flags, but each panel is different.
- Installing server-side mods (BepInEx): that's a separate setup, and it changes which players can join.
- Running the server as a Windows service or a systemd unit: worth doing for 24/7 uptime, but it's beyond a first setup.
- The exact 1.0 chunked-save file names: the wiki doesn't document them yet, which is why the backup advice is to copy the whole folder.
Frequently asked
What ports does a Valheim dedicated server need?
UDP 2456 and 2457 by default. The official server manual says the server uses the port you set with -port and that port +1, so 2456 is game traffic and 2457 is the Steam query port. Older guides and the stock batch file comment mention 2458 too; forwarding it is harmless but not needed. If you launch with -crossplay you don't need to forward any ports at all, because players connect through a PlayFab relay.
How do I install a Valheim server with SteamCMD?
Download SteamCMD from Valve's wiki, then run force_install_dir with your server folder, login anonymous, and app_update 896660 validate, in that order. On Windows the one-line version is: steamcmd.exe +force_install_dir "C:\valheim-server" +login anonymous +app_update 896660 validate +quit. On Linux add +@sSteamCmdForcePlatformType linux and run it as a non-root steam user. No Steam account or purchase is needed for the anonymous download.
Why is my Valheim server not showing in the server list?
Check that the launch line has -public 1 and that the console printed 'Game server connected'. Steam's master server only checks servers about every 5 minutes, so wait a few minutes and search the Community tab by exact name. If it shows but won't connect, the server and game versions don't match, so update the server with SteamCMD. On crossplay servers the 6-digit join code changes on every restart, so share the new one.
How do I make myself admin on a Valheim dedicated server?
Add your ID to adminlist.txt in the server's save folder (by default %USERPROFILE%\AppData\LocalLow\IronGate\Valheim on Windows or ~/.config/unity3d/IronGate/Valheim on Linux, or your -savedir). Put one ID per line with no spaces or comments, and copy it exactly as the server console shows it; crossplay servers use platform-prefixed IDs such as Steam_. Admin unlocks kick, ban, save and world-modifier commands in the F5 console, not cheats.
How do I back up a Valheim 1.0 server world?
Stop the server with Ctrl+C so it saves cleanly, then copy the whole worlds_local folder and zip it. Valheim 1.0 splits world data across chunks, so the old advice to copy only the .db and .fwl files is no longer enough. Keep dated copies off the server machine; the built-in -backups rotation (4 by default: one about 2 hours old, three 12 hours apart) is a safety net, not a replacement. Update to 1.0.17 or later, which fixed a chunk-split bug that could erase objects.
Read next
Valheim Best QoL Mods for 1.0: 15 Mods Checked for 1.0.20
Fifteen quality of life mods from JP Valheim's 1.0 list, each checked on its Thunderstore or Hexium page for a Deep North build as of patch 1.0.20. It covers what each mod does, how to install them with r2modman or Gale, which one is unconfirmed, and why to skip the original Valheim Plus.
Valheim 1.0 Update: Everything New and Changed
Everything the Valheim 1.0 update added and changed, from the Deep North and Kall to pocket upgrades, the Forge of Potential and older-biome rebalances, plus what patches 1.0.10 to 1.0.20 fixed and whether you need a new world.
Valheim Progression Guide: Biome & Boss Order
The full Valheim 1.0 progression order from the Meadows to the Deep North: each biome's boss, summon item and key drop, the metal and forge upgrade path, current Forsaken powers, and the Deep North route from Fader's Kindled Ribs to Kall Fimbulbringer.
Valheim Beginner Guide: First Days & Essential Tips
A spoiler-free Valheim 1.0 beginner guide to your first days in the Meadows: what to craft first, how to build a working starter base, which foods to eat and how Rested, Cold and Wet change your day. Recipes and numbers are checked against the Valheim wiki.