
🎯 The core idea
Good Valheim base design starts with the land, not the floor plan: build into hills, rivers and rocks, flatten only the footprint you need, and split your base into separate zones linked by roads and portals. Then use the 1.0 hammer menu's snap points, the right roof angle and the right material for each height, and finish with decorations and comfort pieces that also feed your Rested buff.
- free costs nothing
- cheap small cost
- setup needs preparation
- grind pays off slowly
- skip the thing to stop doing
These Valheim building tips come from Samo's post-1.0 video (uploaded 2 October 2026, after the hammer menu overhaul), checked against the Valheim wiki on Fandom. The game is on patch 1.0.20. This guide is about design, layout, roofs, defense and decoration. Structural stability gets only a short summary here, since it has its own guide.
Base location: build with the terrain, not against it

free Most new players hunt for a big flat field, or flatten a perfectly good slope to get one. That is the habit Samo says he had to unlearn first. Bases look far better when they sit on the side of a hill, over a river, between trees or on top of a large rock. The aerial shot above is a good example: a set of platforms and walkways built over a stream instead of on a cleared field. If you only take one idea from this guide, take this one.
Picking a base location this way also helps you mechanically:
- Trees and boulders count as ground. The wiki says trees (including ones you plant) act as "the ground" for stability, and boulders count as terrain. A deck built off a big rock or a tree trunk starts fully supported.
- Cliffs help with defense. Most creatures never jump down from a ledge (the wiki names Fenrings and Blobs as exceptions), so a plateau or cliff edge already protects one side.
- Biome borders give you more resources, and more danger. The wiki points out that a base near several biome borders gives easy access to mixed materials, but creatures from both sides will wander through it.
Leveling ground for a starter house: frame it first

cheap Sometimes you do need flat ground, for example for a starter house or a crafting hall. The hoe's Level Ground mode flattens terrain to the height you are standing on. On a natural slope your standing height keeps changing as you walk, so the result comes out lumpy.
Samo's fix: lay out the footprint with beams or floor edges first, then stand on the frame while you level. Every swing then aims at the same height. Do one pass, use Raise Ground on any low spots, and level again from the frame. Two passes usually give you a clean, even base.
Two wiki details worth knowing:
- Holding Shift while you level makes the hoe use the height of the spot you are aiming at instead of the spot you are standing on.
- Raise Ground costs 2 Stone per use and needs a workbench nearby. Bring a stack of stone before you start.
When you put the first floor down, hover over it with the hammer. Blue means it is touching the ground and fully supported. That is the foundation you want before building upward.
The 1.0 hammer menu and snap points

free Valheim 1.0 (9 September 2026) lists a "menu overhaul for hammer and serving tray" in its patch notes. The wiki doesn't yet describe the new layout, so this section sticks to what the video shows on screen and what the wiki confirms.
The video was recorded on a controller. The prompt bar at the bottom of the screen in 1.0 shows these hammer actions: Place, Remove, Toggle snapping / options, Cycle snapping, Rotate, Copy and Build Menu. The two you will use most:
- Cycle snapping steps through a piece's snap points. Use it whenever a wall or roof attaches to the wrong edge, instead of moving your character around until it lines up.
- Copy picks up the piece you are looking at, so you can repeat it without going back into the menu. On PC the wiki lists this as Shift + middle mouse button. Holding Shift also turns snapping off for free placement.
Every piece's tooltip shows the station it needs. In the frame above, Thatch Roof 45° needs a Workbench. Stone pieces need a Stonecutter and metal pieces a Forge, so check the tooltip before you wonder why a piece is greyed out.
Base layout: a main hall, a farm, roads and portals

setup Samo's preferred base layout is one main building for crafting stations and storage, plus a separate farm area for cooking stations and crops, connected by a portal and a road. He says it makes the world feel lived in. You get a reason to ride between areas, and the road itself becomes part of the design.
A layout that works through the whole game:
| Zone | What goes there | Why separate it |
|---|---|---|
| Main hall | Workbench, forge, stonecutter, chests, bed, hearth | Crafting stations need roof and cover, so this is your best-built building |
| Farm | Cultivated soil, cooking stations, fermenters | Crops need open sky, and every plant counts as an instance |
| Portal hub | All your portals, signed | Keeps travel quick and tidy, and looks great as a round platform (see below) |
| Outposts | A small shelter, a fire, a workbench, a portal | Somewhere to sleep and repair on the frontier |
The wiki adds one more layout trick: a workbench or campfire stops enemies from spawning within its radius. A few hidden campfires or workbenches around the edge of your base clear out the spawns between your buildings.
Spread out and mind your instances

skip Stop building everything in one spot. Every placed piece, plant and terrain edit counts as an instance. On PC, press F2 to see the count. In the frame above Samo's main base shows about 7,700 instances. He says a strong PC starts to lag around 20,000, and consoles probably sooner. That threshold is his experience, not a number the wiki gives.
The wiki also warns that terrain edits cause stutter just like placed objects. Raising the ground back to its original height does not remove the cost. Lay out your base so heavy-instance areas (big farms, flattened yards, stone halls) are far enough apart that they don't all load at once. The main hall + farm + portal layout above does that for you.
Valheim house design ideas: round builds and portal hubs

free Square longhouses are everywhere. Circles stand out, and they are easier to build than they look. Samo's method for a perfect circle with 2×2 wood floors:
- Lay a 3×3 square of floors, plus one floor at the top middle.
- Snap a new floor to the corner of the outermost one and rotate it one step.
- Repeat "snap, rotate" all the way around.
- If a gap appears, snap that floor to the other side instead. Sometimes the gap closes and sometimes it doesn't, so expect to adjust a couple of pieces.
To make bigger circles, add two floors to each ring. Round platforms make excellent portal hubs, like the one above with its ring of portals. For more build ideas in the same style, Samo also shows a swamp village of round treehouses joined by bridges, which he calls his "Ewok village" look.
To turn a ring into a hut, put a wall on every outer floor, then add the roof as described in the next section.
Roof tips: angles, rain and smoke

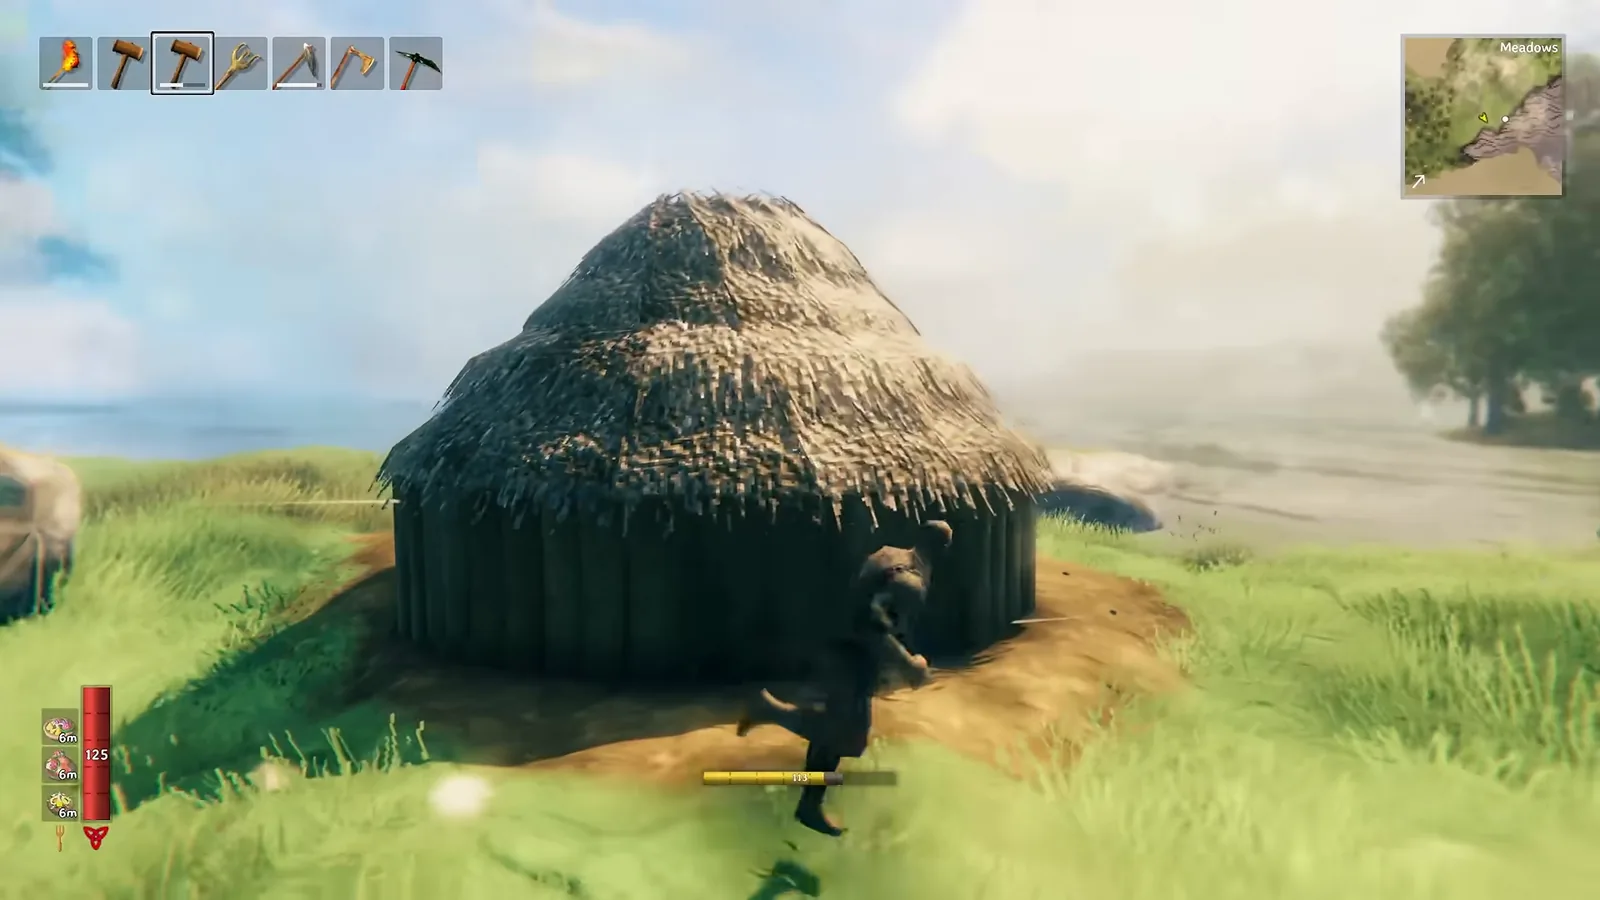
setup On the round hut, Samo places a 45° roof on top of each wall, then snaps a second ring of roof pieces to the first. He uses the thin guide lines on the roof texture to line up each piece and rotates one step each time. Leave one wall section open as a doorway and you get the cone-roofed hut shown above.
Roofs matter for more than looks, so build them with these rules from the wiki in mind:
- Rain rots uncovered wood. Wooden pieces that are uncovered in rain, not connected to a roof, or underwater decay to 50% durability. Stone, black marble and Grausten do not. Stakewalls and other defensive pieces don't rot in the rain either. Building the roof early protects a long build.
- You need cover to rest and craft. The Sheltered status needs a roof and 80% cover. Workbenches, forges and stonecutters need a roof and 70% cover to craft or repair. A very large open hall can lose its cover.
- Fires need a smoke gap. Smoke particles need roughly 1 m of open space to escape. A fire, smelter or hearth stops working if it can't release smoke for 4 seconds. A gap in the roof ridge or a short chimney is enough.
- Steeper options arrived in 1.0. Thatch, shingle, wood and ashwood all got 67° roof, wall and beam pieces, so you can now build tall, steep Nordic roofs without workarounds. Shingle roofs cost 2 Wood + 1 Tar per piece.
Build materials, height limits and the new 1.0 pieces

grind In brief (the Stability guide has the full formulas): every material has a maximum height and reach from a supported foundation, and most lose support faster sideways than straight up. Samo's test tower of stacked poles shows the differences:
| Material | Max height in the video | What the wiki says |
|---|---|---|
| Wood | 15 m | 16 m. The wiki gives 16 m for wood poles and walls, not the 15 m in the video |
| Corewood (log) | 24 m | 24 m, confirmed |
| Grausten | 26 m | No height given. Its sideways loss is 1/3, versus 1/10 going up |
| Timber (1.0) | 32 m | The wiki's stability table isn't updated for timber yet |
| Iron beams (wood iron) | 50 m | 50 m, confirmed. Same loss going up and sideways (1/13) |
The point to remember is that iron beams are the best tool for wide or overhanging builds. They lose support at the same rate horizontally and vertically, which is how Samo hangs a whole Plains house off an iron frame on one pillar. Corewood goes 24 m up but, in his test, only about 12 m sideways.
New building pieces in 1.0. The 1.0 patch notes list 80+ new buildable pieces, including:
- Timber poles and beams, decorated timber, a Timber Wall and a Lathed Timber Wall, made from Timberwood (from Timber trees in the Deep North).
- 15 Scalewood wall pieces, including 26°, 45° and 67° angled walls.
- Three drawbridges: Drawbridge, Rustic Drawbridge and Timber Drawbridge (patch 1.0.12 made it easier to fit a cart through the Timber one).
- A Timber Gate, Roundpole Gate, Stone Fence and Ice Block.
One correction: Grausten is often listed among the "new" 1.0 pieces, but it arrived with the Ashlands update (0.218.15). The only Grausten item 1.0 added is the Grausten Chest.
Base defense that actually works

setup Samo's video doesn't cover defense, so everything in this section comes from the wiki:
- Stakewalls cost 4 Wood, have 1,000 durability and don't rot in rain, which makes them the standard early perimeter wall. A Blob can just about jump one on flat ground, so in the Swamp build them on a slight rise.
- Terrain walls and moats beat built walls. Creatures can't dig, so a ridge raised with the hoe or a ditch dug with a pickaxe can't be broken. A pit about three blocks deep keeps most melee enemies out, though flying enemies will still come over the top if you don't have a roof.
- Jump-gaps beat gates. Enemies can break gates, but they can't cross a gap that you hop over to get in.
- Know what draws aggro. Hostile creatures target light sources (except Jack-O-Turnips) and crafting stations when they aren't fighting you. Keep those inside the wall.
- Raids need a base to trigger. With player-based raids enabled, a raid can only start if you are within 40 m of at least 3 base structures (beds, fires, workbenches, portals and similar). Workbench player-base range grows from 20 m by 4 m per upgrade, up to 36 m.
- Wards are for other players, not monsters. A Ward (5 Finewood, 5 Greydwarf Eyes, 1 Surtling Core) locks doors and blocks building within 32 m. It does not stop creatures from damaging your buildings.
The new 1.0 drawbridges also let you close a moat crossing completely, which is a cleaner version of the old trick of hanging a floor from a gate.
Landscaping and garden decorations: hoe and cultivator

cheap The hoe can do more than flatten ground. Its Paved Road mode lays the cobbled path shown above. Samo says it uses stone and needs a stonecutter nearby. Roads between your zones make a base look planned instead of scattered.
The cultivator (5 Corewood + 5 Bronze, made at the Forge) is a decoration tool too:
- Seed plants as flowerbeds. Plant carrot, turnip or onion seeds and never harvest them. They make neat little garden borders for doorways and paths.
- Grass mode repairs scars. It regrows grass on dirt you churned up. Samo shows it fixing hoed snow, and says it works in the Plains and Ashlands too. The wiki adds that it also regrows lily pads, cattails and shoreline sand.
- Crops need open sky and about 1 m of free space. A pergola over a flowerbed stops it from growing.
Serving tray decorations: mushrooms, meals and drinks

cheap Samo's favorite decorating tool is the Serving Tray, which the Bog Witch sells for 140 coins. It places any food or mead in the world, on the ground or on furniture, and the 1.0 overhaul updated its menu along with the hammer's. His ideas:
- Glowing yellow mushrooms at the foot of a birch tree for a fairy-forest look. They glow at night.
- Regular mushrooms in a ring for a fairy circle in the woods.
- A table set for dinner, with a bowl of soup and a mead next to it.
Be careful when interacting with placed food. Using it eats it, so a placed potion or meal is gone if you press the button by mistake. Use the tray's remove option to pick items back up. The wiki notes that a partly eaten feast is destroyed instead of returned.
Comfort pieces and seasonal decorations

free Decorations can also lengthen your Rested buff. Comfort sets how long Rested lasts: 8 minutes at comfort 1, plus 1 minute per extra level, up to 22 comfort from normal items. Comfort items only count within about 10 m of you, and only the best item in each comfort group counts.
| Seasonal item | Buildable (real-world date) | Comfort |
|---|---|---|
| Jack-O-Turnip | 1 October – 6 November | Counts in the Lantern group, so it doesn't stack with a Dvergr or Lava lantern |
| Yule Tree (10 Wood, 1 Fir Cone) | 1 December – 6 January | +1, no group |
| Maypole | 1 June – 6 July | +1, no group |
Samo calls the last one a "maple", but in game it is the Maypole. The Yule Tree and Maypole stack on top of everything else, which raises the maximum to 24 comfort. That is why players hide them in a pit under the house. Anything within 10 m still counts. Samo also mentions the old trick of changing your system date to unlock them. The wiki confirms that works for the Yule Tree.
One correction: the video says the Flower Garland and the Fey Lights each add a point of comfort. The wiki puts both in the Garland group together with the Yule garland and Mistletoe, so you only get +1 from the whole group. Build whichever one you like the look of. As of today (20 October) the Jack-O-Turnip is buildable, so grab one before 6 November.
Valheim building tricks: upgrade your tools

cheap A quick reminder from the video: upgrade the hammer. It only costs Wood and Stone at the workbench's Upgrade tab, and durability goes from 100 to 200 to 300 (quality 2 needs workbench level 2, quality 3 needs level 3). The hoe goes from 200 to 600 the same way, and the cultivator upgrades with Corewood and Bronze. You will spend much less time repairing tools in the middle of a build. The Serving Tray can't be upgraded.
How this guide was fact-checked
- Source video: Samo, "15+ Valheim Building Tips and Tricks", uploaded 2 October 2026 on Valheim 1.0. All images are frames from that video. The leveling method, round floors and roofs, instance counts (F2), serving-tray decorations and the material height test are taken from what the video shows on screen.
- Valheim wiki (Fandom): the Building, Building stability, Hoe, Hammer, Cultivator, Serving Tray, Cover, Shelter, Smoke, Comfort (edited 8 October 2026), Player base, Events, Stakewall, Ward, Grausten, Timberwood, Yule Tree, Jack-O-Turnip, Maypole, Fey Lights and Version history (1.0.00 to 1.0.20) pages.
- Corrections to the video: wood reaches 16 m, not 15 m. The Flower Garland and Fey Lights share one comfort group and don't stack. The "maple" is the Maypole. The Jack-O-Turnip sits in the Lantern comfort group instead of adding a free point like the Yule Tree. Separately, Grausten dates from the Ashlands update, not 1.0.
- Not on the wiki: the timber (32 m) and Grausten (26 m) height limits, the 12 m sideways reach for corewood, and the ~20,000-instance lag point are Samo's own figures, shown in the video. The details of the new 1.0 hammer menu layout aren't on the wiki yet either. The control names here come from the prompt bar visible in the video.
What this guide doesn't answer
- Exact stability formulas and support math: these are covered in the separate Building Stability guide. Here they only come up in the material table.
- Full recipes for every 1.0 piece: the wiki doesn't list Timber and Scalewood costs yet, so we left them out rather than guess.
- Deep North building: snow has to be cleared before you can build there (1.0 patch notes). Building in that biome deserves its own write-up.
- Boats, carts and bridges for vehicles: we only mention the drawbridges as a defense feature.
- Modded building (Valheim Plus, etc.): everything here is vanilla 1.0.20.
Frequently asked
Where is the best place to build a base in Valheim?
Build with the terrain instead of flattening it: hillsides, cliff edges, river banks, big boulders and trees all work well. Trees and boulders count as ground for stability, and most creatures won't jump down a ledge (Fenrings and Blobs are the exceptions), so a plateau already protects one side. A spot near several biome borders gives you mixed resources, but more creatures wander through it.
How do you level ground evenly in Valheim?
The hoe's Level Ground mode flattens terrain to the height you are standing on, so lay out the footprint with beams or floors first and stand on that frame while you level. Raise any low spots (2 Stone per use, workbench nearby) and level again from the frame. Holding Shift makes the hoe use the height of the spot you are aiming at instead.
What changed for building in Valheim 1.0?
Valheim 1.0 (9 September 2026) overhauled the hammer and serving tray menus and added 80+ build pieces. These include 67° walls, beams and roofs for wood, ashwood, thatch and shingle, timber poles and beams from Deep North Timberwood, Scalewood walls, three drawbridges (Drawbridge, Rustic and Timber), a Timber Gate, a Roundpole Gate, a Stone Fence and Ice Blocks. Grausten itself came earlier, with the Ashlands update.
How do I defend my Valheim base from raids?
Use Stakewalls (4 Wood, 1,000 durability, no rain rot) or, better, terrain walls and moats, since creatures can't dig. Keep fires, torches and crafting stations inside the wall, because enemies target them. Put Stakewalls on a slight rise in the Swamp, where Blobs can jump them. Wards only stop other players, not monsters. With player-based raids enabled, a raid needs you within 40 m of at least 3 base structures.
Do seasonal decorations like the Yule Tree and Maypole give comfort?
Yes. The Yule Tree (1 December to 6 January) and the Maypole (1 June to 6 July) each add +1 comfort in no group, which raises the maximum from 22 to 24. They only need to be within about 10 m, so you can hide them under the floor. The Jack-O-Turnip (1 October to 6 November) counts in the Lantern group instead. The Flower Garland and Fey Lights share the Garland group, so they don't stack.
Read next
Valheim 1.0 Update: Everything New and Changed
Everything the Valheim 1.0 update added and changed, from the Deep North and Kall to pocket upgrades, the Forge of Potential and older-biome rebalances, plus what patches 1.0.10 to 1.0.20 fixed and whether you need a new world.
Valheim Beginner Guide: First Days & Essential Tips
A spoiler-free Valheim 1.0 beginner guide to your first days in the Meadows: what to craft first, how to build a working starter base, which foods to eat and how Rested, Cold and Wet change your day. Recipes and numbers are checked against the Valheim wiki.
Valheim Deep North Weapons & Armor: Endgame Gear
How Valheim 1.0's Deep North gear is made: Bloodgold from petrified Gammeltrolls, moulds and Frostcores from the Winding Tunnels, then casting at the Frost Foundry. It compares Nord, Frostfire and Thunderblood tooltip stats and explains how to farm the Protector, Vanguard and Caller armor moulds.
Valheim Deep North Guide: Bloodgold, Mörkhalla and Kall
A walkthrough of Valheim's final biome, the Deep North: what to bring, how to clear deep snow, get Bloodgold from Gammeltrolls, cast the Intricate key, clear Mörkhalla and collect Malicious Blood from Jotun invasions. Updated for every fix up to patch 1.0.20.