
🎯 The core idea
Nuclear power feels overwhelming because it pulls in resources from all over your save, but you don't need a wiki spreadsheet to plan it — you need to work backwards from the reactor itself. This guide walks through building a nuclear fuel chain component by component, using the in-game Codex and a drone-based logistics setup that keeps everything manageable.
- free costs nothing
- cheap small cost
- setup needs preparation
- grind pays off slowly
- skip the thing to stop doing
Work backwards from the reactor, using the Codex

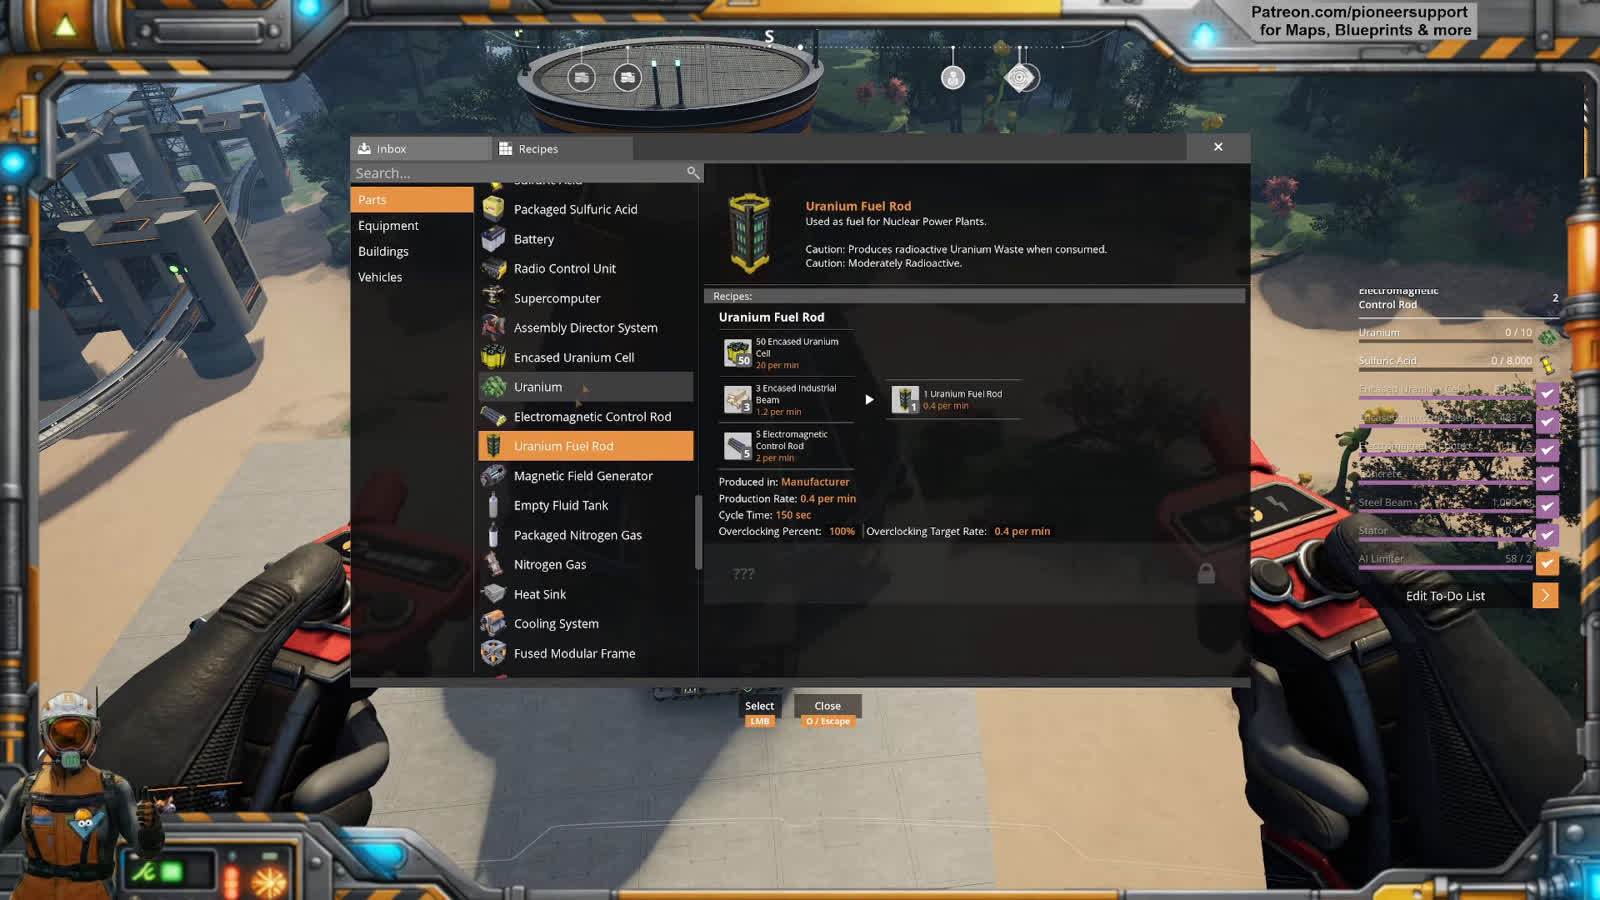
Rather than researching a full nuclear build order externally, start from the final product — Uranium Fuel Rods — and work backwards. Open the Codex (press N), find each ingredient, and add it to your to-do list, which then tracks running totals in a sidebar as you build. The Satisfactory Wiki confirms the exact recipe shown on screen: a Uranium Fuel Rod needs 50 Encased Uranium Cells (20/min), 3 Encased Industrial Beams (1.2/min), and 5 Electromagnetic Control Rods (2/min) in a Manufacturer with a 150-second cycle time, producing 1 Uranium Fuel Rod at 0.4/min.
Building Encased Uranium Cells: find sulfur and uranium close together

Encased Uranium Cells are made in a Blender using Uranium, Sulfuric Acid, and Silica. The trickiest part of the whole chain is Sulfuric Acid, which itself needs Sulfur and Water — so the single biggest time-saver in planning a nuclear site is picking a location where Sulfur and Uranium deposits sit close together. There's also a Silica-only alternate recipe for Encased Uranium Cells that skips Sulfuric Acid production entirely, which is worth prioritizing if you have it unlocked.
Control rods and beams: check for alternate recipes first

Electromagnetic Control Rods are built from Stators and AI Limiters in an Assembler, using either the standard recipe or an alternate recipe using Stators and Smart Plating instead. Encased Industrial Beams are needed in such a small amount (1.2/min) that flying them in by drone from an existing production line elsewhere on the map, rather than building a dedicated line at the reactor site, is often the simpler choice.
Sushi belts and programmable splitters: sorting multiple inputs cleanly

When drones or trains bring in several different parts on the same line — a "sushi belt" — a Programmable Splitter sorts them back out at the destination. Set each output to a specific item, and route "Any Undefined" to a sink at the end of the line. This protects the whole build two ways: it catches anything mis-programmed on the sending end, and it stops backed-up belts from cascading a jam through your entire reactor setup.
Isolating nuclear on its own priority power switch

Putting your entire nuclear power plant on a dedicated Priority Power Switch, set to the highest priority group, means it's the very last thing to lose power if your grid gets overloaded. It also lets you manually cut nuclear off from the rest of the grid to diagnose issues or jump-start the plant in isolation, without those changes affecting your main factory's power supply.
Reactor count and the plutonium connection

Once the full drone-fed pipeline into a Manufacturer is running, scaling to multiple reactors is mostly a matter of increasing throughput on the same design. It's worth deciding your reactor count deliberately: if Plutonium power is part of your endgame plan, you don't need many Uranium reactors, since Uranium Waste (a byproduct of burning Uranium Fuel Rods) is itself an ingredient for Plutonium Fuel Rods — five reactors was enough in the video's own save specifically to feed that waste into Plutonium production downstream.
Quick answers: waste, locations, and whether nuclear is worth it
If you're wondering how to handle nuclear waste disposal, this video's own answer is the best one: don't just stockpile it, feed it into Plutonium Fuel Rod production instead, since Uranium Waste is itself an ingredient for Plutonium — that's effectively free recycling of a byproduct that would otherwise just sit in storage. For uranium node locations, the video doesn't hand you specific coordinates, but the underlying advice is to prioritize map spots where uranium and sulfur nodes sit close together, since that's the single factor most likely to make or break your build's complexity. This method doesn't rely on a specific blueprint or radiation protection setup — it's built entirely around vanilla drone logistics and Codex planning — but a hazmat suit and radiation-resistant gear are still worth having on hand any time you're working directly around reactors or uranium. As for whether nuclear power is worth it at all: yes, especially once you treat it as a stepping stone toward Plutonium rather than a standalone endpoint, which is exactly the best setup this guide walks through.
How this guide was fact-checked
The Satisfactory Wiki confirms the Uranium Fuel Rod recipe shown on screen exactly: 50 Encased Uranium Cells (20/min), 3 Encased Industrial Beams (1.2/min), and 5 Electromagnetic Control Rods (2/min) in a Manufacturer, producing 1 Uranium Fuel Rod at 0.4/min with a 150-second cycle. One correction is needed: the video states each reactor needs "only 50" water per minute, but the Satisfactory Wiki (corroborated by an independent web search) confirms a Nuclear Power Plant actually consumes 240 m³ of water per minute at 100% clock speed regardless of fuel type — the wiki's figure is used here since it directly contradicts the video's recollection, which the creator himself expressed uncertainty about on screen ("I can't remember how much it is per reactor"). This video is from December 2025; core Tier 8 recipes and building stats like these are stable, patch-light numbers rather than balance-sensitive ones, so they should hold up well going forward.
What this guide doesn't answer
This video focuses on planning and logistics for a first nuclear setup, not on optimal reactor layouts, radiation safety details, or the specifics of Plutonium and Ficsonium power that come after — the creator mentions Plutonium only as a reason to limit reactor count, not as a build guide in its own right.
Frequently asked
What does a Uranium Fuel Rod need to produce in Satisfactory?
The standard recipe needs 50 Encased Uranium Cells (20/min), 3 Encased Industrial Beams (1.2/min), and 5 Electromagnetic Control Rods (2/min) in a Manufacturer with a 150-second cycle, producing 1 Uranium Fuel Rod at 0.4/min. This is confirmed exactly on the Satisfactory Wiki.
How much water does a Nuclear Power Plant need in Satisfactory?
A Nuclear Power Plant consumes 240 m³ of water per minute at 100% clock speed, regardless of fuel type, according to the Satisfactory Wiki. This is a common point of confusion since the number is easy to misremember or underestimate when planning a reactor site.
What's the best way to plan a first nuclear power setup in Satisfactory?
Work backwards from the reactor itself: open the Codex, look up the Uranium Fuel Rod recipe, and add every ingredient to your to-do list. This gives you a clear checklist of what needs to arrive at your reactor site before you start building, without needing to reference an external wiki or spreadsheet.
How do you handle nuclear waste disposal in Satisfactory?
Rather than just stockpiling it, feed Uranium Waste into Plutonium Fuel Rod production, since Uranium Waste is itself a required ingredient for Plutonium fuel. This turns a byproduct that would otherwise sit in storage into a useful resource for your next tier of power generation.
How many nuclear reactors do you actually need in Satisfactory?
Fewer than you might expect if Plutonium power is part of your plan. Since Uranium Waste feeds directly into Plutonium Fuel Rods, a modest number of Uranium reactors (five, in this guide's source video) can be enough to supply a Plutonium power line, rather than needing to scale Uranium reactors indefinitely.
Read next
Satisfactory Fuel Power Guide: Fuel, Turbofuel, Rocket Fuel & Ionized Fuel
Satisfactory Coal Power Plant Guide (100% Efficient Setups)
Satisfactory Power Guide: Biomass Burners to Nuclear
A complete walkthrough of Satisfactory's power generators, from early Biomass Burners through Coal, Fuel, and Nuclear plants, with tips for keeping the grid stable as demand grows.