
🎯 The core idea
Curse of the Allflame is three layers stacked on top of each other. In-map encounters drop charts. Charts are short exploration missions you finish by placing lanterns. Nine finished charts become a voyage — and the voyage is where essentially all the money is. Treat charts as fuel, not as content, and plan the voyage board before you sail.
- free costs nothing
- cheap small cost
- setup needs preparation
- grind pays off slowly
- skip the thing to stop doing
How the Curse of the Allflame league mechanic works

Curse of the Allflame is the new league mechanic for 3.29, and if you are a beginner to it the first thing worth knowing is that there are exactly three pieces of content — and they feed each other in one direction.
In-map encounters are the Allflame packs you meet while mapping normally. They drop good loot, hand you map-long buffs, spawn extra monsters, and take a few seconds. This is where charts come from. ZiggyD's position is that you should do these even if you have no intention of engaging with the rest of the mechanic — they are free value in a map you were already running.
Charts are miniature exploration missions. They are items, they function like maps, they roll modifiers like maps, and they can be traded and crafted like maps.
Voyages consume nine completed charts to generate one large zone. This is the payoff layer.
Getting to the Bathysphere and setting up chart storage

You reach the ship — the Sovereign — from town or your hideout by typing /boat in chat. Bind it to a macro if you use a trade helper like Awakened PoE Trade and you will never walk there again.
Two things on deck matter immediately. Chart Storage is a dedicated stash for charts; turn on storage affinity for it and every chart you ctrl-click will file itself automatically. And Valerie, the Corsair is the NPC who charts your areas — the chart tooltip literally instructs you to "Take this item to Valerie aboard the Sovereign to Chart this area."
Run charts in batches. Do ten or twenty maps, then come back and clear the pile in one sitting. Constantly bouncing between mapping and charting wastes more time than it saves.
How to run a chart without drowning

Completing a chart means one thing: place all of your lanterns. Nothing else is required. That gives you a choice — explore carefully for loot, or slam lanterns down as fast as possible to feed the voyage pipeline.
After your first chart, Valerie can enable automatic lantern placement. It triggers when you move outside a bubble. This is where most deaths start, because teleport movement skills break it: Flame Dash, Frost Blink and Lightning Warp can drop you far enough outside the bubble that the game cannot place a lantern at all.
Escaping a chart: how the bubble collapse actually works
Extraction begins the moment you place your final lantern. The bubbles then collapse in reverse order — last lantern placed collapses first, working backwards toward your first. Understanding that ordering is the whole trick, because it means your escape route is your placement route played in reverse.
To escape you only need to reach the Bathysphere and get in. Any loot that drops during extraction is vacuumed up and delivered to the ship anyway, so there is no reason to stop and pick things up. Do still open chests you spot.
The most common cause of drowning is a long, winding lantern trail with awkward pathing back through collapsing bubbles.
Crafting charts before you run them

Charts take currency exactly like maps do. The reason to craft them is only partly the chart's own rewards — the real reason is what those modifiers do once the chart is sitting on a voyage board.
Look at the modifier pool in the screenshot above. The valuable lines are not "more monster life"; they are the ones that read "increased Quantity of Items found in adjacent Areas", "increased Rarity of Items found in adjacent Areas" and "increased Dead Man's Sulphur found in adjacent Areas". Those four payoff axes — quantity, rarity, gold find and Dead Man's Sulphur — are what you are shopping for.
One hard rule: you cannot craft a chart after it has been revealed. Craft everything before you go charting, not when you sit down to build the voyage.
Rerolling room types at Allflame Crafting

The Allflame Crafting bench on the ship carries a craft that rerolls a chart's room type — and with it, the shape and the connections it will have once charted. The tooltip in the screenshot reads "Rerolls the room type of this Chart, potentially changing the connections it will have when Charted."
This matters because room type is not cosmetic. Rerolling can turn an ordinary chart into one of the unique rooms, and some of those are worth many times a normal chart. Anchorfield is the clearest example — its reward-chest clusters make it one of the most valuable rooms in the pool.
The reroll currency's name is not legible in any frame of the source video — the bench shows a cost of 646 of a green currency, and the narration's pronunciation is not clearly recoverable from the audio. Check the bench in-game before budgeting for this craft.
How to build a voyage on the Plan your Voyage board

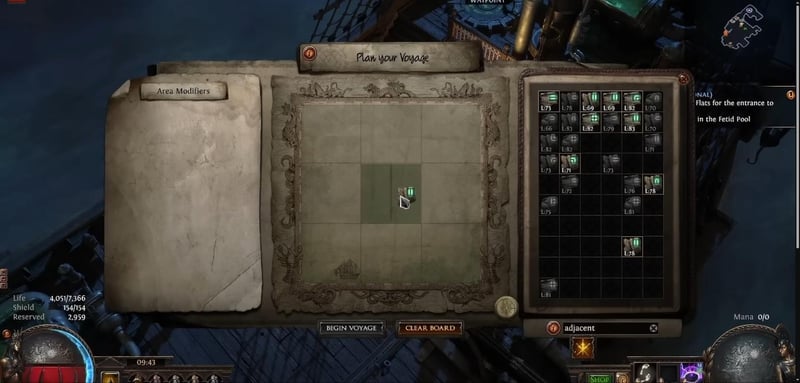
The board is a 3×3 grid — nine charts. You can drag charts into slots, or click an empty slot and pick from a list; both are useful at different points in the build. Charts have shapes and can be rotated with right-click, and the search box at the bottom of the chart pile is the tool that makes the whole thing tractable.
Note the small boat icon in the bottom-left corner of the grid. That is always where you start the voyage. It matters for the golden lantern strategy below.
You can safely include charts a little below your level — they get boosted up to a point — and you should not feel bad about destroying charts that are junk or far too low.
Adjacent modifiers, borders and voyage modifiers explained

There are three scopes of modifier on a voyage board, and mixing them up is what produces disappointing boards.
Adjacent Modifiers — the line the tooltip labels "Adjacent Modifier", which the community usually calls the chart's "bottom modifier" — apply to the chart slots horizontally and vertically next to it. They do not need a path connecting the charts, and borders do not need to be connected either. Adjacency on this board is purely positional.
Voyage modifiers apply to the entire voyage, so they need no planning at all.
The positional consequence is the whole game: a corner slot touches two neighbours, an edge slot three, and the centre slot four. An on-screen note in the video puts it bluntly — the centre is "2x as good as any other slot for adjacent".
What a finished voyage actually rolls

Once you sail, every chart's own modifiers, every adjacent modifier it received from its neighbours, and the board-wide voyage modifiers collapse into one area modifier list. The example above ended up at 84% increased item quantity, 30% increased Dead Man's Sulphur, 25% increased rare monsters, 24% increased pack size and 50% increased gold — plus a revealed minimap.
That list is the scoreboard for your board-building. If it looks thin, the board was the problem, not the charts.
Capsules: extracting loot mid-voyage and calling the Bathysphere

Voyages behave differently from charts in two important ways. You do not need to place every lantern to complete one (though you will want to, for loot), and the bubbles do not start collapsing when you place your last lantern.
Roughly one Allflame Capsule sits near the middle of each of the nine chart areas, and those areas are easy to pick out on the minimap. A capsule does two jobs. Drop loot into it and send it up to the ship — this frees inventory space and, critically, anything extracted is safe even if you die. Or use it to call the Bathysphere down, which is what actually ends the voyage.
Because the Bathysphere arrives at the capsule you called from, extraction is easy if you planned it. The failure mode is running yourself into a corner with no nearby capsule.
Reading lantern arrows to clear faster

The arrows on lanterns point toward nearby loot and notable monsters, and they update as you collect things — so a lantern worth rechecking is not a bug. You also have to be closer than you would expect before an arrow lights up at all.
The genuinely useful inference is the negative one. If a lantern shows no arrow, the unexplored pocket near it holds nothing. That lets you skip whole corners and spend your lantern budget where the loot actually is. In practice you can poke through the middle of each chart area, zigzag slightly, and let the arrows catch the rest.
If an arrow points at something you cannot identify, it is usually a golden lantern — the small floating pickups — or a special monster such as the rares that climb out of graves, which drop guaranteed coins and Allflames.
A note on terminology, since it is a common search: the source video refers to these drops simply as "Allflames". No item labelled an "Allflame Ember" appears on screen at any point in the video, so if you are looking specifically for that term, confirm it in-game or against the 3.29 patch notes rather than assuming the two are the same thing.
Voyage strategy 1: strongboxes

This is the most popular voyage strategy and the easiest to execute. Voyages can generate large numbers of Arcanist's, Diviner's and Operative's Strongboxes, all three of which are strong profit sources.
The method is mechanical: search your chart pile for strongbox, or for a specific type like operative, and place the best charts to maximise how many adjacent areas they touch. Put the most valuable one in the centre. ZiggyD's worked example — a chart reading "adjacent areas contain four operative strongboxes" sitting in the middle — yields sixteen operative strongboxes across the voyage. Then fill the neighbouring slots, where those boxes will actually spawn, with high-quantity charts.
Crafting strongboxes for scarabs

The difference between a white strongbox and a rare one is, in ZiggyD's words, huge on average. So craft the good ones — Arcanist's, Operative's, Diviner's — and don't bother with Blacksmith's, Armourer's or plain strongboxes beyond a lazy alchemy orb for extra monsters.
The part worth internalising is where the rewards live. It is the suffixes that carry lines like "Contains 3 additional Cartography Scarabs" or "Contains 2 additional Beyond Scarabs". That gives you a precise exalt rule:
- Three prefixes and only two suffixes → exalting can land a reward suffix. Worth doing.
- Only two prefixes → the exalt will probably land a prefix. Don't bother.
Exalted Orbs are cheap this league, which is what makes this arithmetic work at all.
Voyage strategy 2: golden lanterns

Golden lanterns were buffed: on top of the stacking rarity bonus they always gave, they now also grant a stacking quantity bonus. That change matters more than it sounds, because quantity scales currency, divination scarabs and general monster drops rather than just improving item tiers.
The technique is positional. Stack golden lantern sources at your starting location — the boat marker in the bottom-left of the planner — so you can collect eight or so of them before you begin clearing. Every buff you pick up early applies to the whole rest of the voyage. Scatter them randomly and you will find most of them on your way out, when they are worth almost nothing.
Payoffs come from pairing the buffs with modifiers that add and scale rare monsters.
Voyage strategy 3: rare monsters
Rare monster strategies stack two separate things: modifiers that add rare monsters, and modifiers that attach bonuses to rare monsters. The second group tends to show up as adjacent modifiers — rare monsters drop Dead Man's Sulphur, or rare monsters drop an additional scarab.
The pairing rule follows directly. When a slot carries one of those payoff adjacent modifiers, put a chart with lots of extra rares in it. Voyage-wide and adjacent modifiers that multiply rare monster counts stack on top. Rares spawned by strongboxes in those areas also gain the added drops, which is why the strongbox and rare strategies combine so comfortably.
In practice you will rarely run one pure strategy — you mix whatever your chart pile and board modifiers happen to offer.
The source names a unique "pillars" room as the go-to source of extra rare monsters (specifically rare starfish). That room name comes only from the video's narration and could not be confirmed against any on-screen label, so treat the name — not the tactic — as unverified.
Voyage strategy 4: Dead Man's Sulphur

Dead Man's Sulphur is in heavy demand for crafting, sells well, and moves instantly on the currency exchange — which makes it the least glamorous and most reliable of the four strategies.
Sulphur comes from explicit modifiers on charts. You can chaos-craft toward 90% or 120% bonus sulphur, or simply buy charts that already rolled it. The official trade site has dedicated Chart Filters including a Chart Sulphur field, shown above set to a minimum of 130 — charts at 135% were listing around 8 chaos at the time of recording.
The multiplier trick is where the real numbers appear. Adjacent modifiers that read "adjacent charts have 60% increased explicit modifier magnitudes" apply to your sulphur rolls: a 120% sulphur chart placed next to one becomes 192%.
Charts and modifiers that are simply good

Some things are worth running regardless of what strategy the rest of your board is built around.
Anchorfield is the standout unique room — it contains clusters of reward chests, and was going for roughly 50 chaos. There is also an adjacent modifier that adds two additional treasure anchors, which arrive with their own clusters of chests around them. When you see a modifier like that, make a point of fully exploring that chart area, because the chests are the entire reason you took it.
A clam-infested shelf room was quoted at 40+ chaos for its gold and its clam shells, which can drop all-resistance amulets.
Chart prices in this section are from the first fortnight of 3.29 and decay quickly as supply catches up — check the trade site rather than trusting the numbers. The clam-shelf room's exact in-game name could not be confirmed from any captured frame and is transcribed from narration only.
Reading the voyage map: the 45° diamond
One last piece of orientation that trips people up. The voyage map is rotated 45° to the right relative to the planner, so the square board becomes a diamond in-game.
That gives you a direct translation: the top-left of the planner is the top point of the diamond, the top-right of the planner is the right point, the bottom-left is the left point, and the bottom-right is the bottom point. Your starting boat, bottom-left on the planner, is therefore the left point of the diamond in the field.
If you have never had to do this in an ARPG before, expect it to take a couple of voyages before it stops requiring conscious effort — but it is the difference between confidently walking to the strongbox chart you planned and wandering into the wrong quadrant.
Curse of the Allflame is a 3.29-specific league mechanic and GGG has already tuned it once in 3.29.1. Values quoted here — chart prices, the ocean-currency crafting rule, and the golden lantern quantity buff — reflect the state of the league in early August 2026.
How this guide was fact-checked. Curse of the Allflame is new in 3.29 and the Path of Exile Wiki does not yet carry a page for it, so nothing here could be checked against the wiki the way a settled mechanic would be. Every proper noun and number in this guide was instead confirmed against in-game frames captured from the source video — Dead Man's Sulphur, Valerie the Corsair, the Sovereign, Anchorfield, the Adjacent Modifier label and the chart tooltip values are all read directly off the screen. Anything that could not be confirmed that way is flagged inline where it appears. Treat prices as the most perishable claims in the guide.
Frequently asked
What is the Curse of the Allflame league mechanic in Path of Exile 3.29?
Curse of the Allflame is built from three layers. Allflame encounters appear inside your normal maps and drop charts. Charts are short exploration missions you complete by placing every lantern. Nine completed charts are then loaded onto the Plan your Voyage board to create a single large zone — the voyage — which is where the great majority of the mechanic's rewards come from. You access all of it from the ship, the Sovereign, by typing /boat in chat.
How do charts work in PoE, and why do I keep drowning?
A chart is finished the moment you place your last lantern — that is the only completion condition. Placing the final lantern also starts the extraction, and the bubbles collapse in reverse order: the last lantern you placed collapses first, working back toward the first. Drownings almost always come from laying a long, winding trail and then having to run it backwards through collapsing bubbles. Either keep a few lanterns in reserve to lay a short path home, or place your final lantern right next to the Bathysphere.
Charts do not use map tiers — each one carries an area level (81 and 79 in the examples in this guide) plus a required character level, and slightly under-levelled charts get boosted when you place them on a voyage board.
How many charts does a voyage need, and where should the best one go?
Nine, on a 3×3 grid. Position is the entire game here: a corner slot touches two neighbours, an edge slot three, and the centre slot four. An on-screen note in the source video states the middle slot is "2x as good as any other slot for adjacent" — so your strongest Adjacent Modifier chart belongs in the centre, with high-quantity charts in the slots around it where the rewards will actually spawn.
Adjacent Modifiers do not need paths or borders connecting the charts. Adjacency on this board is purely positional.
Is Curse of the Allflame worth doing?
The in-map Allflame encounters are worth doing unconditionally — they are fast, drop loot and map-long buffs, and they are the only source of charts. Whether the rest is worth it depends on your appetite for planning: charts on their own are modest, and the video's advice is explicitly to rush them rather than loot them carefully. The payoff sits almost entirely in voyages, and a voyage is only as good as the board you built. If you are not going to plan adjacency, you are leaving most of the value on the table.
There is no published loot table for charts; what they drop scales with the quantity, rarity, gold-find and Dead Man's Sulphur modifiers rolled on the chart itself and granted by its neighbours.
What are the best voyage rewards to farm in 3.29?
Four strategies carry the mechanic, and most boards mix them.
- Strongboxes — Arcanist's, Operative's and Diviner's. Centre a chart whose Adjacent Modifier adds several of them; four adjacent zones turns a "four operative strongboxes" modifier into sixteen boxes.
- Golden lanterns — now stack quantity as well as rarity. Stack them at the starting boat so the buffs cover the whole voyage.
- Rare monsters — pair modifiers that add rares with modifiers that make rares drop extra scarabs or Dead Man's Sulphur.
- Dead Man's Sulphur — the steadiest earner, in constant crafting demand and instantly sellable.
The crew you deal with aboard the Sovereign are Valerie, the Corsair, who charts your areas and can identify your whole inventory at once, and Vesper. Prices quoted anywhere in this guide are early-3.29 and decay quickly.
Read next
Path of Exile Delve Guide Explained: Sulphite, Azurite, Fossils & Finding Hidden Walls
A beginner-friendly walkthrough of Path of Exile's Delve system: what it gives you (fossils, Azurite upgrades, unique bosses), how to sustain sulphite from mapping, and how to actually find the hidden walls that gate the best rewards.
PoE Atlas Passive Tree & Progression Guide 3.29: Voidstones, Red Altars and What to Allocate First
A step-by-step Path of Exile 3.29 Atlas guide built from Fubgun's progression video and fact-checked against the wiki: rush tier 14 for red altars, complete low-tier nodes with high-tier maps at the right rarity, take the Searing Exarch Voidstone first, and allocate the Atlas passive tree in the order that funds your league start.
PoE 3.29 Mercenaries of Trarthus Guide: Recruiting, Infamy and the Mercenary Rush Farm
Mercenaries of Trarthus returned as core content in 3.29. This guide covers how to recruit and hire mercenaries, what Infamous status actually changes, the four Trarthan scarabs, the Atlas passives worth taking, and the mercenary rushing farm that turned 400 chaos of cheap maps and scarabs into 16 divines in ninety minutes. Every number is checked against the Path of Exile Wiki.
Uber Elder Boss Fight Guide: Fragments, Mechanics & Loot Explained
How the Uber Elder dual boss fight actually works: fragment requirements, alternating invulnerability, permanent ground vortices, and loot, checked against the current wiki with notes on what's changed since HeavyHeals recorded the source video in 2024.