
🎯 The core idea
Razor's Warfare build guide walks through a build for every single weapon in Delta Force — over 60 guns in a two-hour video, one chapter each. That's too much for one sitting, so this guide pulls out five representative, fully-verified builds spanning the classes most players actually run in Warfare (Assault Rifle x2, Shotgun, SMG, and LMG), read directly from the in-game Gunsmith stat panels rather than guessed at.
- free costs nothing
- cheap small cost
- setup needs preparation
- grind pays off slowly
- skip the thing to stop doing
AK-12: control-focused handguard and optic

The AK-12's build in this video centers on the KC Hound Handguard Panel, an Upper Patch attachment whose only listed effect is a Stability boost — a clean pick with no downside shown on its effects panel. The AK-12's base stats with this piece installed: Damage 24, Range 35m, Control 68, Handling 54, Accuracy 26, Fire Rate 735 rpm, Capacity 45 rounds, Single/Burst/Auto fire modes, and a 578 m/s muzzle velocity. It's a 5.45x39mm rifle, and those stats put it toward the higher end of Control among assault rifles in this build set — useful if you're fighting at range in Warfare's larger engagement distances.

The optic slot runs a VMX Frameless Sight, whose main effect is a "Clear Sight Picture" — its calibration sliders were tuned to -0.25x zoom and -2mm eye relief in this build, trading a little magnification for a wider, cleaner sight picture rather than maximizing zoom.
K416: trading stability for faster ADS

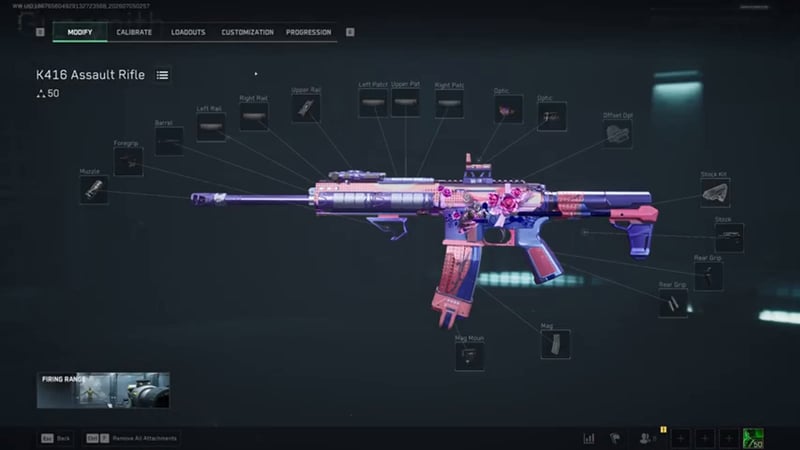
The K416 build in this video fills every attachment slot shown on the Modify screen — Muzzle, Foregrip, Barrel, Left and Right Rail, Upper Patch, Left and Right Patch, dual Optic slots, an Offset Optic, Stock Kit, Stock, dual Rear Grip slots, and a Mag — which is the full attachment map for this weapon class.

The stock slot runs a Shadow Buffer Tube Stock, and its trade-off is explicit on screen: Control and ADS Movement Speed go up, while Handling and Stability go down. The calibration numbers behind that are +6% extra Control and +4.80% faster ADS speed, against -18% breath stability while aiming and -3.84% firing stability. With this stock installed, the K416 reads: Damage 21, Range 21m, Control 64, Handling 56, Stability 55, Accuracy 57. This is a build that leans into faster aim-down-sights and tighter recoil control at the direct cost of hold-steady stability — a trade that favors a more aggressive, close-to-mid-range playstyle over long, sustained beams.
M870: a shotgun build tuned for accuracy over handling

The M870's build runs a Shotgun Vortex Choke on the muzzle slot, which raises Control, Accuracy and aiming spread tightness at the cost of Handling — the standard shotgun-choke trade of a tighter, more reliable pellet spread in exchange for slower handling. With it installed, the M870 reads: Damage 30x8 (eight pellets at 30 damage each), Range 12m, Control 34, Handling 48, Stability 47, Accuracy 77, Fire Rate 74 rpm, Capacity 8 shells, single-fire mode, 419 m/s muzzle velocity. The in-game description calls it "a classic and reliable 12-gauge pump-action shotgun."

Its full slot map covers Muzzle, Handguard, Barrel, Left and Right Rail, Firegrip, a Tactical Device slot, Optic, dual Riser Optic slots, an Offset Optic, Mag and Stock — a shotgun in this game has essentially the same attachment depth as a rifle, which is easy to miss if you've only ever equipped the muzzle and called it done.
MP7: a laser that trades visibility for handling and accuracy


With the laser installed, this MP7 build reads: Damage 20, Range 20m, Control 71, Handling 45, Stability 51, Accuracy 72, Fire Rate 950 rpm — a very high fire-rate SMG where the laser's accuracy and handling boost while active is worth the visibility trade-off for most close-range Warfare fights, since you're rarely out of an enemy's sightline at SMG range anyway.
M249: an LMG build that spends stability for reach

The M249 build reuses the same PEQ-2 Red Laser-Light Combo seen on the MP7, with the same on/off Handling and Accuracy trade and the same "Visible to Enemies" cost while active. With it installed: Damage 20, Range 46m, Control 61, Handling 50, Stability 64, Accuracy 48, Fire Rate 858 rpm — more than double the MP7's range, which is the entire point of running an LMG in Warfare's larger maps.

The barrel choice is where this build spends its stability budget: the M249 Rhino Long Barrel raises Range, Muzzle Velocity and Control, but costs Stability, Handling and Accuracy. Its calibration numbers land on +4% firing stability and +3% ADS speed against -4% ADS movement speed and a steep -9% muzzle velocity — meaning the barrel's own calibration slider claws back some of the range gain it was chosen for, so it's worth checking whether your calibrated numbers still justify the base pick before copying this build outright.
What these five builds have in common
Across all five weapons, the same pattern holds: every attachment in this video trades something for something else, and the "best" pick depends on whether you value raw Control, Handling speed, or Stability more for that specific gun's role. None of these five builds maximizes every stat at once, because the Gunsmith doesn't allow that — every slot's calibration effect list has at least one stat going down alongside the ones going up.
How this guide was fact-checked
Every attachment name, effect, and stat number in this guide is read directly from Razor's in-game Gunsmith screens (2:00:24, published 2026-07-05), captured at the chapter timestamps for each weapon. This video has no spoken narration track or captions available to transcribe — the creator's commentary, if any, isn't reflected here, and everything above comes from what the Gunsmith UI itself displays on screen (attachment names, effect arrows, and calibration percentages), which is why every claim here is tied to a specific stat panel rather than paraphrased advice.
What this guide doesn't answer
This video covers more than 60 individual weapon builds across nearly every gun in Delta Force; this guide deliberately picked five representative weapons (two Assault Rifles, one Shotgun, one SMG, one LMG) rather than transcribing the entire two-hour video, per the scope call already noted on this guide's own content-planning row. If your specific weapon isn't one of these five, the same video covers it in its own chapter — check the video's chapter list for the exact timestamp. This guide also can't tell you whether these builds are still current: attachment stats and unlock levels get retuned every season, and this video is confirmed to be Warfare-mode specific (every build shown is for the 32v32 mode, not Operations extraction), so don't assume these exact numbers carry over to an Operations loadout.
Read next
Delta Force Best AKM Loadout: Season 10 Meta Build Guide
Razor's S10 meta AKM build for Delta Force Warfare: best attachments, calibration numbers, and what the stat screens show that he doesn't say out loud.
Delta Force Best Sniper & Marksman Rifle Guide: SV-98, R93, M700 and AWM Builds
Four bolt-action sniper builds (SV-98, R93, M700, AWM) with long-range and close-range/TDM variants, built around the core rule that bolt-actions need stability, not control or firing-stability calibration.
Delta Force Season 10 Gun Tier List (Meltdown): The 5 S-Tier Weapons and Sniper Ranking
POACH's cross-class Season 10 weapon tier list: the five S-tier guns (CI-19, M7, KC-17, M14, SVCH), a separate sniper ranking, and the near-misses worth knowing about.
Delta Force Best Assault Rifles: Season 9 Top 5 Checked Against Season 10 Meltdown
Fulcrum's Season 9 top-five AR list (AK-12, MCX LT, KC-17, MK4, AR-57) cross-checked against a fresh Season 10 gun tier list — only two of the five still hold up unchanged.