
🎯 The core idea
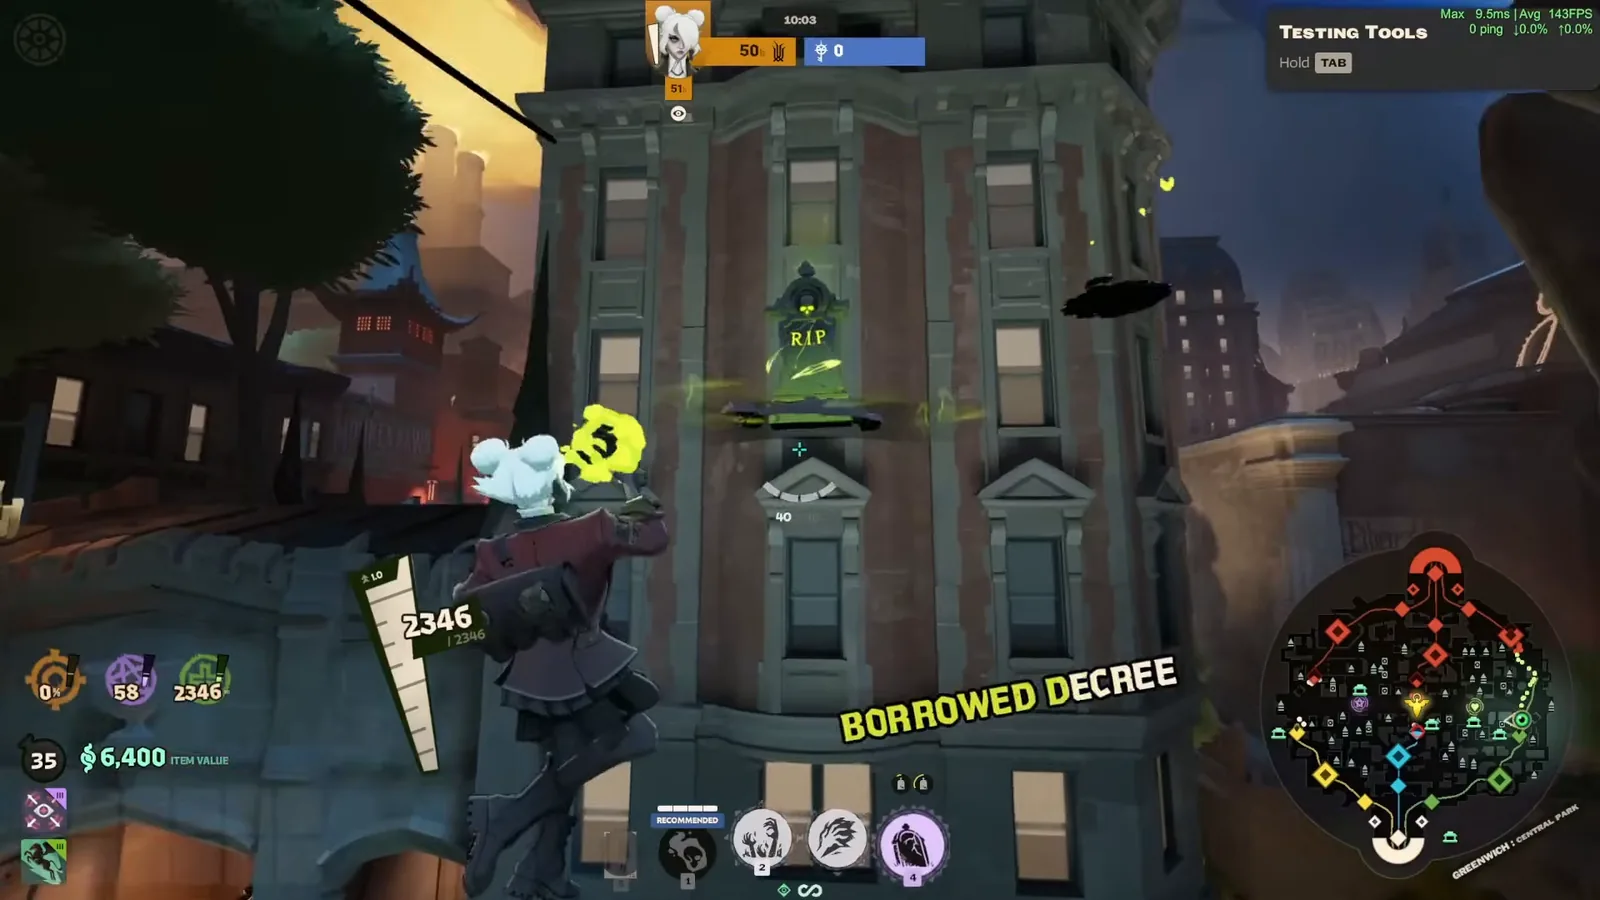
Graves wins by never fighting alone. Her beam gun steals damage and spirit resist, Jar of Dead and Grasping Hands add bodies and a wall, and her ultimate, Borrowed Decree, drops a gravestone that keeps spawning Ghouls. On the City Never Sleeps map the best gravestone spots are high ledges, trees and the roof above your own Walker, where enemies need a climb or two heavy melees to stop it.
- free costs nothing
- cheap small cost
- setup needs preparation
- grind pays off slowly
- skip the thing to stop doing
Who Graves is and how her beam gun works

Graves is Deadlock's necromancer: a summoner who fights through Deadheads, Ghouls and a wall of grasping hands while her gun drains whoever she is attached to. The wiki lists 730 base health (+35 per boon since the September 16, 2026 patch), 7 m/s move speed and 2 stamina. She was added on January 29, 2026, and her own update history shows no ability changes since the September 29 City Never Sleeps rework apart from one interaction: her gun can now destroy Venator's traps.
Her weapon, The Teacher, is a close-range beam rather than a normal gun. It locks onto the target closest to your reticle, deals 35 damage per second at base, has a 17 m maximum range and does nothing past it. It cannot headshot, so headshot items are not even sold to her. Every 13th consecutive shot on the same target deals double damage, and that count resets on a reload, a target swap or losing the target. One trick from the wiki is worth learning on day one: air dashing while firing pauses ammo use, and it is the only weapon in the game that keeps firing through an air dash.
Her passive-style ability, Essence Theft, is why the beam matters. Shooting a target steals up to 25% of its weapon damage and 10% of its spirit resist over 4 s, from up to 3 targets at once, and you keep the stolen amount only while the debuff stays on them. Its ability upgrades are +5% spirit resist stolen (tier 1), +20% weapon damage stolen (tier 2) and +1 target plus all your summons applying the theft (tier 3). Since July 9, 2026 melee hits apply it too.
This guide is about how to play graves deadlock in the current patch: her kit, a graves build that works on the new map, and the graves ult spots that make Borrowed Decree worth its long cooldown.
Jar of Dead: Deadheads and death charges

Jar of Dead has two halves. The passive collects "death" whenever something dies near you: troopers and Ghouls give 1, Haunts give 3, heroes and the Mid-Boss give 5, and each charge needs 12. The active throws the jar and releases 4 Deadheads (the skulls in the screenshot) that dash between enemies for 16 spirit damage per hit (+0.25 per spirit power) and prioritize whoever your beam is on. If no enemy is near, they follow you instead.
Deadheads have only 20 health (+1.3 per boon), take no damage from abilities or items, and die to bullets and melee. Enemies who kill them get 7 souls each, so throwing a jar into a hero who can sweep them with gunfire hands out souls.
| Tier | Jar of Dead upgrade |
|---|---|
| 1 | Collecting death heals 5 health per pickup |
| 2 | Deadhead hits slow by 24% for 1 s |
| 3 | +2 Deadheads and +4 s Deadhead lifetime |
free Stand near last hits and Haunt camps to fill charges, and throw the jar at whoever you are already shooting so both the beam and the skulls stack Essence Theft on the same target.
Grasping Hands: the wall that wins lanes

Grasping Hands opens a line of hands in the ground. Enemies who walk through take 90 spirit damage (x1.6 spirit power scaling) and are immobilized for 1 s. The rift stays for 5 s, the cooldown is 34 s, and every cast also raises one Ghoul. The wall is 14 m long by default and alt-cast rotates it, so you can lay it across a corridor or along a lane.
| Tier | Grasping Hands upgrade |
|---|---|
| 1 | +2 s duration |
| 2 | +90 damage and +10 m wall length |
| 3 | +1 Ghoul, -14 s cooldown, +0.75 s immobilize |
Use it as a door, not a nuke. Put it between an enemy and their escape route (the stairs or the bridge back to their Guardian), or across the path of a diving hero, and they either eat the immobilize or waste a dash going around it. The tier 2 upgrade doubles the damage and makes the wall long enough to cover most lane widths, which is why it is the first upgrade in the skill order below.
Borrowed Decree: how the gravestone ultimate works

Borrowed Decree is Graves' ultimate. The video calls it a tombstone; the wiki calls it a gravestone, and both mean the same thing. You place it at a target point up to 20 m away (0.66 s cast), and for 16 s it raises a Ghoul every 4 s. Cooldown is 140 s after the June 30, 2026 global ultimate change (it was 120 s before).
Her innate passive is tied to it: Ghouls shamble toward the enemy base, hit troopers and Haunts with melee, and explode when they reach a hero or an objective for 115 spirit damage (x1.27 scaling) in a 6.5 m radius, slowing by 64% for 1.25 s. Each Ghoul has 180 health (+8 per boon) and lives 20 s. They start chasing any visible enemy hero within 30 m of line of sight and keep following until that hero is more than 30 m away.
| Tier | Borrowed Decree upgrade |
|---|---|
| 1 | -15 s cooldown and +25% Ghoul speed |
| 2 | +10 s duration and -0.3 s time to spawn |
| 3 | Ghoul explosions deal +5% of the target's current health |
Two weaknesses decide where you put it. Enemies can destroy the gravestone with two heavy melees, and it is visible on their minimap at all times with an outline that shows through walls. A gravestone on flat ground next to the lane is found and punched within seconds. A gravestone on a ledge, a tree or a rooftop has to be climbed to, which is the whole point of the ult spots below.
Graves build: items by phase and skill order

The newest Graves build we found is the "Jamlex Tank Graves" build, shown in HaxeuDL's October 17, 2026 video (he credits the build to the creator Jamlex). It treats Graves as a tanky front-liner who stays in enemies' faces so her beam, Torment Pulse and Tesla procs all hit at once. In that game it finished 10 kills, 1 death and 23 assists with MVP. Item order is what the build panel shows on screen; costs are from the wiki.
| Phase | Items (in panel order) | Cost each |
|---|---|---|
| Early game (panel: 16k souls) | Restorative Shot, Grit, Extra Spirit, Mystic Shot, Tesla Bullets, Enchanter's Emblem, Extra Stamina, Torment Pulse, Improved Spirit, Stamina Mastery | 800 / 800 / 800 / 1,600 / 3,200 / 1,600 / 800 / 3,200 / 1,600 / 3,200 |
| Mid game (panel: 36k souls) | Toxic Bullets, Mystic Vulnerability, Siphon Bullets, Capacitor, Escalating Exposure | 3,200 / 1,600 / 6,400 / 6,400 / 6,400 |
| Late game (optional) | Scourge first, then any of Spirit Lifesteal, Spiritual Overflow, Boundless Spirit, Infuser | 6,400 for Scourge and the tier 4 items |
| Situational | Extra Regen if the lane is dangerous, Spirit Shielding against spirit burst, Reactive Barrier among the counter picks | 800 / 1,600 / 1,600 |
Why these graves items fit her kit, using wiki numbers:
- Tesla Bullets into Capacitor: a 15% chance per bullet to shock and jump to nearby enemies. The Teacher fires about 9.8 bullets a second, so it procs constantly. Capacitor raises it to 20% and adds an active slow and silence.
- Torment Pulse: +100 bonus health and a pulse every 1.4 s that hits the two closest enemies, which suits a hero who has to stand within 17 m anyway. The video's creator calls it an unusual buy for Graves; it is the core of the tank idea.
- Mystic Vulnerability into Escalating Exposure: spirit resist shred that stacks with what Essence Theft steals. The panel note in the video claims 42% spirit resist once you own Escalating Exposure and have one theft running; that number is the build author's, not ours.
- Toxic Bullets: a bleed plus -35% incoming healing, the build's anti-heal.
- Scourge: +100 bonus health and an active you can self-cast for +40% spirit resist, +20% debuff resist and a damaging aura for 10 s. The panel says to buy it first in the late game, and the video's creator buys it at 6,400 souls.
The panel also says to sell Restorative Shot once you run out of slots.
Graves skill order. Neither video shows one and the wiki doesn't give one, so this is our suggestion built from the upgrade breakpoints above, with the usual 1, 2 and 5 ability point costs per tier:
- Grasping Hands tier 1 and 2 (double damage, longer wall).
- Borrowed Decree tier 1 (-15 s cooldown and faster Ghouls) once you have the ult.
- Jar of Dead tier 1 and 2 (heal on pickup, then the slow).
- Essence Theft tier 2 (+20% weapon damage stolen), which pays off most in the tank build where you are shooting all fight.
- Tier 3s: Grasping Hands first (-14 s cooldown and a second Ghoul), then Essence Theft, Jar of Dead and Borrowed Decree.
These are the graves ability upgrades that change how a fight goes; everything else is order of taste. For a graves late game build, the tier 3s plus Scourge and a second tier 4 spirit item are what the build is aiming for.
Laning as Graves on the new map

cheap The video's creator opens with Restorative Shot and only takes Extra Regen when the lane looks dangerous, then adds Grit and Extra Spirit. Restorative Shot heals your next bullet (50 from heroes, 20 from troopers or orbs every 6 s), and since The Teacher fires continuously that heal comes up on cooldown without any aiming.
Lane plan, one of the most useful graves tips: keep the beam on the enemy hero rather than troopers whenever it is safe, because Essence Theft only builds on the target you are actually shooting and you lose it the moment they leave range. Use Grasping Hands across the enemy's retreat path when they step forward, and throw Jar of Dead after a few troopers have died so it has charges. Ghouls explode on objectives, and Essence Theft lowers a structure's spirit resist, which is why the creator says Graves does a lot of tower damage. Just remember the 17 m beam range: against long-range heroes, play near cover and walk into range only when your wall or jar is ready.
Teamfights: be a nuisance, then be a wall

In fights, Graves is a pressure hero. Your beam picks one target and drains them, Deadheads follow that same target, Torment Pulse and Tesla hit whoever is near, and Grasping Hands decides where the enemy can go. Lay the wall between your team and the enemy's divers, or behind a hero who is already low.
setup The video shows two ways to use Borrowed Decree in fights. Drop it behind your team when a fight is going badly so the Ghouls cover anyone trying to escape, or drop it near the enemy's position "just to annoy them" so they have to split up to punch it. Because Ghouls chase any hero within 30 m, a gravestone placed early, on a ledge above a fight, keeps sending explosions in for its full 16 s.
The ledge rule for graves ult spots

The most useful single tip from p2mg's October 5, 2026 graves ult spots guide: almost every building on the new map has small ridges and ledges along its walls, and you can place the gravestone on them. Hold the cast, sweep the preview along the building, and it will snap onto any ledge in range. When the preview glows green above an object, it will land there. The video recommends turning on quick cast for this.
Some ledges are out of reach at the base 20 m range. The video uses Greater Expansion for those, and also mentions jumping or Arcane Surge to get closer. The wiki confirms both: Greater Expansion (3,200 souls) adds 30% ability range, which takes Borrowed Decree from 20 m to 26 m, and Arcane Surge (1,600) gives your next ability +12% range after a dash-jump. Neither is in the tank build above, so for most players this means placing from closer or jumping first.
free A ledge spot costs nothing and forces the enemy to climb or lose the gravestone's full duration. Ghouls that spawn on a ledge drop to the ground and walk on normally; a few spawn inside a wall first and correct themselves.
Green lane gravestone spots

These are the deadlock graves ult spots the video shows for green lane, the middle of the three lanes:
- Hidden King base exit, second tree. Coming out of the Hidden King base on green, skip the first tree and use the second one: a branch sticks out that holds the gravestone, and the Ghouls spawn straight onto the ground.
- The window early in green lane. Ghouls sometimes spawn inside the wall here but move down to the street.
- The church. One spot needs a dash jump or wall bounce aimed at a small dark patch high on the wall; the creator calls it the hardest of the set and misses it once himself. The other side of the church has a safer option behind a tree, out of most sightlines, and that one works without Greater Expansion.
- Hidden King statue. Stand by the statue and look up slightly.
- Archmother side. A spot up by the clock tower, two spots next to each other in a tree (fiddly, quick cast helps), the top of a gate, and the corner of that gate for a placement even further out of line of sight. A last optional spot sits further back, but the Ghouls have much further to walk from there.
Blue lane gravestone spots

On blue lane the video's spots are all building ledges:
- Hidden King side, near the Guardian. Walk over and look up slightly, lining the preview up with the ledge. The creator likes this one because enemies have to climb it while your Guardian shoots them.
- Hidden King side, the gap. Double jump while looking at a gap in the building. Defending a Walker, you can also use the ledges on the other side, which are quicker since there is no special angle.
- Archmother side. The same ledge as on the Hidden King side works, and the windows along that building hold it well too.
Yellow lane gravestone spots

Yellow lane has the most options. On the Archmother side the video places the gravestone on top of the lift, on top of the crane, on the lamps and inside the structure itself. On the Hidden King side there is a pipe a little higher up, though the creator prefers a lower spot nearby that enemies have to use a lot of movement to reach, and the fence (either section) also works. As on green lane, Ghouls can spawn outside the wall for a moment before fixing themselves.
The best Walker spot for Borrowed Decree

setup The creator's favorite spot is directly above the Hidden King yellow Walker. Ghouls drop straight down onto the Walker fight, and enemies standing under the Walker can't easily get up to punch the gravestone. You can also stand up there yourself and parry while still getting the Walker's buff. The wiki puts that at 15% bullet and 15% spirit resist for allied heroes within 28 m of a Walker. On the Archmother side of yellow, the ledges around the Walker work the same way.
The blue Walker ledge to avoid

skip Do not place the gravestone on the ledge by the blue Walker shown here, which the video shows right after the Archmother-side spots. The Ghouls get stuck on that ledge and never reach the fight. The creator says the matching spot on the Hidden King side does not have this problem.
Graves counter: what beats her and how to play around it

If you are trying to beat a Graves, or playing her and want to know what hurts, these interactions come from the wiki:
- The gravestone is fragile and visible. Two heavy melees break it, and it shows on the minimap and through walls. That's why Graves players pick high spots, and why you should go break it fast when it's somewhere you can reach.
- Summons die to guns. Deadheads ignore abilities and items but fall to bullets and melee. Ghouls take +48% headshot damage and are worth 35 souls (+2 per minute) to whoever kills them. Monster Rounds and Cultist Sacrifice deal extra damage to both.
- Essence Theft is an on-shot effect. Plated Armor blocks it, and her beam does nothing past 17 m, so long-range heroes can stay out of reach.
- Grasping Hands is a disable. Indomitable prevents the immobilize, Reactive Barrier triggers on it, debuff resist shortens it, and it can be dispelled.
As Graves, buy Spirit Shielding or Scourge if you are being burst down by spirit damage, and don't throw Jar of Dead into a hero who can shoot the Deadheads for easy souls.
How this guide was fact-checked
Ability numbers, upgrades, item costs and the counter interactions come from the deadlock.wiki pages for Graves, her update history, each listed item, and the Walker. The wiki has no separate Graves abilities page, so those numbers come from the main hero page. Her update history lists no balance changes after the September 29, 2026 City Never Sleeps rework (only the Venator trap interaction), and the October 5 and October 14 patches did not touch her.
Sources used: p2mg's "Best Graves Ult Spots in The NEW Deadlock Map" (October 5, 2026), for every ult spot, and HaxeuDL's "This Might Be The Best Graves Build..." (October 17, 2026), for the item build, which is read straight from the on-screen build panel, plus the laning and teamfight notes. The ult spots are the video creator's own testing; we could only check them against what the frames show.
Corrections and clarifications: the first video calls the ultimate a tombstone, but the wiki's name is a gravestone. The "Walker resist" the creator mentions is 15% bullet and 15% spirit resist within 28 m, per the wiki. The Greater Expansion range gain (20 m to 26 m) is our arithmetic from the wiki's +30%. The skill order is our suggestion, since neither video nor the wiki gives one. The 42% spirit resist figure belongs to the build author's panel note, not the wiki.
What this guide doesn't answer
- Graves tier placement. How she ranks against other heroes is covered in our tier list, not here.
- A pure spirit or pure gun build. We cover the current tank build because it is the most recent tested one; other Graves builds exist and change with every patch.
- Every possible ledge. The video's own point is that most building ledges work, so we list the shown spots rather than every one.
- Exact Ghoul pathing on each spot. Spawn and walk times depend on the spot and weren't measured in either video.
- Street Brawl. Graves has different numbers in that mode; this guide covers standard matches only.
Frequently asked
Where are the best Graves ult spots on the new Deadlock map?
High building ledges, trees and the roof above your own Walker. On green lane, use the second tree outside the Hidden King base, the church and the Archmother gate. On blue lane, use the ledges by the Guardian and Walker. On yellow lane, use the lift, the crane and the lamps. The best spot is directly above the Hidden King yellow Walker, where Ghouls drop straight into the fight.
How does Graves' Borrowed Decree ultimate work?
Borrowed Decree places a gravestone up to 20 m away that raises a Ghoul every 4 seconds for 16 seconds, on a 140 second cooldown. Ghouls chase enemy heroes within 30 m and explode for 115 spirit damage in a 6.5 m radius with a 64% slow. Enemies can break the gravestone with two heavy melees, and they can see it on the minimap and through walls.
What is the best Graves build in Deadlock right now?
The most recent tested build is the Jamlex Tank Graves build from October 2026. Early on, buy Restorative Shot, Grit, Extra Spirit, Mystic Shot, Tesla Bullets, Enchanter's Emblem, Torment Pulse, Improved Spirit and Stamina Mastery. In mid game, add Toxic Bullets, Mystic Vulnerability, Siphon Bullets, Capacitor and Escalating Exposure. Late game, buy Scourge first, then spirit items like Boundless Spirit or Infuser.
What skill order should I use on Graves?
Neither source video nor the wiki gives one, so ours is a suggestion. Take Grasping Hands to tier 2 first for +90 damage and a 10 m longer wall. Then get Borrowed Decree tier 1 for -15 s cooldown, Jar of Dead tiers 1 and 2, and Essence Theft tier 2 for +20% stolen weapon damage. After that, buy tier 3s, starting with Grasping Hands for -14 s cooldown and a second Ghoul.
How do you counter Graves in Deadlock?
Break her gravestone with two heavy melees as soon as you can reach it. It shows on your minimap and through walls. Shoot her Deadheads and Ghouls, since they die to bullets and melee and give souls. Monster Rounds and Cultist Sacrifice deal extra damage to them. Stay outside her 17 m beam range, and buy Plated Armor to block Essence Theft or Indomitable to ignore Grasping Hands' immobilize.
Read next
Deadlock Doorman Guide: Door Spots, Build & Skill Order
Where to place Doorman's doors on the City Never Sleeps map, from the Bell Tower to Midboss, plus every ability with wiki numbers, the skill order, an early-to-late item build and how to counter him.
Deadlock Nurse Harrow Guide: Build, Abilities & Tips
A launch guide to Nurse Harrow, Deadlock's first left-click healer: what Leech Therapy, Wretched Vapors, Healing Needles and Lurking Terrors do with wiki-checked numbers, plus the support item build, skill order, laning plan and counters.
Deadlock Viscous Guide: Build, Abilities & Tips (Oct 2026)
A wiki-checked Viscous guide for Deadlock's City Never Sleeps patch: every ability and upgrade, the Splatter-first skill order, a damage-support item build by phase, the Time Waster and Puddle Punch melee builds, and how to beat Viscous.
Deadlock Warden Guide: Build, Abilities & Tips (Oct 2026)
A wiki-checked Warden guide for Deadlock's City Never Sleeps patch: every ability and upgrade, a skill order, the gun-and-ultimate item build by phase, the flask, Slowing Hex and Binding Word lockdown combo, and how to counter Warden.