
🎯 The core idea
Two things carry a Soviet run, and neither of them is a navy. The first is hitting the focus and research order in the right sequence, because the Soviet tree hands you industry and research slots that compound if taken early and are nearly worthless if taken late. The second is arriving at June 1941 with an army that was already trained in Spain.
This page is the reusable half: the exact 44-focus order, the research order slot by slot, and every tank and plane design decoded to components. It is the part you want open on a second monitor. The play-by-play — how the front is actually held when Barbarossa lands — lives in the video, and every section below links to the second it starts.
How the video is laid out
| Chapter | Starts | |
|---|---|---|
| Intro | 0:00 | watch ↗ |
| Game setup | 0:28 | watch ↗ |
| Unpause | 4:25 | watch ↗ |
| Winning the Spanish Civil War | 6:02 | watch ↗ |
| Barbarossa is happening | 34:22 | watch ↗ |
| Outro | 42:07 | watch ↗ |
Note the proportions. Setup and Spain take four minutes; the middle of the run takes twenty-eight. Barbarossa itself gets eight. That shape is the actual lesson: the war against Germany is decided long before it starts.
The author's own summary of what to ignore: navy — "LMAOOO GOOD ONE", and air force — "which you shouldn't". The run is land power plus a defensive CAS wing, and the design list below reflects that: four tank designs, two fighters, one CAS, and no ships at all.
How to play the Soviet Union in HOI4
If you have never taken the USSR past 1941, the short version is this: the Soviet Union is not a hard country to play, it is a slow country to prepare. You start with more manpower and more states than anyone else on the map, and with three national spirits that quietly tax all of it. Everything in this HOI4 Soviet Union guide for 2026 — the focus order, the research order, the designs — is aimed at one date, and the tree gives you five years to reach it in a usable state.
That is what a HOI4 USSR focus tree guide has to say before it lists anything, because it explains why the order matters more than the picks. The Soviet start looks like this:
| National spirit | What it does |
|---|---|
| Trotskyite Plot? | −15% political power gain · −20% stability |
| The Red Army | −10% army experience gain · −15% division organisation · +25% experienced soldier losses · −10% conscription law cost |
| Five Year Plan | +10% consumer goods factories factor · +5% production efficiency cap · −15% production efficiency growth · +5% civilian factory construction speed |
Read the middle row twice. −15% division organisation is the reason a Soviet line breaks where a German one holds, and no amount of manpower fixes it — organisation is what a division spends to stay in a battle rather than fall out of it. It is also why the run below is built around a line that stands still and equipment that supports it, rather than an early offensive.
Everything on this page is scheduled against June 1941. Focuses that hand you building slots, factories or a research slot compound for every month they have been running, which is why the industrial branch goes first and the army branch goes last. A research slot taken in 1940 is a research slot that never paid for itself.
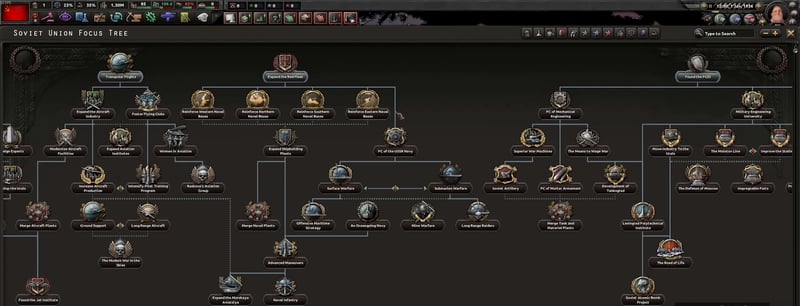
1. National focus order
All 44, in order. Numbering is automatic — tick them off as you play.

The tree at 1:03, before anything is picked. 1:03
- this is what makes the Spanish Civil War section possible
The order above is transcribed from the author's own published order sheet. The middle of the list — the focuses between Military Conspiracy and Tankograd, and between Merge Tank and Materiel Plants and Positive Heroism — is in the same document; open it alongside this page and follow it line by line rather than reconstructing it from the video.
The Soviet focus order, branch by branch
The list above is a click order. This is what it is buying, so that you can rebuild the sequence yourself when a patch moves something.
- The industrial trunk. Infrastructure Effort, Heavy Industry, Finish the Five Year Plan, Improve Railway Network. Building slots and civilian factories dropped into random owned states, railways and supply hubs laid where the game decides you need them, and the political advisor Lazar Kaganovich off the back of finishing the plan. The value of every one of these is measured in months of compounding, which is the whole argument for taking them before anything with a gun in it.
- The political trunk. The Path of Marxism–Leninism opens it and is worth taking for the paranoia reduction alone. From there the tree forks: The Centre keeps Stalin and leads into the purge line, while The Left Opposition starts the process toward a Soviet civil war instead. The order sheet on this page takes The Centre every time.
- The purge line. Several of the focuses listed above each start a Great Purge that cannot be declined, and parts of that chain are gated behind waits of 175 days. That is the real reason this order is a schedule rather than a preference — the purge section further down works through what each one costs.
- Research and army. The USSR Academy of Sciences is where the tree's research slot comes from, and the army focuses are what work off the worst of The Red Army spirit. Both sit late because both are cheap to delay by a few months and expensive to take instead of a factory in 1936.
2. Research order
The Soviet opening is not "research good things" — it is a specific sequence of switching research slots, because you are exploiting the discount that builds up on a slot left alone.
That pattern — start something, switch off it, come back for the discount — continues for roughly fifty entries. Follow the order rather than the slot numbers, exactly as with any other research order: how many slots you have open changes which slot each item lands in, but not the sequence.
There is exactly one explicit fork in the whole order sheet. After the machine tools stretch:
- Multiplayer: take signal companies.
- Singleplayer: signal companies are overkill — take gun technology in that slot instead.
3. Designs
Every tank design uses the OKMO design company. Every plane design uses the MiG design bureau. No exceptions across all seven.

Where those picks are made — the MIO screen at 2:27, here with Tula Arms Plant open. 2:27
Tanks
| Design | Chassis | Loadout |
|---|---|---|
| LT-Convert | Light tank chassis II | Riveted armour · petrol-electric engine · heavy machine gun · 2× extra ammo · wheeled suspension · light 3-man turret |
| FT-Convert | Medium flame tank chassis I | Gasoline engine · flamethrower · interleaved suspension |
| FT-Full | Medium flame tank chassis I | Advanced flamethrower · radio III · armour skirts · dozer blade |
| SP Artillery (basic, high reliability) | Medium tank artillery chassis I | Medium howitzer · wet ammo · 2× secondary HMG turret · torsion bar suspension |

23:42 — LT-Convert A-1 on the improved light tank chassis. 23:42

22:39 — SPArty-Convert on the basic medium SP artillery chassis. 22:39

26:36 — the first flame tank, before the upgrade. 26:36

33:30 — the same chassis as FT-Full, with the later modules on it. 33:30
The naming tells you the plan: "Convert" designs are cheap variants meant to be built early and converted or upgraded later, while FT-Full is the version you actually want once radio III and armour skirts are available. The light tank is a support and screening chassis carrying a machine gun rather than a gun — it is not there to fight tanks.
Planes
| Design | Airframe | Loadout |
|---|---|---|
| Fighter-Convert | Small plane airframe II | Engine III (1×) · 3× heavy MG (4×) · armour plate · fuel tanks |
| Fighter-Good | Small plane airframe II | Engine III (1×) · 3× heavy MG (4×) · armour plate · fuel tanks · self-sealing fuel tanks |
| CAS (defensive) | Small plane CAS airframe II | 3× bomb locks · dive brakes |
The CAS design is named defensive for a reason — it exists to break attacks on your line, not to support offensives. That fits the shape of the run.

23:51 — LBSh on the basic close air support airframe. 23:51

27:27 — the Il-2T, the improved CAS airframe. 27:27
The order sheet lists two fighters and one CAS. On camera the plane designer is only ever opened for CAS, twice — the two frames above. The fighters are visible in the production queue but their design screens are never shown, so build those from the component list rather than from the video.
Turning the designs into Soviet tank production
A design is only half of it. HOI4 Soviet Union tank production comes down to three things — which organisation builds it, how long the line runs untouched, and how often the design on it changes — and the Soviet start makes the third one unusually expensive.
Look again at the Five Year Plan spirit in the table near the top: +5% production efficiency cap and −15% production efficiency growth. Soviet lines end up slightly better than average and take noticeably longer to get there. A country holding that pair should choose a design and then leave the line alone, which is exactly what the "Convert" naming above is for — cheap early variants meant to be upgraded on the line that is already running rather than replaced by a fresh one at zero efficiency.
The organisation half compounds the same way. A military industrial organisation earns funds from the equipment it is assigned to build and from finishing related research, and every size step it gains buys a trait point to spend. Putting every tank design on OKMO and every plane design on the MiG bureau — which is what the order sheet does, without a single exception across all seven — is not a stylistic choice. It is the difference between one designer with a full trait tree by 1941 and three designers with a third of one each.
Attach the organisation when the production line is created, not later. Funds accrue from what that organisation is currently assigned to build, so a line that ran for a year with nobody attached is a year of growth that nobody collected.
4. The Spanish Civil War
The focus Send Military Advisors to Spain sits ninth in the order, well before anything military matters at home, and the video gives Spain its own chapter starting at 6:02.
The reason is the same reason every major does it: Spain is a free training ground years before it counts. Volunteers earn army experience — which is what pays for the template edits above — and generals sent there grind traits and levels against a real opponent while the rest of the world is still at peace. You arrive at 1941 with commanders who already have their bonuses.
5. Barbarossa

What the order sheet builds toward: one army of 86 rifle divisions, February 1940. 24:57

June 1941 near Białystok, right as Barbarossa opens. 34:25
Everything above is preparation for the chapter starting at 34:22, which is where the actual defence and counter-attack are played out.
The video covers beating Germany in both singleplayer and multiplayer — which is why the research fork above exists, and why the templates are built around holding a line rather than racing east. Watch the chapter for the front-line handling; the order sheet on this page is what gets you there in a state to hold it.
The Great Purge in HOI4: what it costs and what it buys
Several focuses in the order above start a Great Purge, and new players route around them because losing generals sounds like an obvious mistake. It is not optional and it is not a mistake — on the Stalin path the purges are the political line, and skipping them means skipping the branch they sit on.
The machinery underneath is a hidden paranoia meter, 0 to 100, that runs for as long as Stalin leads the country. It rises every week from whatever modifiers are active — chiefly Stalin's own paranoid trait and whoever is currently head of the NKVD — and where it sits decides what happens to your roster of characters:
| Paranoia | What fires |
|---|---|
| Below 25 | nothing. Stalin does not purge. |
| 25 to 75 | occasional Regular Purges — one character, or a few, taken at random |
| Above 75 | Great Purges — a larger batch removed in one go |
A purge takes characters rather than divisions: generals, admirals, advisors and theorists. After any purge there is a 15-day cooldown before another can fire. Left alone, the meter climbs on its own and keeps helping itself to your officer corps for the rest of the game.
The four scripted purges on the Stalin path
Four focuses each start a Great Purge that cannot be avoided or declined. They are listed here under the names the focus tree itself uses:
| Focus | Paranoia | Gated behind |
|---|---|---|
| The Zinovyevite Terrorist Center | +30 | The Stalin Constitution |
| The Anti-Soviet Trotskyist Center | +30 | the focus above, finished at least 175 days earlier — and Stalin picks up the paranoia trait here |
| The Military Conspiracy | +30 | The Workers' Dictatorship |
| The Bloc of Rights and Trotskyites | removes it entirely | The Military Conspiracy, again 175 days later |
That last row is the point of the whole sequence, and it is what a HOI4 Stalin path guide has to get across: the purges are how you switch the purge system off. Until The Bloc of Rights and Trotskyites lands, paranoia keeps climbing and keeps taking characters at random; once it does, Stalin loses the trait, the meter stops mattering, and the generals you promote from then on stay promoted.
The 175-day gates are also why the order on this page is a schedule and not a preference. Start the chain late and you are still trading away commanders in 1941, in the same months you need them levelling on a front.
The purges belong to Stalin. The other route out of The Path of Marxism–Leninism is The Left Opposition, which starts the process toward a Soviet civil war instead. That is a different game rather than a shortcut around this one, and it is not what the focus and research order on this page is built for.
The Five Year Plans, and what each one changes
The Soviet Union does not begin a Five Year Plan in 1936 — it is already inside one. Five Year Plan is a national spirit sitting on the country from the first day, and the industrial branch never removes it. It rewrites it.
That changes how the focuses read. You are not deciding whether to industrialise; you are deciding how quickly the modifier attached to all of your industry improves. The spirit starts at:
- +10% consumer goods factories factor — a slice of your civilian industry is spoken for before you build a thing
- +5% production efficiency cap — your lines top out a little higher than most
- −15% production efficiency growth — and they take noticeably longer to get there
- +5% civilian factory construction speed
Three focuses in the industrial branch act on it directly:
| Focus | What it does |
|---|---|
| Finish the Five Year Plan | twice over: 2 building slots and 1 civilian factory in a random owned state. Also unlocks Lazar Kaganovich as a political advisor |
| Third Five Year Plan | +5% production efficiency growth · −15% industrial concern cost · +5% consumer goods factories factor · two 75% research bonuses toward construction technology |
| Fourth Five Year Plan | −5% consumer goods factories factor · +5% factory repair speed · +5% production efficiency cap |
Read the two later plans as a pair. Third Five Year Plan buys back a third of the efficiency growth penalty and makes industrial concerns cheaper, at the cost of another point of consumer goods; Fourth Five Year Plan hands that point back and raises the ceiling again. Neither of them is a factory, and that is the trap in them — they are multipliers on everything your factories do afterwards, so they are worth a great deal in 1937 and close to nothing in 1941 when the lines are already sitting at their cap.
Two other focuses on the same branch pay out the same way and are just as easy to leave too late. Improve Railway Network lays railways and supply hubs you would otherwise be building by hand, and it turns up again in the Barbarossa section below. The USSR Academy of Sciences is where the tree's research slot comes from, and a research slot is worth what it compounds — which is a function of how many years it has left to run.
The best Soviet Union templates for holding a line
The order sheet above talks about template edits without printing one, so here is the frame those edits sit in. Every division in the game is up to five combat regiments of up to five battalions each, plus five support companies — so a template is really two decisions, and for the Soviet Union the second one carries more weight than usual.
The reason is a national spirit from the table at the top of this page. The Red Army costs 15% of division organisation and adds 25% to experienced soldier losses. A Soviet division built from the same battalions as a German one holds a battle for less time and pays more manpower for it, and the support slots are where some of that is bought back.
| Company | What it gives | Worth a slot when |
|---|---|---|
| Engineer Company | raises the division's entrenchment, and helps when attacking forts and crossing rivers | always, on a line meant to stand still |
| Support Artillery | soft attack — less than an artillery battalion, because it carries fewer guns | you want the damage without the width and the supply cost of a line battalion |
| Signal Company | initiative: faster planning, better reinforcement chance | multiplayer, per the fork in the research order above |
| Logistics Company | cuts the whole division's supply use | divisions are stacked on a narrow front, or fighting away from a hub |
| Field Hospital | returns a share of lost manpower and reduces experience loss | the division is expected to grind rather than break through |
| Support Anti-Air | air attack — again less than a line anti-air battalion | the enemy has close air support and you do not have air superiority |
| Maintenance Company | raises the reliability of everything in the division, so attrition destroys less of it | the division is expensive — anything with a tank in it |
| Recon Company | reconnaissance, and speed through difficult terrain | you are the one moving |
A reasonable order to make the edits in, once army experience starts arriving from Spain:
- entrenchment — the cheapest thing on this list and the one the Soviet plan leans on hardest
- soft attack without the combat width
- multiplayer only — see the fork in the research order above
- supply, not combat stats
- reliability, so attrition stops eating the expensive equipment
Two numbers decide the rest of it. Every point of entrenchment a division has built is +2% for the defender — a division that has held a province for weeks is a materially different unit from the same template that arrived yesterday, and the Engineer Company is what makes that climb faster. And combat width is set by the terrain the battle is fought in, with a penalty of −1% for every percent you exceed it, up to −33%. There is no single perfect width for that reason: what there is, is a small set of templates you keep — one shaped for the terrain you expect to defend, and a heavier one for the counter-attack.
Barbarossa defence: the mechanics that hold the 1941 line
Section 5 above points at the video for the play-by-play, and that is genuinely the right place to watch it happen. What is worth writing down instead is the set of numbers the play-by-play is exploiting, because those do not change between runs — and they are what turns the USSR against Germany in 1941 from a coin flip into a schedule.
Terrain does most of the work. An attacker crossing a river takes −30% or −60% to attack and breakthrough depending on the size of the river, and rough terrain costs an attacker up to −50%. The Soviet Union has more of both than anybody, and the most useful habit when the front opens is to stop asking where you can hold and start asking which rivers and which forests you can hold behind.
Entrenchment is the reward for deciding early. Each point a division has built is worth +2% to the defender, and it accrues faster with an Engineer Company in the template. That is the argument against a restless defence in the opening weeks: a line that keeps shuffling is a line that keeps resetting the one modifier it holds an advantage in.
Supply is a weapon and it points east. A supply hub is fed through the rail network from your capital — a level one railway gives that hub a base 15 supply throughput, rising 5 per additional railway level, to a maximum of 35 — and hubs are unmotorised by default, with motorisation costing 40 or 80 trucks depending on the level. Every province Germany takes is a province further from its own hubs and closer to yours. That is what makes Improve Railway Network, taken five years earlier, a Barbarossa focus wearing an industry focus's clothes.
And do not overstack. Combat width is terrain-dependent and exceeding it costs −1% per percent over, capped at −33%. Throwing everything in the theatre at one province is the most common way a defence that should have held gets ground down instead.
So the answer to how you defend against Barbarossa is not a trick played on the day. It is arriving in June 1941 with divisions already dug in on ground that punishes the attacker, behind a rail network that supplies them and does not supply him, with commanders who earned their traits in Spain five years earlier — every part of which is decided by the order sheet at the top of this page.
Where to go next
This page is the order sheet: what to click, and in what sequence. For the campaign built around it — the Political Paranoia purges that decide which generals survive to 1941, the industry that pays for the army, and the encirclement tactics that break Barbarossa — see the full Soviet Union walkthrough. The Germany focus order is the other half of that war, and the defensive templates guide covers the divisions that have to hold the line while the focuses tick over.
Sources
- "The Ultimate HoI4 Soviet Union Guide | 2026" — VijoPlays, YouTube, 22 July 2026 (42:15).
- The focus order, research order and all seven designs come from the author's own published order sheet, linked from the video description — not from the narration. Design loadouts above are decoded from the export strings in that document, so component names match what the game will show you.
- Two further documents are linked from that sheet — a doctrines and construction-tech spreadsheet, and a separate designs document. Neither is reproduced here.
- An unedited full VOD of the run is also linked from the description for anyone who wants the unabridged version.
This page deliberately covers the order sheet rather than the play-by-play: the sequencing is what transfers between runs, while the front-line handling is easier to watch than to read. Chapter links above jump straight to the relevant part of the video.
Frequently asked
Do I need a navy as the Soviet Union?
No. The source guide's own description dismisses it outright — the Soviet navy is not worth the dockyards, and the run is built on land and a defensive air force instead.
What is the first focus as the USSR?
Heavy Industry, then the political line — The Path of Marxism–Leninism, The Centre, Stalin Constitution — before the purge focuses. The full 44-focus order is listed below.
Do I need signal companies as the Soviet Union?
In multiplayer, yes — they go in as soon as the supporting tech lands. In singleplayer they are overkill, and the author takes gun technology in that slot instead. This is the one place the order sheet explicitly forks.
Which MIOs should the Soviet Union use?
OKMO for every tank design and the MiG design bureau for every plane design. Both are used across all seven designs in the source guide without exception.
Why send volunteers to the Spanish Civil War?
It is a free training ground: army experience for templates and level-ups plus trait grinding on generals, years before Barbarossa. The focus Send Military Advisors to Spain sits early in the order for exactly this reason.
What is the Great Purge in HOI4, and can you avoid it?
The Great Purge is driven by a hidden paranoia meter that runs from 0 to 100 for as long as Stalin leads the Soviet Union. Below 25 nothing happens, between 25 and 75 occasional Regular Purges take a character or two at random, and above 75 a Great Purge can remove a larger batch of generals, admirals, advisors and theorists at once, with a 15-day cooldown after each one. Four focuses on the Stalin path start a Great Purge that cannot be declined, so on that route the purges are not avoidable. They are also the way out: the last of the four, The Bloc of Rights and Trotskyites, removes paranoia from the game entirely.
What do the Five Year Plans do for the Soviet Union in HOI4?
Five Year Plan is a national spirit the Soviet Union already has in 1936, not something a focus starts. It begins at +10% consumer goods factories factor, +5% production efficiency cap, -15% production efficiency growth and +5% civilian factory construction speed, and three focuses rewrite it rather than remove it. Finish the Five Year Plan hands you building slots and civilian factories and unlocks Lazar Kaganovich; Third Five Year Plan buys back part of the efficiency growth penalty and cuts industrial concern cost; Fourth Five Year Plan raises the efficiency cap again. Because they are multipliers on your industry rather than industry itself, they are worth far more taken early than in 1941.
What are the best Soviet Union division templates in HOI4?
There is no single width that is correct everywhere, because combat width is set by the terrain a battle is fought in and exceeding it costs 1% for every percent over, up to 33%. Keep a small set instead: a line template shaped for the ground you expect to defend, and a heavier one for the counter-attack. The support slots matter more for the Soviet Union than for most countries, because The Red Army national spirit costs 15% of division organisation and adds 25% to experienced soldier losses. Engineer Company first for entrenchment, then support artillery, a logistics company where divisions are stacked, and a maintenance company on anything with a tank in it.
How do you defend against Barbarossa as the Soviet Union?
By deciding where the line is before the war starts rather than on the day. An attacker crossing a river loses 30% or 60% of attack and breakthrough depending on the river, rough terrain costs an attacker up to 50%, and every entrenchment point a division has built is worth 2% to the defender, so a line that stays put on good ground is worth several that shuffle. Supply is the other half: railways feed each hub with a base 15 throughput at level one, rising 5 per level to a maximum of 35, so every province Germany takes moves it further from its own hubs and closer to yours. Improve Railway Network, taken years earlier, is what makes that true.
Should the USSR take The Centre or The Left Opposition?
The Path of Marxism-Leninism forks into both, and they are different games rather than different difficulties. The Centre keeps Stalin and leads into the purge line, which is what the focus and research order on this page is built around. The Left Opposition instead starts the process toward a Soviet civil war, which changes what you are preparing for and when. If your plan is to be ready for Germany in June 1941, take The Centre.
Read next
HOI4 Soviet Union Guide: Purges, Industry and Encirclements
A historical, Iron Man Soviet Union playthrough covering the Political Paranoia purge mechanic, a purge-avoidance focus order, division and tank/plane designer builds, and the mass encirclement tactics that break the Wehrmacht once Barbarossa starts. No ship designer appears in the source video.
HOI4 France Guide: Napoleon Path and Munich Conference
A single continuous France campaign that rushes the Bonapartist 'Third Empire' monarchist-restoration branch for free war goals on the Low Countries and the UK, fixes the Disjointed Government national spirit first, then uses the Munich Conference decision to fight Germany on France's own timing. Covers the focus order, the only equipment design shown (aircraft — the source has no division templates or tank and ship designs), and the war through Spain, the UK, Italy and the USSR.
HOI4 UK Guide 2026: Focus Tree, Navy and Division Templates
A political route for the United Kingdom that engineers a war with France to trigger an early George VI accession, then runs the King's Party and Empire focus branches in parallel to core the United States through Canada and the Imperial Federation focus. Covers the France-war trick, the Create Pan-North-American State decision, one fully-specified late-game infantry template, and the eventual succession to Elizabeth II.
HOI4 Italy Guide 2026: Every Focus Path (By Blood Alone)
A tour of Italy's 314-focus By Blood Alone tree across twelve distinct playthroughs, from the historical Axis collapse and a competent-Mussolini Axis Victory through diplomatic, republican, papal, socialist, communist and novelty endings. Explains what triggers each path, what it becomes, and the two mechanics — a fast Ethiopian war and the Italian Civil War reset — that gate most of them.