# HOI4 Navy Guide 2026: Fleet Composition and Ship Design
> One destroyer template currently wins naval combat on its own. Here is that template, plus the systems underneath it — screening ratios, missions, doctrines, MIOs — so you can build the next meta template yourself when this one gets patched.
- **Game:** Hearts of Iron IV
- **Category:** Templates
- **Author:** LongBeam (https://guides-factory.com/about)
- **Difficulty:** Intermediate
- **Reading time:** 35 min
- **Published:** 2026-08-07
- **Updated:** 2026-08-22
- **Tags:** Division templates, Doctrines, Navy, Single player
- **Adapted from:** [VijoPlays — The Only HoI4 Navy Guide You'll Ever Need](https://www.youtube.com/watch?v=HMmNPQSNygI)
- **Canonical URL:** https://guides-factory.com/guides/hoi4-navy-guide-2026
---
Everything below answers one question — how to build a navy in HOI4 that wins the sea zone you send it to — in the order the game makes you answer it: which hulls go in the water, how many screens stand in front of them, which mission each task force sits on, and where the naval experience goes. Sections 1 to 9 follow a build from the ship designer to the fleet screen. Sections 10 to 15 are the mechanics underneath it, so you can rebuild any of this after a patch instead of waiting for someone to post the new template.
## 🎯 The core idea
> One ship wins naval combat right now: a **destroyer with full light attack and torpedoes bolted on**. Most "meta" multiplayer fleets are that single template copy-pasted until the dockyards run out. If you only take one thing from this page, build that destroyer and stop reading.
>
> The rest of this exists because that template *will* be nerfed. Everything below — how battles resolve row by row, why screening efficiency is the only ratio that matters, which doctrines feed which hull — is the machinery that produced it. Learn the machinery and you build the next meta template yourself instead of waiting for someone to post it.
## Do this first
1. **Get naval dominance the cheap way, not the expensive way.** The single biggest dominance modifier is the *hull*, not what you bolt to it. A **blank carrier with no modules** is the most dominance per factory in the game. A **naval dominance battlecruiser** gives slightly less for much less IC. Neither ship ever enters a battle — they exist to sit on a patrol mission and generate a number.
2. **Fix screening before you fix damage.** Three screens per capital, one capital per carrier. Below 100% screening efficiency, enemy torpedoes start reaching your capital ships, and a battleship dies to destroyers it never got to shoot at.
3. **Keep recon out of the main fleet.** Surface detection is averaged across every ship in the task force. The meta destroyer has 38 surface detection and drags that average into the floor, so a separate five-ship recon fleet on patrol does more for you than any amount of radar on the death stack.
## 1. The ship designs
All of these come off the designer screens in the source video. The author keeps the exact slot-by-slot loadouts in a linked Google Doc rather than reading them out, so treat the notes below as the shape of each design and pull exact module tiers from your own tech level.

The meta destroyer as the author builds it: light attack 13.8, torpedo attack 43.2, production cost 2418.
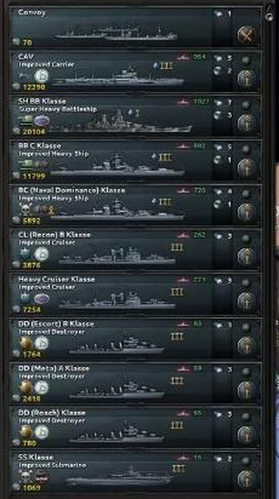
Every hull from the list above, together in one list of ship designs — not a production queue, which never shows more than one hull at a time.
Careful
**Super heavy battleship is the exception to the cheap-armour rule** — it runs super heavy armour and is worth building whenever you can, but it needs both the research and the special project first.

The super heavy battleship — the one ship that justifies expensive armour.
### Every design, as the designer shows it

10:04 — the carrier. Deck 100, cost 12,290, and nothing bolted on that would slow it down.

11:15 — the ordinary battleship, anti-air 33.1. The frame at 10:34 that the narration lands on is actually the super heavy above, not this.

11:08 — the naval dominance battlecruiser from the opening advice: cheap hull, never fights, exists to hold a patrol.

11:42 — heavy cruiser, heavy attack 45.0, cost 7,254.

11:53 — the recon cruiser, submarine detection 33.0, cost 3,876. There is no separate offensive light cruiser in this run; the designer returns to this same hull later.

## 2. How a naval battle actually resolves
This is the part that makes every ratio below make sense.

8:03 — the Battle of the North Sea with the rows laid out: screens in front, capitals behind, support and carriers at the back.
Ships line up in rows: **row 1 screens, row 2 capitals, row 3 support ships and carriers**, with submarines underneath. Every gun can only reach the first line — **except heavy guns, which reach the first two**. That is the entire reason capitals are worth their cost, and the entire reason screens exist.
Torpedoes are the exception that breaks the wall. They **penetrate the screening line** when enemy screening efficiency drops, or through torpedo screen penetration modifiers. At 100% enemy screening efficiency with 10% torpedo screen penetration, 10% of your torpedoes still reach their capitals. Light attack kills screens, hard attack kills capitals, and piercing below enemy armour cuts your damage — exactly like land combat.
In the video
**Naval bombers changed.** They used to seek out the biggest ship on the map. They now "play fair" and hit the **screening line first**, like everything else. If your mental model of naval bombers is from an older patch, it is wrong.
| Ratio | Value | |
|---|---|---|
| Screens per capital | 3 | [watch ↗](https://www.youtube.com/watch?v=HMmNPQSNygI&t=545s) |
| Capitals per carrier | 1 | [watch ↗](https://www.youtube.com/watch?v=HMmNPQSNygI&t=545s) |
| Cost of the cheapest capital vs a destroyer | ~7× | [watch ↗](https://www.youtube.com/watch?v=HMmNPQSNygI&t=378s) |
| Submarine visibility penalty in shallow seas | 33% | [watch ↗](https://www.youtube.com/watch?v=HMmNPQSNygI&t=434s) |
| Rows a heavy gun can reach | 2 | [watch ↗](https://www.youtube.com/watch?v=HMmNPQSNygI&t=500s) |
Build **past** those ratios. Losses during a battle drop you below 100% screening efficiency, and that is the moment torpedoes start landing on your battleships.
## 3. Missions
Assign one zone to an admiral and every task force stacks there. Assign two and they split one per zone, rotating every few weeks. Each sea zone has its own dominance requirement and enemy ships present have to be contested — a single submarine is not going to patrol the Gulf of Mexico.
**Strike force is usually the right home for capitals.** Instead of patrolling and generating raw dominance, they hand your patrolling ships a percentage modifier that applies across every assigned zone, burn less fuel, and stay in port where nothing can kill them.
Careful
The video puts the naval invasion threshold at **around 100 naval dominance in each of the two zones**. A commenter reports the game demanding **350–375** for a single empty, uncontested zone. Check the number the game actually shows you on the invasion arrow before you plan around it.
## 4. Fleet composition
The best navy is **your entire navy, in one task force**. Once you death-stack, supply is the only thing still limiting you.
A worked multi-theatre composition, as narrated: **4 carriers : 8 battleships : 16 destroyers**, ideally with super heavy battleships in the capital slots.

The composition editor on screen tells a slightly different story: it targets 4 carriers, 8 capitals and 40 destroyers — five screens per capital rather than three. Treat 3:1 as the floor and this as what the author actually builds toward.
**Carrier overstacking has been removed.** The old advice to run five carriers in a stack is dead — if you learned navy from a guide older than this patch, that is the first habit to drop.
## 5. Carrier planes
Aim for **green air**, then stop thinking about it. The rule of thumb is **50/50 naval bombers to fighters**; once you hold green air shift toward more naval bombers, and if you are at red or yellow air shift toward fighters — ideally heavy fighters with the range to reach the fight.
In the video
Two things worth knowing that the plane designer will not tell you:
- **Air defence only matters against enemy fighters.** It does nothing against enemy air attack. If the enemy has no air superiority you can fly a stripped, zero-aluminium naval bomber with no armour at all.
- **Carrier stances are, in the author's words, incredibly buggy.** Defensive means planes only fly when the carrier itself is in a battle; aggressive means they keep working and will not come home to defend. The practical advice reduces to: set them aggressive.
- **Supply shortage grounds carrier planes entirely** — a full carrier with no supply is "a big bucket of steel".
## 6. Research, MIOs, doctrines, spirits
### Research priorities
Smoke generators, damage control and **fire control methods** first — the author calls these "super important". Then the hull for whatever you are actually building, torpedo tech if you run submarines, basic depth charges, upper-tier tech for screens and lower-tier for heavy ships. Transports if you plan invasions, underway replenishment for range, snorkels for submarines. **Mine warfare does not matter.**
### MIOs
| Hull | Take | |
|---|---|---|
| Submarines | Submarine Builders — fill 5 traits to unlock Coastal Battle Fleet, then swap everything into it | [watch ↗](https://www.youtube.com/watch?v=HMmNPQSNygI&t=1293s) |
| Screens | Escort Ship Builders, focusing light attack and speed | [watch ↗](https://www.youtube.com/watch?v=HMmNPQSNygI&t=1323s) |
| Battleships | Battle Line Ship Builders | [watch ↗](https://www.youtube.com/watch?v=HMmNPQSNygI&t=1330s) |
| Carriers | Task Force Ship Builders | [watch ↗](https://www.youtube.com/watch?v=HMmNPQSNygI&t=1342s) |

21:50 — the shipbuilder MIOs. The types are what the table above names; the organisations themselves are nation-specific, so in this German run they read Deutsche Werke, Deschimag, Germaniawerft and HDW.
### Doctrines
**Fleet in Being** as the grand doctrine for a normal navy — it stays good even with carriers. Trade Interdiction only if submarine raiding is genuinely all you care about and dominance is not.
Then: **Patrol Boats** for screens — "no discussion", because it unlocks Selective Engagement. **Naval Gunfire Support** for capitals, almost always. **Light Task Forces** for carriers unless you are running a carrier-focused fleet, in which case Mass Carrier Fleet. For submarines, Long-Range Submarines if you have the special projects, otherwise Capital.
### Spirits
**Instilled Aggression, hands down.** Under Naval Command take **Selective Engagement** first; Night Fighting and Rapid Concentration are both fine after it. Under Spirit of the Navy, Naval Refit Yards, Naval Reform and Fleet Interoperability are all defensible — which one is right depends on your doctrine.

24:00 — the Spirit of the Navy panel. Worth knowing that the doctrine tree itself is never shown filled in anywhere in the video, so the picks above come from the narration rather than from a visible build.
## 7. Special projects
take clearly worth the slot
situational depends on your fleet
skip arrives too late to matter
## 8. Micro that is actually worth doing
| Action | How | |
|---|---|---|
| Send a fleet into an ongoing battle | select fleet, hold **Ctrl**, right-click | [watch ↗](https://www.youtube.com/watch?v=HMmNPQSNygI&t=1482s) |
| Change home base | **Ctrl + right-click** a naval base | [watch ↗](https://www.youtube.com/watch?v=HMmNPQSNygI&t=1510s) |
| Set where new ships spawn | production drop-off port, per ship | [watch ↗](https://www.youtube.com/watch?v=HMmNPQSNygI&t=1535s) |
| Toggle underway replenishment | button on the task force | [watch ↗](https://www.youtube.com/watch?v=HMmNPQSNygI&t=1528s) |
Setting the **production drop-off port per ship** is the one that quietly saves runs: without it, expensive ships trickle out of whichever dockyard finished them and sail into a war zone one at a time. Point them all at a safe haven and the fleet leaves together.
A **naval headquarters** gives fleet-wide modifiers if you build it and assign an admiral — but it costs about as much as a civilian factory, more if you already have one.
## 9. Two free things almost nobody takes
In the video
**Pride of the Fleet.** Designate one ship and it gets bonuses plus **+5% war support**. The downside is losing war support for 30 days if it sinks, so name something that is not going to die.
**Coastal core state protection.** Naval dominance in your own coastal regions gives **up to 10% stability**, distributed as *(number of coastal states ÷ 10)% per state* — 10 coastal states means 1% each, 5 means 2% each. It **works in peacetime**. The example given: Lithuania picks up the full 10% stability essentially free by putting two boats on patrol.

26:58 — the tooltip itself, reading +1.42% on this particular set of coastal states.
## 10. The best destroyer template for 2026
Section 1 hands you the ship. This is the reasoning behind it, which is the half that survives a patch.
Two targeting rules do most of the work. **Light guns can only fire at the closest non-empty group** — in a full battle that is the enemy screening line and nothing else. **Heavy guns reach the first two groups**, which is the entire argument for owning capital ships at all. A destroyer built around light attack is therefore a screen-killer by construction: while the enemy has screens it cannot shoot at anything else, and while the enemy has screens there is nothing else worth shooting at.
Torpedoes are the exception, and the rule is worth memorising exactly. **A torpedo's chance of targeting the enemy battle line is 100% minus their screening efficiency**, and reaching the carrier group behind it needs a second check against 100% minus their *carrier* screening efficiency. Torpedoes therefore do nothing at all to a fleet screened at 100%, and a great deal to one that has started losing destroyers. That is the whole case for carrying both weapons on one hull: the guns pay immediately, the torpedoes pay once the guns have done their job.
The destroyer hull gives you six fixed slots and two custom ones, so the template is a budget rather than a wish list.
| Slot spent on | What it buys | Take it when |
| --- | --- | --- |
| Light Battery I–IV | light attack, aimed at the enemy screening line | always — this is the ship's job |
| Dual-Purpose Main Battery I–IV | light attack plus anti-air from one slot | the enemy flies carrier planes |
| Torpedo Launcher I–IV | 18–36 torpedo attack | you expect enemy screening to break |
| Fire control (Central Rangefinding, Director Fire) | accuracy | the research is already done |
| Radar I–IV | detection and hit chance | this task force is also your eyes |
| Light Engine I–IV | speed, which is also survivability | always |
The other reason destroyers carry the meta is defensive. Surface visibility is a ship's profile: the higher it is, the more easily the ship is spotted outside a battle and the more easily it is hit inside one. Destroyers carry the lowest profile of any surface hull, so the same fleet budget buys you more guns *and* more misses.
Careful
One template cannot hold three jobs. The strike destroyer wants light attack, torpedoes and speed; the escort destroyer in section 1 wants sonar and depth charges, and **depth charges are the only weapon in the game that can hit a submarine at all** — and only while that submarine is revealed. Merge the two and you get a ship that is mediocre at both, in a task force whose sub detection is the *average* of every ship in it.
For what the naval rework changed about which of these hulls to spam and in what quantity, that is the [navy meta guide](/guides/hoi4-navy-meta-what-to-build-after-the-naval-changes). This page stays on the templates and the mechanics under them.
### Heavy cruiser vs light cruiser
The heavy cruiser vs light cruiser argument is usually had about firepower and is really about which line the ship stands in. A **light cruiser is a screen**; a **heavy cruiser is a capital ship**. Every heavy cruiser you add raises your screening bill by three destroyers, while every light cruiser pays part of that bill itself.
The guns follow the same split. Light Cruiser Batteries I–IV are light attack — roughly 4 to 7.5 per module — and can only reach the closest group. Heavy Cruiser Batteries I–IV are heavy attack with heavy piercing, roughly 6 to 12 attack and 22 to 34 piercing, and they reach the second group where the enemy capitals actually are. Both hulls share the cruiser engine and Cruiser Armor I–IV, and the heavy cruiser carries the lightest armour of any capital ship, so what a heavy cruiser buys you is reach rather than toughness.
Piercing decides whether that reach is worth paying for. Damage scales off the ratio of your piercing to their armour: at twice their armour or better you do full damage and double critical chance, and below a tenth of it you do a tenth of the damage and cannot land a critical at all. A heavy cruiser that cannot pierce what it is shooting at is a very expensive screen that does not screen.
## 11. Carrier build guide: what really limits your deck
Section 5 covers what to put in the air. This is what the ship underneath does to it — because the number deciding how much of your deck actually flies is **sortie efficiency**, and it starts at **50%**.
Three things move it:
- **Deck space.** Overcrowding costs **2% sortie efficiency for every 1% you exceed the deck**, so a wing that does not fit is worse than a wing you never built. Sortie efficiency above 100% absorbs that penalty rather than wasting the surplus, which is the only reason to push it past full.
- **Screening the carrier group.** 100% carrier screening efficiency is **one capital ship per carrier**, plus 0.25 per convoy present, and holding it is worth **up to +10% sortie efficiency** on top of keeping torpedoes out. The same battleships are doing two jobs at once.
- **The clock.** Carrier planes sortie **every six hours**, and they will not fly at night without the officer corps spirit that allows it. A battle joined at the wrong hour delivers fewer waves than the arithmetic promises.
Worth knowing
A carrier's own planes hit **10× harder** when their carrier is taking part in the battle they are bombing. Land-based naval bombers can join the same fight, but how many of them arrive is capped by the enemy's total hit points and grows the longer the battle runs, from a floor of 20 planes — so land-based air is a supplement to a carrier, never a replacement for one.
Carrier fighters never target ships at all. Everything they do is protect the deck and contest the sky above it, which is why the fighter half of the wing earns its slots even in a fleet that only wants to sink things: a carrier that loses the air above it stops being a carrier and becomes a large, slow capital ship.
## 12. Submarine guide for 2026: hidden is the only stat that matters
A submarine guide comes down to one binary. **A hidden submarine cannot be targeted at all**, and depth charges — the only weapon that can hit one — work only while it is revealed. Every design decision below is about how long that revealed window stays open.
| What happens | The window it opens |
| --- | --- |
| Your task force is spotted and you are the defender | revealed for 16 hours |
| You fire torpedoes at an enemy with any sub detection | 3.5% base chance to reveal, per attack |
| You have been revealed | a 20-hour cooldown before the boat can hide again |
| Enemy sub detection working passively | an hourly chance, slow enough that it rarely catches you alone |
Three build consequences fall straight out of that table:
1. **Visibility modules are the design.** Snorkels take 7–13% off visibility depending on tier, and the reveal chance from your own torpedo attacks scales with visibility — so a quieter boat is not merely harder to find, it is harder to keep found after it shoots.
2. **Engagement rules are half the ship.** Submarines **only attack capital ships on Medium risk or higher**, and **only attack screens on High risk**. A wolfpack left on the cautious setting is an expensive scouting flotilla.
3. **Bad positioning multiplies visibility**, by up to 200%. Submarines that arrive at a battle badly positioned are the ones that get found and depth-charged.
Depth charges are worth understanding from the other side as well: base hit chance 11%, hit profile 100, which means they are equally accurate against every target regardless of how small or fast it is. Nothing else touches a submarine, and against submarines that is enough.
### Convoy raiding, and what it actually pays
Most convoy raiding advice stops at "put the submarines on convoy raiding". The cost of that order is the part worth knowing: **a task force raiding convoys contributes only 25% of its naval supremacy**, against 100% on strike force and 75% on patrol. Raiders are not holding the sea while they raid.
| Mission | Share of its naval supremacy it contributes |
| --- | --- |
| Strike force | 100% |
| Naval invasion support | 100% |
| Patrol | 75% |
| Convoy escort | 50% |
| Convoy raiding | 25% |
| Minelaying and minesweeping | 25% |
| Naval exercises, or holding | 0% |
Coverage is the second limit. **Each raiding task force covers about 1.5 strategic regions efficiently**, and a fleet asked to cover more than that loses efficiency everywhere at once — which argues for several small raiding task forces rather than one large one, and is the exact opposite of the death-stack rule that governs your fighting fleet.
Two more numbers change what supremacy you get for the ships you already own. **Air superiority is worth up to +100%**, making each ship count as two in a sea zone whose sky you own. Thin naval intelligence cuts the other way: at 10% naval intel efficiency or less your supremacy is halved, with the penalty shrinking to nothing by 40%. And a task force set to do not engage contributes nothing at all.
Naval invasions read the same number. You need **more than 50% naval supremacy in every strategic region your divisions cross**, and only for the moment the invasion launches — once it is away it continues whether or not you still hold the sea.
## 13. The screen to capital ship ratio, worked out
Three to one is the right answer to the screen to capital ship ratio, and it is also the floor of a formula with three more terms in it, each of which can quietly move what your fleet actually needs.
- **The base.** 100% screening efficiency needs **three screens per capital ship and per carrier**. Carriers count in that total as well as carrying their own separate requirement.
- **Convoys count.** Add **0.5 screens per convoy** present in the battle. A fleet escorting an invasion is screening far more than its own warships.
- **Carriers are screened twice.** The carrier group needs **one capital ship per carrier**, plus 0.25 per convoy, for 100% carrier screening efficiency.
- **Positioning multiplies all of it.** The positioning penalty scales linearly to **−50% at 0% positioning**, which doubles the screens required for the same efficiency.
Run the multi-theatre fleet from section 4 through that. Four carriers and eight battleships is twelve capitals-and-carriers, so 100% screening efficiency wants **36 screens**, not 16. At 16 destroyers that fleet screens at roughly 44% — which means **about 56% of every enemy torpedo gets a check against your battle line** instead of being stopped by your destroyers. That is where the composition editor's 40-destroyer target comes from, and it is why "build past the ratio" is not padding.
Careful
The ratio is checked continuously, not once at the start of the battle. Screens are designed to sink first, so a fleet that entered at exactly 100% is under it within the hour — and the moment it drops is the moment torpedoes start arriving at capitals that were perfectly safe a minute earlier.
## 14. Naval doctrine guide: one grand branch, four tracks
The naval doctrine tree is one mutually exclusive choice followed by four independent tracks. The grand choice is the one you cannot walk back.
| Grand doctrine | Built around | Headline bonuses |
| --- | --- | --- |
| Fleet in Being | a gun line that expects to win the surface battle | capital ship armour +10%, battleship organisation +15 |
| Trade Interdiction | strangling trade rather than holding sea zones | convoy raiding efficiency +15%, submarine organisation +10 |
| Base Strike | carrier aviation striking from beyond gun range | port strikes +40%, carrier organisation +20 |
The four tracks run alongside it, one per hull class, and you draw from all of them:
| Track | What sits in it |
| --- | --- |
| Screens | Convoy Escort, Integrated Operations, Hunter Killer Groups, Torpedo Primacy, Anti-Aircraft Cruisers, Screen Support Focus, The New School, Patrol Boats |
| Capital ships | Line of Battle, Fast Battleships, Armored Raiders, Coastal Defense Fleet, Naval Gunfire Support, Anti-Aircraft Battleships |
| Carriers | Carrier Battlegroups, Floating Airfields, Escort Carrier Support, Generalized Support, Massed Carrier Fleet, Light Task Forces |
| Submarines | Wolfpacks, Fleet Operations, Capital Hunters, Coastal Defense, Coastal Minelaying, Long Range Submarines |
Several of those are DLC-gated, so a tree with gaps in it is not a bug. Read the tracks against what you are actually building rather than against a tier list: the screens track is where a destroyer fleet's damage comes from, the capital ships track is where a gun line stops dying, and the carriers track is mostly wasted on a fleet with two carriers in it.
Naval experience is the real constraint on this tree, not political power. Exercises pay it out until a ship reaches Regular and burn 60% of normal fuel while they do it, so the picks that matter most are the ones you can afford before your first real battle.
## 15. The nation you pick, and the treaty that caps its ships
Which is the best navy nation in 2026 is really two questions: who starts with a fleet, and who can build one. The United States begins the 1936 scenario with 229 vessels, weighted toward submarines rather than heavy hulls, and the industry to replace whatever it loses. The United Kingdom starts with the fleet everyone else's treaty ratios are measured against. Japan starts with carriers already in the water, which is the one hull that takes longest to grow from nothing. Germany — which is what most of the designs in this guide are built as — starts with almost nothing, and is the honest place to learn, because every hull in the water is one you chose.
For five of those countries the catch is the **London Naval Treaty**, which binds the United States, the United Kingdom, France, Italy and Japan, and caps what they may put in the water:
| Cap | Maximum production cost |
| --- | --- |
| Carrier | 9,500 |
| Cruiser | 5,300 |
| Heavy ship | 10,000 |
Signatories also hold their capital ship count in ratio to the United Kingdom's. Leaving early costs political power — 25 for a fascist country, 150 for anyone else — and the treaty lapses on its own once any two major powers are at war or world tension reaches 75%. The practical reading is that a treaty navy's first years are research and dockyard years rather than super-heavy-battleship years, while a country with no treaty and no fleet can start building the templates above the moment the research lands.
## From the comments
From the comments (not in the video)
- **Sea zone type changes the answer.** No submarines in Shallow Seas. In Deep Oceans screens take heavy penalties, so carriers get stronger and cruisers beat destroyers. In Archipelagos heavy ships are badly debuffed, torpedo cruisers shine, and mines lose their hit-chance penalty. The video never mentions region-type modifiers at all. — foxdavion6865
- **The invasion dominance number is disputed.** "I know it's meant to be 150, but the game asked me for 375 for a single empty uncontested zone." — kleinerprinz99
- **Underway replenishment is expensive.** It "uses an absurd number of convoys" on anything larger than a small navy. — montymechanizedmarines
- **Triple depth charges on the escort destroyer may be wasted IC** — a ship in battle attacks one target at a time, so anything past a one-shot kill on a submarine is overkill. — apoivre
- **Multirole naval bombers instead of the 50/50 split** — torpedo and machine guns on top, armour, self-sealing fuel tanks and ground radar below. More IC, but no dedicated fighter slots. Weakness: they struggle against land-based planes. — robertalaverdov8147
- **Germany can skip screens entirely.** A battlecruiser-only Germany reaches **90% screening with zero screens** through focuses, doctrines and spirits — you may need one carrier to advance the doctrine path. — elbast0
- **Naval AA may be close to useless against carrier planes.** Naval bombers push agility so high that naval AA accuracy approaches zero — 45 agility on the current patch. — WalrusJones185
Unresolved
Two questions in the comments that never got a confirmed answer, both worth testing yourself:
- **When should you refit an existing fleet, and which ships first?** Asked directly, never answered.
- **Do carrier naval bombers also hit screens first, and once screening efficiency drops, do they reach carriers or capitals?** The video's "naval bombers play fair now" line leaves this ambiguous.
## Where to go next
Fleet composition is only half the problem — the other half is which nation you are building it for. The [Japan guide](/guides/hoi4-japan-guide) runs a naval-led campaign end to end and shows the doctrine and dockyard order that pays for it, while the [UK guide](/guides/hoi4-uk-guide) and the [USA guide](/guides/hoi4-usa-guide) cover the two navies that start large and have to be spent rather than grown.
## Sources
- ["The Only HoI4 Navy Guide You'll Ever Need"](https://www.youtube.com/watch?v=HMmNPQSNygI) — VijoPlays, YouTube, 3 August 2026. Published under the title "The Ultimate HoI4 Navy Guide | 2026".
- Ship loadouts are given slot-by-slot in a Google Doc linked from the video description rather than read out on camera. The designs above are the shape of each ship; pull exact module tiers from the doc or from your own tech level.
- Detail is transcribed from the video's auto-generated captions, so **some proper nouns may be slightly misspelled** — the method is right even where the spelling is not.
- The "from the comments" box collects points raised by viewers foxdavion6865, kleinerprinz99, montymechanizedmarines, apoivre, robertalaverdov8147, elbast0 and WalrusJones185 that are not in the video itself.
- Sections 10 to 15 are game mechanics rather than video content: screening and carrier screening ratios, torpedo penetration, group targeting, piercing, sortie efficiency, submarine reveal rules, mission supremacy shares, the doctrine tracks and the London Naval Treaty caps are taken from the [Hearts of Iron IV wiki](https://hoi4.paradoxwikis.com/Naval_battle), read on 22 August 2026.
Heavily patch-dependent by the author's own admission — the framing of the whole video is that the meta destroyer will be nerfed. Carrier overstacking removal, naval bombers no longer targeting the largest ship, and buggy carrier stances are all called out as current-patch behaviour.
---
## FAQ
### What is the best ship design in HOI4 right now?
A **destroyer with full light attack and torpedoes on top**. It does the most damage to the enemy screening line, and most meta fleets are simply this one ship repeated. Everything else in a navy exists to support it.
### How many screens do I need per capital ship?
**Three screens per capital, and one capital per carrier** for 100% screening efficiency. Build past the minimum — losses drop you below 100% mid-battle, and that is when torpedoes start reaching your capitals.
### Should I split my fleet into task forces?
Only to cover different sea zones. For actually fighting, the death stack is still better — your whole navy in one task force. At that point supply is your only real limit.
### Which naval doctrine should I take?
**Fleet in Being** as the grand doctrine for any normal navy. Then Patrol Boats for screens (it gives Selective Engagement), Naval Gunfire Support for capitals, Light Task Forces for carriers. Trade Interdiction only if you care exclusively about submarine raiding.
### Do I even need a navy against the AI?
Barely. The video's own concession is that you can probably beat the AI by spamming torpedo destroyers and ignoring composition entirely. The ratios matter in multiplayer.
### What is the best destroyer template in HOI4 for 2026?
Build the destroyer around light attack and treat it as a screen-killer. Light guns can only fire at the closest non-empty group, which in a real battle is the enemy screening line — so a light-attack destroyer is always shooting at the only thing worth shooting at. Torpedoes are the exception worth carrying, and the full module order is in the destroyer section above.
### Heavy cruiser vs light cruiser in HOI4: which should you build?
They are not competing designs — they stand in different lines. A light cruiser counts as a screen; a heavy cruiser counts as a capital ship, so every heavy cruiser you add raises your screening bill by roughly three destroyers while a light cruiser pays part of that bill itself. The guns follow the same split: light cruiser batteries are light attack and reach only the closest group, heavy cruiser batteries carry heavy attack and piercing and reach the second.
### Does convoy raiding cost you naval supremacy in HOI4?
Yes, and it is the part most advice leaves out. A task force on convoy raiding contributes only 25% of its naval supremacy, against 100% on strike force and 75% on patrol — raiders are not holding the sea while they raid. If you need supremacy for an invasion, the raiding fleet is not helping you get it.